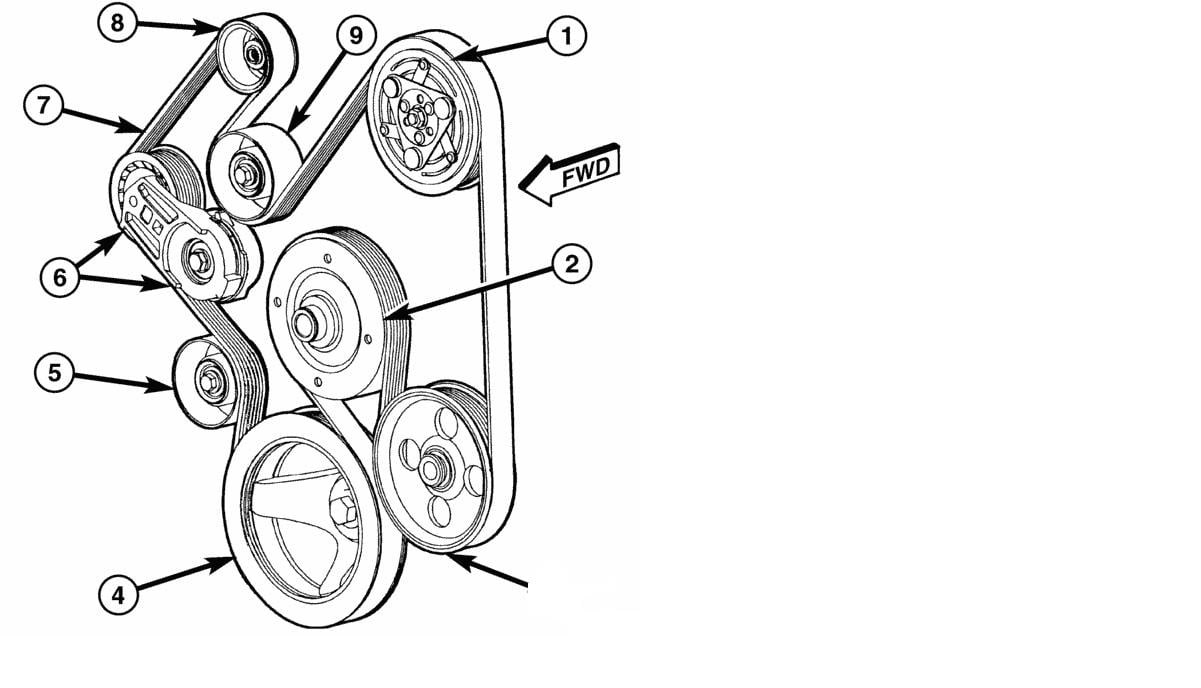
2008 Dodge Ram 1500 Serpentine Belt Diagram
Alright, let's dive into the serpentine belt diagram for your 2008 Dodge Ram 1500. This isn't just a pretty picture; it's your roadmap to understanding how all your vital engine accessories are driven. Whether you're replacing a worn belt, troubleshooting a squealing noise, or just trying to get a better handle on your truck's mechanical systems, knowing this layout is crucial.
Purpose of the Serpentine Belt Diagram
Why bother with a diagram? Several reasons. First, a serpentine belt replacement becomes significantly easier when you know the correct routing. Misrouting the belt can cause serious damage to your accessories and even lead to belt failure. Second, understanding the system helps in diagnosing problems. Is the belt slipping on a particular pulley? The diagram will tell you what component that pulley drives, narrowing down the possibilities. Finally, it's about preventative maintenance. Knowing how the system works allows you to identify potential issues before they become major headaches.
Key Specs and Main Parts
Your 2008 Dodge Ram 1500 likely came with one of a few different engine options: the 3.7L V6, the 4.7L V8, or the 5.7L HEMI V8. Each engine uses a slightly different serpentine belt routing, so make sure you're looking at the correct diagram for your specific engine. While the general principle remains the same, the arrangement of pulleys and the belt's path can vary. We have the diagrams for all engine variants available for download.
Here are the main components you'll find in almost all serpentine belt systems:
- Crankshaft Pulley (Harmonic Balancer): This is the primary driver, connected directly to the crankshaft and providing rotational force to the belt.
- Alternator Pulley: Driven by the belt to power the electrical system and charge the battery.
- Power Steering Pump Pulley: Powers the hydraulic power steering system.
- Air Conditioning Compressor Pulley: Operates the air conditioning system.
- Water Pump Pulley: Circulates coolant throughout the engine to prevent overheating.
- Idler Pulley(s): Smooth, ungrooved pulleys that guide the belt and maintain optimal tension. They do not drive any accessories.
- Tensioner Pulley: A spring-loaded pulley that maintains the correct tension on the belt. This is crucial for proper operation. A worn tensioner can cause belt slippage and damage to other components.
- Serpentine Belt: The rubber belt itself, usually made of EPDM rubber, that transmits power from the crankshaft to the various accessories.
Symbols and Diagram Conventions
A typical serpentine belt diagram isn't just a picture; it's a coded representation of the system. Here's a breakdown of what you might see:
- Solid Lines: These generally represent the belt itself. The thickness of the line might vary slightly, but the primary purpose is to show the belt's path.
- Dashed Lines: Sometimes used to indicate the rear of pulleys or areas where the belt passes behind other components for clarity.
- Arrows: Indicate the direction of belt travel. These are critical for ensuring you route the belt correctly.
- Component Labels: Abbreviations like "ALT" for alternator, "P/S" for power steering, "A/C" for air conditioning, "W/P" for water pump, "CRANK" for crankshaft, "IDLER" for idler pulley, and "TENSIONER" will identify each pulley.
- Pulley Groove Representation: Diagrams might show whether a pulley has grooves (for the ribbed side of the belt) or is smooth (for the back side of the belt).
How It Works
The serpentine belt system is ingeniously simple. The crankshaft pulley, powered by the engine, rotates, driving the serpentine belt. The belt, in turn, wraps around and drives the pulleys connected to the various accessories. The tensioner pulley keeps the belt taut, preventing slippage. Think of it like a chain connecting different gears, except instead of gears, we have pulleys and a flexible belt.
The ribbed side of the belt engages with grooved pulleys (like the alternator, power steering pump, and A/C compressor), while the smooth back side of the belt engages with smooth pulleys (like the idler pulley and sometimes the water pump). This allows the belt to drive components in different directions and effectively "snake" through the engine bay, hence the name "serpentine" belt.
Real-World Use: Basic Troubleshooting
Here's how you can use the serpentine belt diagram to diagnose common problems:
- Squealing Noise: A common issue. If you hear a squealing noise, especially when the engine is cold or under load (like turning the steering wheel or turning on the A/C), it often indicates a slipping belt. Use the diagram to check the tensioner pulley for proper operation. Is it moving freely? Is the belt tension adequate? Also, inspect the belt itself for cracks, glazing, or wear.
- Accessory Failure: If one of your accessories stops working (e.g., the alternator isn't charging the battery, the power steering is stiff, or the A/C isn't blowing cold air), the diagram can help you determine if the belt is the culprit. If the belt is broken or completely off, that's an obvious sign. But even a partially damaged belt can cause intermittent failures.
- Belt Wear: Regularly inspect your serpentine belt for signs of wear. Look for cracks, fraying, missing chunks, or glazing (a shiny, smooth surface). Compare the belt's condition to the diagram to see which pulleys it interacts with most. Excessive wear near a specific pulley might indicate a problem with that component (e.g., a seized bearing).
- Visual Inspection: Use the diagram to double-check the belt routing after you've replaced it. It's surprisingly easy to misroute a serpentine belt, and this can lead to serious problems. Before starting the engine, ensure the belt is properly seated on all pulleys and that it follows the correct path.
Safety Precautions
Working around the serpentine belt system can be dangerous if you're not careful. Here are some key safety points:
- Disconnect the Battery: Always disconnect the negative battery terminal before working on the serpentine belt system. This prevents accidental starting of the engine.
- Hot Engine: Never work on the serpentine belt system when the engine is hot. You can easily burn yourself on the engine components or the exhaust manifold. Allow the engine to cool completely before proceeding.
- Moving Parts: The serpentine belt system involves moving parts. Keep your hands, hair, and clothing clear of the belt and pulleys when the engine is running.
- Tensioner Tool: When replacing the serpentine belt, use the correct tensioner tool to relieve tension on the belt. Do not try to force the tensioner with other tools, as this can damage the tensioner or cause injury. The tensioner is under significant spring pressure.
- Eye Protection: Wear safety glasses to protect your eyes from debris.
Specific Risks: The tensioner pulley spring can be very powerful. Always use the correct tool to release tension and avoid injury. The crankshaft pulley is directly connected to the engine and spins at high speeds. Never attempt to touch or adjust the belt while the engine is running.
Ultimately, understanding the serpentine belt system and having the correct diagram for your 2008 Dodge Ram 1500 is a huge asset for any DIY mechanic. It empowers you to perform routine maintenance, diagnose problems effectively, and keep your truck running smoothly for years to come.
We have the complete serpentine belt diagram for all 2008 Dodge Ram 1500 engine variants ready for you. Download it now and keep it handy for your next maintenance project.