
2008 F250 6.4 Serpentine Belt Diagram
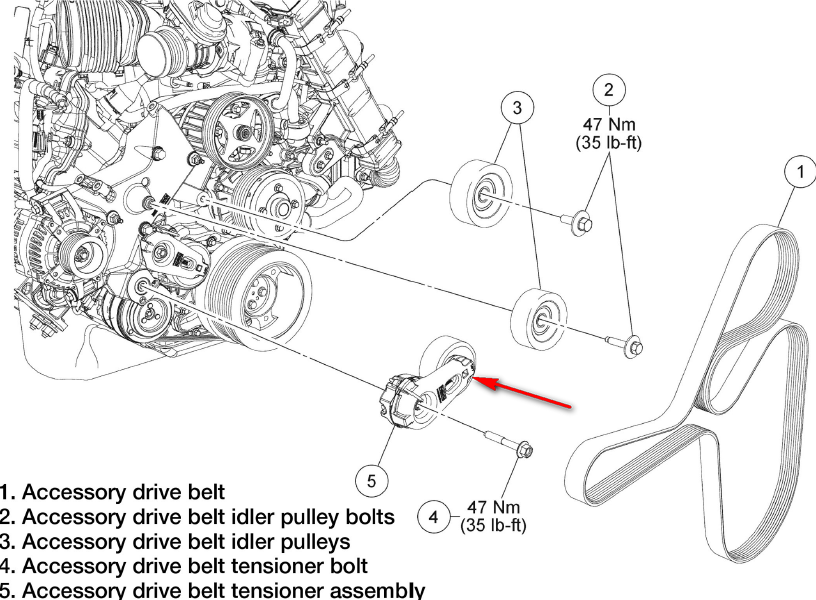
So, you're wrestling with the serpentine belt on your 2008 Ford F250 6.4L Powerstroke? You've come to the right place. This article is your deep dive into understanding the serpentine belt system on this particular beast. We'll break down the diagram, its components, how it all works together, and some practical troubleshooting tips. Forget just slapping a new belt on; we're going for understanding. And yes, we have a downloadable diagram for you to keep on hand.
Why This Diagram Matters
The serpentine belt diagram isn't just a pretty picture; it's your roadmap to a smoothly running engine. Here's why it's crucial:
- Repair and Replacement: The most obvious reason. When your belt snaps, frays, or slips, you need to know the correct routing for the new one. Incorrect routing can lead to component damage and belt failure.
- Component Diagnosis: The belt drives several critical engine components. Understanding the diagram helps you isolate issues. For example, if your power steering is weak, the diagram helps you confirm the power steering pump is actually being driven by the belt.
- Preventative Maintenance: Inspecting the belt routing allows you to identify potential issues early, like misaligned pulleys or excessive tension, preventing future breakdowns.
- Learning and Customization: Understanding the system allows you to do more complex modifications. For example, if you decide to upgrade to a high-output alternator, you’ll want to ensure the belt is routed and tensioned correctly for the new load.
Key Specs and Main Parts
Let's get familiar with the vital organs of your 2008 F250's serpentine belt system:
- Serpentine Belt: The heart of the system. It's a long, single belt that snakes around multiple pulleys, driving various components.
- Crankshaft Pulley (Damper): Connected directly to the crankshaft, this pulley is the driving force of the system. It's also a vibration damper, absorbing torsional vibrations from the engine.
- Alternator Pulley: Powers the vehicle's electrical system.
- Water Pump Pulley: Circulates coolant to regulate engine temperature. Crucial for preventing overheating, especially in the 6.4L which is known to run hot.
- Power Steering Pump Pulley: Provides hydraulic pressure for power steering.
- A/C Compressor Pulley: Engages to compress refrigerant for the air conditioning system.
- Idler Pulley(s): Smooth, bearing-equipped pulleys that guide the belt, maintain its path, and prevent excessive bending.
- Tensioner Pulley: This pulley is spring-loaded and maintains the correct tension on the belt. Proper tension is critical for efficient operation and belt longevity. Too loose, and the belt will slip; too tight, and it can damage bearings.
The 6.4L Powerstroke uses a specific length and type of serpentine belt. While aftermarket options exist, it's generally recommended to stick with a high-quality OEM-equivalent belt to ensure proper fit and durability. Check your owner's manual or a reputable parts supplier for the correct belt specification for your specific truck configuration (e.g., with or without dual alternators).
Decoding the Serpentine Belt Diagram
The diagram uses several visual cues to represent the system. Here's what to look for:
- Solid Lines: Represent the serpentine belt itself. The thicker the line, often the more important (but not always!). Focus on the path it takes.
- Pulleys: Circular shapes representing the pulleys. Some diagrams might label them (ALT, WP, PS, AC) while others use symbols or abbreviations.
- Arrows: Indicate the direction of belt travel. This is *critical* for ensuring you route the belt correctly. Note that different pulleys can rotate in opposite directions.
- Tensioner Location: The tensioner pulley is usually depicted with an arrow indicating the direction of its movement (e.g., showing which way to move it to relieve tension).
- Icons/Symbols: Some diagrams may use specific icons to denote accessories or other components. Refer to the diagram's legend (if provided) to understand these symbols.
Key Tip: When comparing diagrams, be absolutely sure they correspond to the exact year and engine configuration. Small variations in accessories or pulley layouts can dramatically alter the belt routing.
How It Works
The serpentine belt system is surprisingly simple in concept. The crankshaft pulley, driven by the engine's rotation, spins the serpentine belt. The belt, in turn, wraps around various accessory pulleys, transferring the rotational force. Each accessory pulley then drives its respective component (alternator, water pump, etc.).
The tensioner pulley plays a vital role. It maintains consistent tension on the belt, preventing slippage and ensuring efficient power transfer. The spring-loaded mechanism automatically adjusts for belt stretch and thermal expansion.
Important: The order in which the belt is routed around the pulleys is *essential*. A slight deviation can cause the belt to rub, overheat, or fail to drive a crucial component. This is where the diagram becomes your Bible.
Real-World Use: Basic Troubleshooting Tips
Here are a few common issues and how the serpentine belt diagram can help:
- Squealing Belt: Often caused by a loose belt. Use the diagram to ensure the tensioner is functioning correctly and the belt is properly seated in all pulley grooves. You can use a belt tension gauge to verify the tension is within spec (check your service manual for the correct value).
- Belt Slipping: Similar to squealing, but can also be caused by worn or glazed pulleys. Inspect the pulleys for signs of wear or contamination. Again, the diagram confirms correct routing.
- Component Failure: If a component (e.g., alternator) stops working, the diagram helps you verify that the belt is properly driving that component's pulley. If the pulley isn't turning when the engine is running, you know there's a problem with the belt, pulley, or potentially the accessory itself seizing.
- Belt Wear: Uneven wear patterns can indicate misaligned pulleys. Use the diagram to visually inspect the alignment of all pulleys. A straightedge can help you identify misalignments.
Diagnostic trick: A simple spray bottle with water can be your friend. Lightly misting the belt while the engine is running can temporarily eliminate squealing. If the squeal disappears, it confirms the belt (or pulley) as the source of the noise.
Safety First! Risky Components
Working around a running engine always involves risks. Here are a few specific to the serpentine belt system:
- Moving Parts: Obvious, but worth emphasizing. Keep your hands, clothing, and tools clear of the spinning belt and pulleys. Never reach into the engine bay while the engine is running unless absolutely necessary, and even then, exercise extreme caution.
- High Temperatures: The engine components, including the pulleys and belt, can get extremely hot. Allow the engine to cool down before working on the system to avoid burns.
- Spring-Loaded Tensioner: The tensioner pulley is under significant spring pressure. Use the correct tool to relieve the tension and *always* wear eye protection. Releasing the tensioner without proper control can cause it to snap back violently.
Crucial Safety Tip: Disconnect the negative battery cable before working on the serpentine belt system. This prevents accidental starting of the engine while your hands are near moving parts.
You now have a solid foundation for understanding your 2008 F250 6.4L Powerstroke serpentine belt system. Remember, the downloadable diagram is a valuable resource. Use it in conjunction with your service manual for the best results.
Now that you have a comprehensive understanding of your serpentine belt system, consider further educating yourself about the cooling and lubrication systems of your 6.4L Powerstroke. These systems are vital to the longevity of your engine.