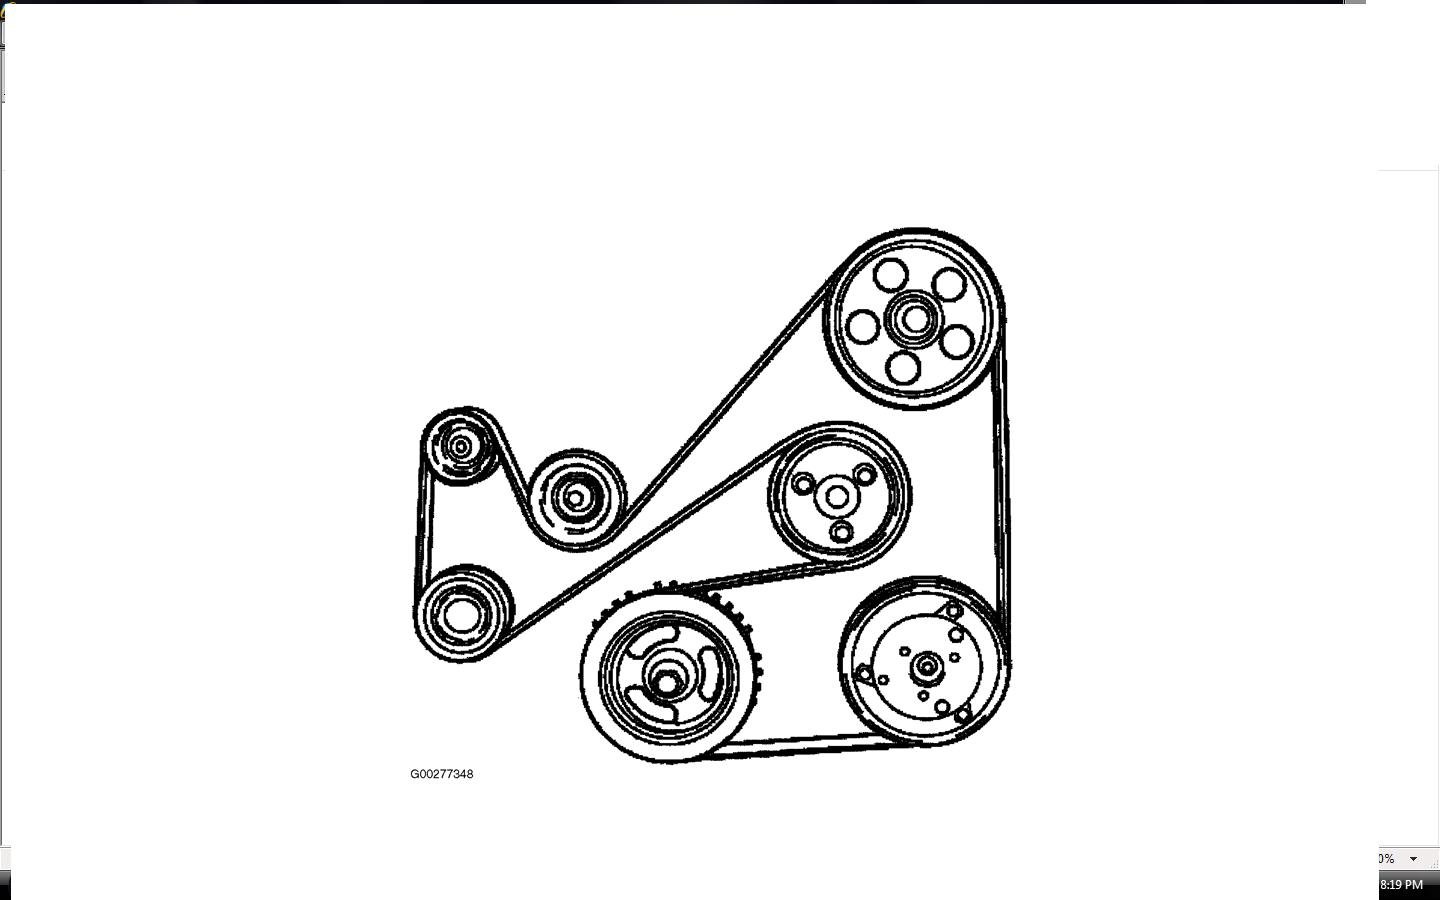
2008 Ford Fusion 3.0 Serpentine Belt Diagram
The serpentine belt on your 2008 Ford Fusion with the 3.0L V6 engine is a critical component. It's responsible for driving several essential engine accessories. Understanding its routing and how it interacts with these accessories is crucial for maintenance, repairs, and even performance modifications. This article provides a detailed breakdown of the 2008 Ford Fusion 3.0L serpentine belt diagram, enabling you to confidently tackle related tasks.
Purpose: Why a Serpentine Belt Diagram Matters
A serpentine belt diagram isn't just a pretty picture; it's a vital resource for several reasons:
- Belt Replacement: When replacing a worn or broken belt, the diagram ensures correct routing. Incorrect routing can lead to accessory malfunction, belt damage, and even engine damage.
- Troubleshooting: The diagram helps diagnose issues. For example, squealing noises might indicate a misaligned or worn belt, and the diagram pinpoints which accessories are affected.
- Accessory Replacement: If you're replacing components like the alternator, power steering pump, or A/C compressor, the diagram shows how the belt interacts with the new part.
- Learning & Modification: Understanding the system layout allows you to trace the power flow, which is beneficial for understanding how the engine accessories function and can be useful if undertaking modifications that might affect belt routing or load.
Key Specs and Main Parts
Before diving into the diagram, let's cover the key components and specifications related to the serpentine belt system on the 2008 Ford Fusion 3.0L:
- Engine: 3.0L Duratec V6
- Belt Type: Typically a multi-ribbed belt (often referred to as a 'poly-v' belt).
- Components Driven:
- Alternator: Provides electrical power to the vehicle.
- Power Steering Pump: Assists in steering the vehicle.
- A/C Compressor: Compresses refrigerant for the air conditioning system.
- Water Pump: Circulates coolant throughout the engine to regulate temperature.
- Idler Pulley(s): Smooth pulleys that guide the belt and maintain tension.
- Tensioner Pulley: Spring-loaded pulley that automatically maintains the correct belt tension. This is a critical component.
- Crankshaft Pulley (Harmonic Balancer): The main pulley driven directly by the engine crankshaft, which in turn drives the serpentine belt.
The belt length and rib count can vary slightly depending on options (like A/C presence), so always double-check the manufacturer's specifications for your specific vehicle before purchasing a replacement belt. A slightly different belt may not route properly and could cause significant issues.
Diagram Symbols and Conventions
Serpentine belt diagrams typically use a standard set of symbols and conventions:
- Solid Line: Represents the belt itself. The thickness of the line doesn't usually convey any specific information.
- Circles: Represent pulleys. The size of the circle is generally proportional to the physical size of the pulley.
- Arrows: Indicate the direction of belt travel around each pulley. This is essential for correct routing.
- Labels: Each pulley is labeled with its function (e.g., ALT for Alternator, P/S for Power Steering, A/C for Air Conditioning, W/P for Water Pump, TEN for Tensioner, IDL for Idler).
- Tensioner Symbol: The tensioner pulley is often depicted with an arrow indicating the direction it moves to release tension when replacing the belt. This arrow is extremely important for understanding the belt replacement process.
Some diagrams might use different colors to highlight specific sections, but this is not common for basic serpentine belt diagrams. Always refer to the legend or key accompanying the diagram if it uses non-standard symbols.
How It Works: Serpentine Belt System Overview
The serpentine belt system is a relatively simple yet crucial system. The engine's crankshaft drives the crankshaft pulley (also known as the harmonic balancer). The serpentine belt wraps around this pulley and then snakes its way around the other pulleys, transferring rotational force to each accessory. The tensioner pulley maintains consistent tension on the belt, preventing slippage and ensuring that all accessories are driven effectively.
The belt's "serpentine" path allows it to drive multiple accessories with a single belt, simplifying the engine design and reducing the number of individual belts required. However, this also means that if the belt breaks, all of these accessories will cease to function, potentially leading to serious problems like overheating (due to water pump failure) or loss of power steering.
Real-World Use: Troubleshooting Tips
Here are some common problems related to the serpentine belt and how the diagram can help you troubleshoot them:
- Squealing Noise: Often indicates a worn, glazed, or loose belt. Check the belt's condition for cracks, fraying, or glazing (a shiny, hardened surface). Use the diagram to ensure the belt is properly routed and that the tensioner is functioning correctly. A failing tensioner may not provide enough pressure, leading to belt slippage and noise.
- Accessory Malfunction: If one or more accessories aren't working (e.g., weak A/C, hard steering, charging problems), the belt could be slipping on that accessory's pulley. Inspect the pulley for damage or contamination. Use the diagram to confirm the belt's path and verify that it's making good contact with the malfunctioning accessory.
- Belt Breakage: A broken belt indicates a serious problem. Common causes include a seized accessory (e.g., alternator bearing failure), a worn or damaged belt, or improper belt installation. Before replacing the belt, check all accessories for free rotation. The diagram will show you the order of operations and where to inspect for potential sources of failure.
- Belt Misalignment: If the belt is constantly coming off, one or more pulleys could be misaligned. This requires careful inspection of the pulleys to ensure they are properly aligned with each other. A straightedge can be a useful tool for checking pulley alignment.
Safety Precautions
Working on the serpentine belt system can be dangerous if proper precautions aren't taken. Here's what you need to know:
- Disconnect the Battery: Always disconnect the negative battery cable before working on the electrical system, including the alternator, which is part of the serpentine belt system. This prevents accidental short circuits and potential injury.
- Hot Engine: Never work on the serpentine belt system when the engine is hot. Allow the engine to cool completely before starting any repairs.
- Moving Parts: Keep your hands, clothing, and tools clear of the serpentine belt and pulleys while the engine is running. Severe injury can result from contact with these moving parts.
- Tensioner Safety: The tensioner pulley is spring-loaded and can snap back forcefully when released. Use the correct tool (typically a wrench or socket) to relieve tension before removing the belt. Follow the manufacturer's instructions for releasing the tensioner to avoid injury.
Working on the serpentine belt system is a manageable task for the experienced DIYer with the right knowledge and tools. Careful observation of the diagram and adherence to safety precautions are essential for a successful repair.
For your convenience, we have the full 2008 Ford Fusion 3.0L Serpentine Belt Diagram available for download. This high-resolution file will provide even greater detail to aid you in your repairs and maintenance.