2008 Honda Accord 2.4 Serpentine Belt Diagram
Let's talk about the serpentine belt diagram for the 2008 Honda Accord with the 2.4L engine. This guide is aimed at experienced DIYers like yourself, providing a clear and technical understanding to empower your maintenance and repair endeavors. We'll cover everything from the diagram's purpose to practical troubleshooting, ensuring you're well-equipped for the task at hand.
Purpose of the Serpentine Belt Diagram
The serpentine belt diagram is your roadmap to understanding how the belt snakes its way around various engine components. Why does this matter? Several reasons:
- Replacement: When replacing a worn or broken belt, the diagram ensures you route the new belt correctly. Incorrect routing can lead to component failure and damage.
- Troubleshooting: If you hear squealing noises, or notice components aren't functioning correctly (power steering, AC, charging), the diagram helps you pinpoint potential problems related to the belt's path and tension.
- Component Inspection: The diagram allows you to identify all the components driven by the belt, enabling you to inspect them for wear, damage, or misalignment.
- Learning: Understanding the serpentine belt system provides a deeper understanding of how the engine's accessory systems function.
Key Specs and Main Parts
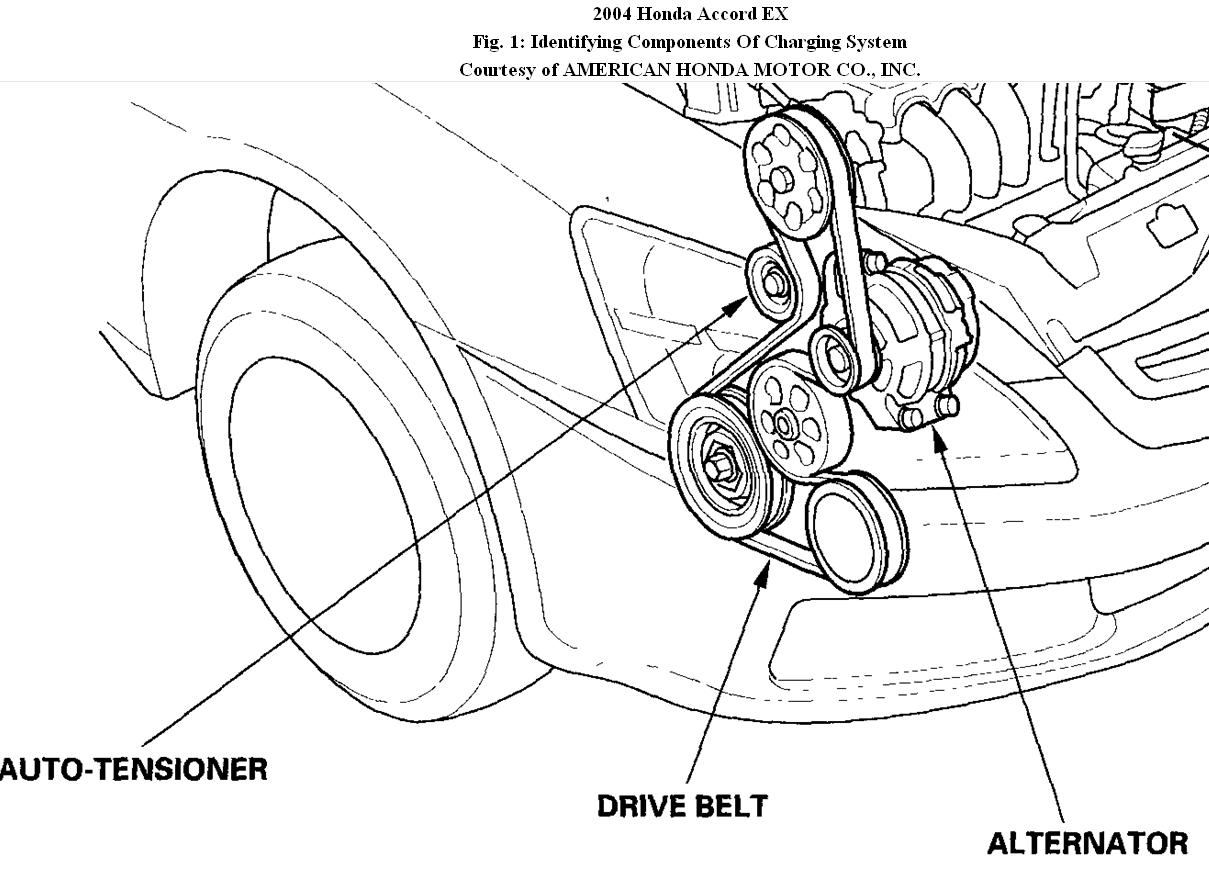
The 2008 Honda Accord 2.4L utilizes a single serpentine belt to drive several essential engine accessories. Here's a breakdown of the key components involved:
- Crankshaft Pulley: This pulley, connected directly to the engine's crankshaft, is the driving force behind the serpentine belt system.
- Alternator: The alternator generates electrical power to charge the battery and run the vehicle's electrical systems. It's driven by the serpentine belt.
- Power Steering Pump: This pump provides hydraulic pressure to assist with steering. It's another critical component powered by the serpentine belt.
- Air Conditioning Compressor: The AC compressor circulates refrigerant, enabling the air conditioning system. You guessed it, driven by the serpentine belt.
- Tensioner Pulley: This spring-loaded pulley maintains the correct tension on the serpentine belt, preventing slippage and ensuring proper operation of the driven accessories. The tensioner is crucial for the longevity of the belt and the proper function of accessories.
- Idler Pulley: Some diagrams may show an idler pulley. This pulley provides additional support and guidance for the belt, ensuring proper alignment and preventing excessive wear. In some configurations, it might not be present.
Belt Specifications: While the exact length of the belt can vary slightly depending on the manufacturer, it's generally around 77 inches. Refer to your owner's manual or a reputable auto parts store for the correct belt length and part number for your specific vehicle.
Symbols and Diagram Conventions
Understanding the symbols and conventions used in the serpentine belt diagram is crucial for accurate interpretation.
- Solid Lines: These represent the main path of the serpentine belt. Follow them carefully to understand the belt's routing.
- Dashed Lines: Sometimes, dashed lines might indicate the routing of the belt behind other components, giving you a clearer perspective.
- Arrows: Arrows indicate the direction of belt rotation on each pulley. This is vital for understanding how each component is driven.
- Pulley Symbols: Pulleys are typically represented as circles. The diagram will usually label each pulley with an abbreviation indicating the component it's associated with (e.g., ALT for Alternator, P/S for Power Steering).
- Tensioner Symbol: The tensioner is often depicted with an arrow indicating the direction in which it tensions the belt.
Color coding is not typically used in standard serpentine belt diagrams. The focus is primarily on the routing path and component identification.
How It Works
The serpentine belt system is elegantly simple yet crucial for the car's functionality. The crankshaft pulley, powered by the engine's combustion, spins the serpentine belt. The belt, in turn, transfers this rotational force to the various accessory pulleys (alternator, power steering pump, AC compressor). Each accessory pulley drives its respective component, enabling the vehicle's electrical, steering, and air conditioning systems to operate. The tensioner pulley plays a crucial role by maintaining optimal belt tension. If the belt is too loose, it will slip, causing reduced performance and potentially damaging the accessories. If it's too tight, it can put excessive strain on the bearings of the accessories and the belt itself, leading to premature failure.
Real-World Use and Basic Troubleshooting
Here's how you can put this knowledge into practice:
- Squealing Noise: A squealing noise, especially when starting the engine or turning on the AC, often indicates a slipping serpentine belt. Check the belt's tension, look for cracks or wear, and ensure the pulleys are clean and free of debris. A worn tensioner is a common cause of belt slippage.
- Component Failure: If your alternator isn't charging, your power steering is weak, or your AC isn't cooling, check the serpentine belt's condition and routing. A broken or improperly routed belt will prevent these components from functioning correctly.
- Belt Inspection: Regularly inspect your serpentine belt for signs of wear, such as cracks, fraying, or missing chunks. Replace the belt if you notice any of these issues. The general rule of thumb is to replace the belt every 60,000 to 100,000 miles, but more frequent inspections are always a good idea.
- Tensioner Check: Inspect the tensioner for smooth operation. If it's seized or the spring is weak, replace it along with the belt.
Troubleshooting Tip: A quick and dirty test for belt slippage is to spray a small amount of belt dressing on the belt while the engine is running. If the squealing stops temporarily, it confirms belt slippage as the issue. However, this is only a temporary fix; the underlying cause (worn belt, faulty tensioner, etc.) still needs to be addressed.
Safety Considerations
Working on the serpentine belt system involves inherent risks. Always disconnect the negative battery cable before working on any engine components to prevent accidental electrical shock. Be extremely cautious when working around a running engine. The serpentine belt and pulleys are moving at high speeds and can cause serious injury if you come into contact with them. Never wear loose clothing or jewelry that could get caught in the belt. The tensioner pulley can also be under significant spring pressure; use appropriate tools to safely relieve the tension before removing or installing the belt. Use the correct size wrench or socket to avoid rounding off bolt heads.
Additionally, be aware that the engine may be hot, so allow it to cool down before working on the serpentine belt system to avoid burns.
By understanding the serpentine belt diagram and following safe working practices, you can confidently maintain and repair this essential engine system on your 2008 Honda Accord 2.4L.
We have a high-resolution serpentine belt diagram file available for download. This will provide you with a detailed visual aid to assist with your maintenance and repair tasks.