2008 Honda Accord Front Suspension Diagram
The 2008 Honda Accord, a staple of reliability and practicality, utilizes a MacPherson strut front suspension. Understanding its components and operation is crucial for proper maintenance, troubleshooting, and even performance modifications. This article dissects the front suspension diagram of a 2008 Honda Accord, providing you with the knowledge to confidently tackle repairs and upgrades. We have the file of the 2008 Honda Accord Front Suspension Diagram, and you can download it.
Purpose of the Suspension Diagram
A front suspension diagram isn't just a pretty picture; it's your roadmap to understanding, diagnosing, and repairing your Accord's suspension. It serves multiple purposes:
- Identification: Clearly identifies each component of the suspension system, enabling you to accurately name parts when ordering replacements or discussing repairs.
- Assembly Reference: Provides a visual guide for reassembling the suspension after disassembly for repairs or modifications. This is especially important for ensuring correct torque specifications and component orientation.
- Troubleshooting: Helps pinpoint potential problem areas by illustrating the relationships between different parts and how they interact. For example, unusual tire wear can be traced back to issues with alignment, which in turn can be caused by worn ball joints or damaged suspension arms.
- Modification Planning: If you're planning to lower your Accord, upgrade the shocks, or install stiffer springs, the diagram gives you a clear overview of the suspension layout, allowing you to anticipate potential challenges and choose the right parts.
Key Specs and Main Parts
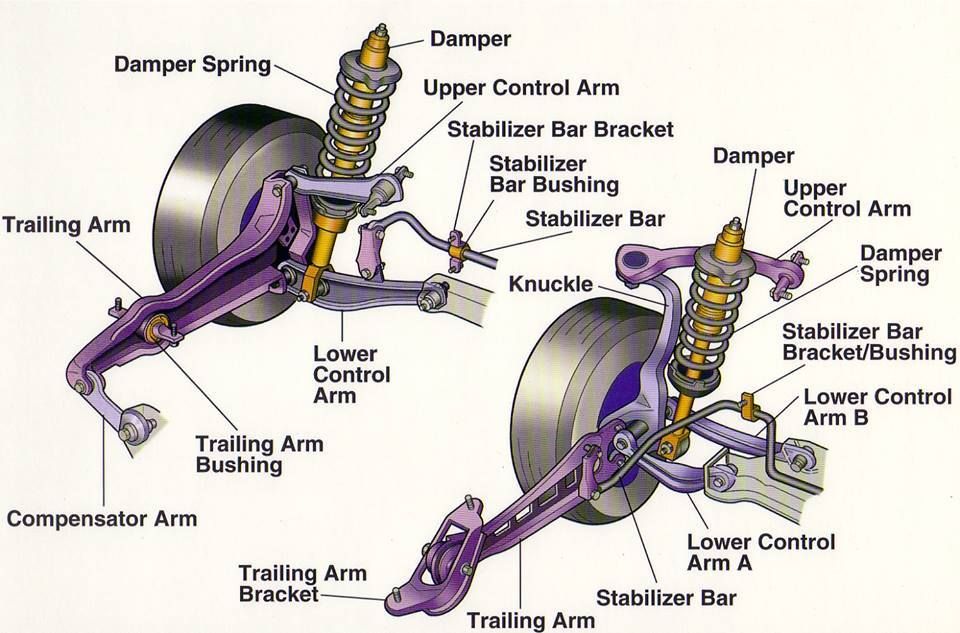
The 2008 Accord's front suspension is a MacPherson strut design. This design is known for its simplicity and relatively compact size, making it a popular choice for front-wheel-drive vehicles. Key components, as depicted in the diagram, include:
- MacPherson Strut: This is the heart of the system, combining the functions of a shock absorber and a coil spring. The strut assembly comprises:
- Coil Spring: Absorbs vertical impacts and supports the vehicle's weight.
- Shock Absorber (Damper): Controls spring oscillations, preventing excessive bouncing and improving ride quality.
- Strut Mount: Connects the strut assembly to the vehicle's body and allows for steering articulation.
- Lower Control Arm: Connects the steering knuckle/hub assembly to the vehicle's frame. It controls wheel movement in the vertical plane and plays a crucial role in maintaining proper suspension geometry.
- Ball Joint: A spherical bearing that allows the steering knuckle to pivot, enabling steering. Ball joints connect the lower control arm to the steering knuckle.
- Steering Knuckle (Hub Assembly): Houses the wheel bearing and provides a mounting point for the brake caliper and steering linkage.
- Tie Rod End: Connects the steering rack to the steering knuckle, transmitting steering input from the steering wheel to the wheels.
- Sway Bar (Anti-Roll Bar): A torsion spring that connects the left and right sides of the suspension, reducing body roll during cornering. It connects to the suspension via sway bar links.
- Sway Bar Links: Connect the sway bar to the struts or lower control arms.
Specific dimensions and torque specifications, such as strut length, spring rate, control arm length, and fastener torque values, are not typically included directly in the diagram itself but can be found in the vehicle's service manual. Refer to the service manual for precise figures.
Understanding Diagram Symbols
Suspension diagrams often utilize symbols and conventions to convey information efficiently. Here are some common elements you might encounter:
- Lines: Solid lines typically represent physical components, while dashed lines may indicate hidden components or lines of force. Thicker lines generally denote major structural elements.
- Arrows: Indicate direction of movement, force, or flow (e.g., direction of suspension travel, direction of torque application).
- Circles/Dots: Often represent fasteners, pivot points, or lubrication points.
- Hatching/Cross-hatching: Can be used to differentiate between materials or to indicate a cutaway view.
- Callouts: Numbers or letters linked to specific parts in the diagram, cross-referencing them with a parts list or description.
While the diagram itself might not use color extensively, exploded views in the service manual may use color coding to highlight specific sub-assemblies or components. Always refer to the diagram's legend or accompanying documentation for a clear explanation of the symbols used.
How the Suspension Works
The 2008 Accord's front suspension is designed to provide a comfortable ride and responsive handling. Here's a simplified explanation of how it works:
- When the wheel encounters a bump, the coil spring in the MacPherson strut compresses, absorbing the initial impact.
- The shock absorber dampens the spring's oscillation, preventing the car from bouncing excessively. It achieves this by forcing hydraulic fluid through small orifices, converting the energy of the spring's motion into heat.
- The lower control arm pivots on its bushings, allowing the wheel to move vertically while maintaining its position relative to the vehicle's frame.
- The ball joint allows the steering knuckle to pivot freely, enabling steering.
- The sway bar resists body roll during cornering by transferring force from one side of the suspension to the other. When one wheel moves upwards, the sway bar twists, applying force to the opposite wheel to keep the body level.
- Steering input is transmitted from the steering wheel to the steering rack, which then pushes or pulls on the tie rod ends, causing the steering knuckles to pivot and turn the wheels.
The interplay of these components allows the suspension to absorb shocks, maintain tire contact with the road, and provide stable and predictable handling.
Real-World Use and Troubleshooting Tips
Understanding the front suspension diagram is invaluable for diagnosing common suspension problems. Here are a few troubleshooting scenarios:
- Clunking Noises: Clunking noises when going over bumps can indicate worn ball joints, strut mounts, sway bar links, or control arm bushings. Visually inspect these components for signs of wear, damage, or excessive play.
- Excessive Bouncing: Excessive bouncing after hitting a bump suggests worn shock absorbers. A bounce test (pushing down on the corner of the car and observing how many times it bounces) can help confirm this.
- Uneven Tire Wear: Uneven tire wear can be caused by misaligned wheels due to worn ball joints, tie rod ends, or bent control arms. An alignment check is essential in these cases.
- Vibrations: Vibrations, especially at higher speeds, can be caused by loose or worn wheel bearings, damaged suspension components, or unbalanced tires.
When troubleshooting, always start with a visual inspection. Look for obvious signs of damage, wear, or leakage. Then, use your knowledge of the diagram to systematically check each component. Keep good notes of your findings.
Safety Considerations
Working on the suspension can be dangerous due to the presence of compressed springs and the potential for stored energy. Here are some crucial safety precautions:
- Spring Compression: The coil spring in the MacPherson strut is under tremendous pressure. Never attempt to disassemble a strut assembly without using a properly rated spring compressor. Improper use of a spring compressor can result in serious injury or death.
- Vehicle Support: Always use jack stands to support the vehicle when working underneath it. Never rely solely on a jack.
- Torque Specifications: Use a torque wrench to tighten fasteners to the manufacturer's specified torque values. Over-tightening can damage components, while under-tightening can lead to failure.
- Brake Lines: Be careful when working near brake lines. Damaging a brake line can result in brake failure.
- Personal Protective Equipment (PPE): Wear safety glasses, gloves, and appropriate clothing when working on the suspension.
If you're not comfortable working on the suspension yourself, it's best to take your vehicle to a qualified mechanic.