2008 Honda Civic 1.8 Serpentine Belt Diagram
Hey folks! Let's dive into the serpentine belt system of the 2008 Honda Civic with the 1.8L engine. This guide will walk you through understanding the belt diagram, a crucial piece of knowledge for maintenance, repairs, and even performance upgrades. Whether you're swapping a worn belt, troubleshooting a squealing noise, or just want a deeper understanding of your Civic's engine bay, knowing how this system works is invaluable.
Why Understanding the Serpentine Belt Diagram Matters
The serpentine belt is a vital component, driving several critical engine accessories. A broken or improperly installed belt can lead to a cascade of failures, leaving you stranded. Understanding the belt diagram allows you to:
- Correctly route the belt: Ensuring it's properly positioned on all pulleys prevents slippage and premature wear.
- Diagnose problems: A visual inspection, aided by the diagram, can reveal misaligned pulleys or worn tensioners.
- Perform maintenance: Replacing the belt at recommended intervals is easier with a clear understanding of the routing.
- Plan for upgrades: If you're considering adding an aftermarket supercharger or other accessory, you'll need to know how it integrates into the existing belt system.
Key Specs and Main Parts of the 2008 Civic Serpentine Belt System
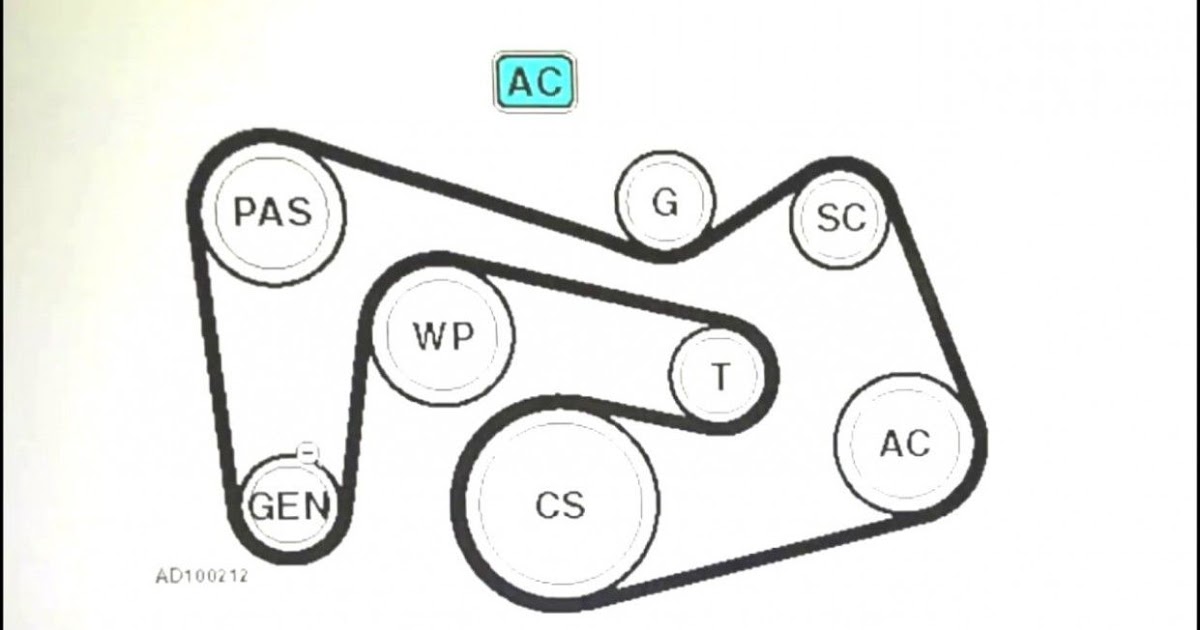
The 2008 Honda Civic 1.8L utilizes a single serpentine belt to drive the following components:
- Crankshaft Pulley: The driving force of the system. This pulley, connected directly to the engine's crankshaft, transfers rotational energy to the belt.
- Alternator Pulley: The alternator generates electricity to power the vehicle's electrical system and charge the battery. The belt drives the alternator pulley to make this happen.
- Air Conditioning Compressor Pulley: The AC compressor circulates refrigerant, providing cool air to the cabin. The belt enables its operation.
- Power Steering Pump Pulley: This pump provides hydraulic pressure to assist steering, making it easier to turn the wheel. Again, it's belt-driven.
- Tensioner Pulley (Automatic or Manual): The tensioner maintains the correct tension on the belt. There are two common types:
- Automatic Tensioner: Spring-loaded, automatically adjusting to belt stretch and variations. The most common type.
- Manual Tensioner: Requires manual adjustment to achieve proper belt tension. While less common on this model, it is worth noting.
- Idler Pulley: A smooth pulley used to guide the belt around other components and optimize its path. Some Civics will have one or more depending on specific configuration.
Belt Length: While specific part numbers vary by manufacturer, a typical serpentine belt length for this application is around 82 inches. Always consult your vehicle's service manual or a parts catalog to confirm the correct belt length for your specific Civic's trim level.
Decoding the Serpentine Belt Diagram: Symbols and Conventions
Serpentine belt diagrams use specific symbols to represent components and belt routing. Understanding these symbols is crucial for accurate interpretation.
- Solid Lines: Represent the path of the serpentine belt. Thicker lines might indicate the belt's primary path or sections where it has the most contact with the pulley.
- Dotted Lines: Sometimes used to show the belt's path behind other components or to illustrate the wrap angle around a pulley. Wrap angle is important to maintain grip between the belt and the pulley.
- Arrows: Indicate the direction of belt rotation. This is critical for proper installation.
- Pulleys: Shown as circles, with the name of the component it drives (e.g., "ALT" for Alternator, "AC" for Air Conditioning Compressor) clearly marked.
- Tensioner: Typically depicted as a pulley with an arrow indicating the direction of its movement. The arrow shows which direction you need to move the tensioner to relieve tension on the belt.
Color coding is rarely used on these diagrams, but if present, it typically highlights specific sections of the belt path for emphasis.
How the Serpentine Belt System Works
The serpentine belt system is a cleverly designed mechanism for efficiently powering multiple engine accessories using a single belt. Here's how it works:
- The crankshaft, driven by the engine's combustion process, rotates the crankshaft pulley.
- The serpentine belt, wrapped tightly around the crankshaft pulley and the other accessory pulleys, transfers this rotational motion.
- As the crankshaft pulley turns, it forces the serpentine belt to move, driving each of the connected accessory pulleys.
- The tensioner pulley plays a critical role in maintaining consistent belt tension. This is especially important because belts stretch over time, and variations in engine speed and accessory load cause fluctuations in tension.
- Each accessory (alternator, AC compressor, power steering pump) performs its function as it's driven by the belt.
The serpentine belt's grooved design (multi-V or rib design) maximizes contact area with the pulleys, improving grip and reducing slippage. This efficiency is crucial for reliable operation of all the driven components.
Real-World Use: Basic Troubleshooting Tips
Here are some common serpentine belt problems and how to troubleshoot them using your understanding of the diagram:
- Squealing Noise: Often indicates a slipping belt.
- Check: Look for glazing (shiny surface) on the belt, indicating wear. Also, inspect the pulleys for rust or damage. Verify proper belt tension. Using the diagram, make sure the belt is routed correctly.
- Solution: Replace the belt if worn. Adjust the tensioner (if manual) or replace the tensioner if it's weak (automatic). Clean or replace damaged pulleys.
- Cracked or Frayed Belt: Sign of aging and wear.
- Check: Closely inspect the belt for cracks, especially on the grooved side. Look for frayed edges.
- Solution: Replace the belt immediately. A broken belt can cause serious engine damage.
- Accessory Not Working (e.g., AC not blowing cold):
- Check: First, verify the belt is intact and properly routed. Then, check the connection to the individual accessory and make sure it is not blocked or restricted.
- Solution: If the belt is slipping or broken, replace it and troubleshoot that particular component.
Safety First! Risky Components and Procedures
Working on the serpentine belt system involves certain risks. Here are some key safety precautions:
- Disconnect the Battery: Always disconnect the negative battery terminal before working on any electrical components, including the alternator. This prevents accidental shorts and potential injury.
- Hot Engine: Never work on the serpentine belt system when the engine is hot. Allow the engine to cool completely to avoid burns.
- Rotating Parts: Keep hands, clothing, and tools away from the serpentine belt and pulleys when the engine is running. These are rapidly rotating parts that can cause serious injury.
- Tensioner Spring: The automatic tensioner has a strong spring. Use the correct tool to relieve tension and avoid injury. Always wear safety glasses when working with the tensioner.
- Proper Tools: Use the correct tools for the job. Improper tools can damage components and increase the risk of injury. A serpentine belt tool makes releasing tension on the belt much easier and safer.
Pay special attention to the alternator. Improper handling can damage the sensitive electronics inside. Never short the terminals on the alternator.
By following these safety guidelines, you can minimize the risks associated with working on the serpentine belt system.
We have the detailed 2008 Honda Civic 1.8L serpentine belt diagram ready for you to download. Just look for the link below!