2008 Hyundai Elantra Serpentine Belt Diagram
The serpentine belt in your 2008 Hyundai Elantra is a crucial component, responsible for powering multiple accessories essential to your vehicle's operation. Understanding its routing and condition is vital for both preventative maintenance and troubleshooting. This article provides a detailed breakdown of the 2008 Hyundai Elantra serpentine belt diagram, offering insights that will empower you to confidently inspect, diagnose, and even replace the belt yourself.
Purpose of the Serpentine Belt Diagram
Why bother with a diagram? Quite simply, the serpentine belt snakes around several pulleys, and its path isn't always intuitive. A diagram is essential for:
- Proper Installation: Ensuring correct belt routing after replacement. Incorrect routing can lead to accessory malfunction and premature belt wear.
- Troubleshooting: Identifying potential issues based on belt condition and accessory performance. A slipping belt or whining noise can often be traced to improper tension or misaligned pulleys.
- Preventative Maintenance: Regularly inspecting the belt for wear and tear, cracks, or glazing. Early detection of these issues can prevent a complete breakdown and potential damage to other components.
- Learning & Understanding: Gaining a deeper understanding of your vehicle's mechanical systems and how the accessories function.
Without a reliable diagram, you risk damaging components and causing further issues during maintenance or repairs.
Key Specs and Main Parts
The serpentine belt in a 2008 Hyundai Elantra is a multi-ribbed belt, typically made of EPDM (Ethylene Propylene Diene Monomer) rubber for heat and wear resistance. While the exact length might vary slightly based on the specific engine and installed accessories, it is in the range of 6PK1850 or 6PK1855. The "6PK" signifies a 6-ribbed belt, and the number (1850 or 1855) represents the belt length in millimeters. Always verify the correct belt part number for your specific Elantra model and engine configuration.
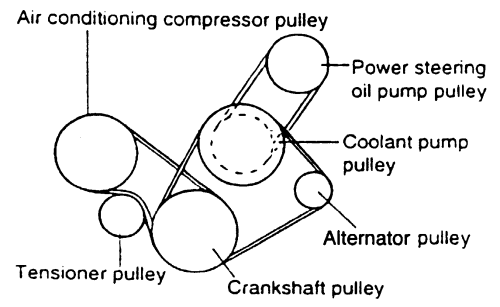
The diagram showcases the routing of the belt around several key components, including:
- Crankshaft Pulley (or Damper): The main drive pulley, connected directly to the engine's crankshaft. It transfers rotational power to the serpentine belt.
- Alternator Pulley: Driven by the belt, the alternator generates electrical power to charge the battery and run electrical accessories.
- Power Steering Pump Pulley: The power steering pump provides hydraulic assistance to ease steering effort.
- Air Conditioning Compressor Pulley: The A/C compressor is responsible for cooling the cabin air.
- Tensioner Pulley: A spring-loaded or hydraulically adjusted pulley that maintains proper tension on the serpentine belt. This is critical for optimal performance and belt life.
- Idler Pulley (Optional): Some models may have an idler pulley, which serves solely to guide the belt and maintain proper wrap angle around other pulleys.
Symbols and Diagram Conventions
Serpentine belt diagrams use standardized symbols to represent different components and belt routing. Understanding these symbols is essential for correctly interpreting the diagram.
- Solid Lines: Represent the visible portion of the serpentine belt.
- Dashed Lines: Indicate the portion of the belt that is hidden behind other components or runs along the back side of a pulley.
- Arrows: Show the direction of belt travel.
- Circles/Pulleys: Represent the various pulleys driven by the belt. Each pulley is typically labeled with an abbreviation indicating its function (e.g., ALT for alternator, P/S for power steering, A/C for air conditioning).
- Spring Symbol (near Tensioner): Identifies the tensioner pulley, often indicating the direction of tensioner arm movement.
While color coding isn't universally standardized, some diagrams might use different colors to differentiate sections of the belt or highlight specific components. Always refer to the diagram's key or legend for clarification.
How It Works
The serpentine belt system operates on a simple principle: the rotational force from the engine's crankshaft is transferred to various accessories via a continuous belt loop. The crankshaft pulley acts as the primary driver, spinning the serpentine belt. The belt, in turn, wraps around the pulleys of the alternator, power steering pump, A/C compressor, and other accessories, causing them to rotate and perform their respective functions.
The tensioner pulley plays a critical role in maintaining the proper tension on the belt. Insufficient tension can cause the belt to slip, resulting in reduced accessory performance (e.g., weak alternator output, poor power steering assist, inadequate A/C cooling). Excessive tension can lead to premature belt wear, pulley bearing failure, and even damage to accessory components.
Real-World Use: Basic Troubleshooting Tips
Here are some common issues you might encounter and how the serpentine belt diagram can help with troubleshooting:
- Squealing or Chirping Noise: This is often a sign of a slipping belt, caused by either insufficient tension, a worn belt, or a glazed pulley. Check the tensioner's operation and inspect the belt for cracks or glazing. Refer to the diagram to ensure the belt is properly routed.
- Whining Noise: A whining noise can indicate a failing pulley bearing. Use the diagram to identify each pulley and carefully listen to each one while the engine is running to pinpoint the source of the noise.
- Accessory Malfunction: If an accessory (e.g., alternator, power steering pump) is not functioning correctly, first check the serpentine belt for proper tension and condition. If the belt is slipping, the accessory may not be receiving enough power.
- Visual Inspection: Regularly inspect the serpentine belt for signs of wear, such as cracks, fraying, missing ribs, or glazing. Replace the belt if any of these conditions are present. Using the diagram, make sure belt is running properly on each pulley.
Safety Considerations
Working around a running engine involves inherent risks. Here are some key safety precautions to observe:
- Never work on the serpentine belt system with the engine running unless absolutely necessary for diagnosis. If you must run the engine, exercise extreme caution and keep your hands, tools, and clothing away from moving parts.
- Disconnect the negative battery cable before performing any maintenance or repairs on the serpentine belt system. This will prevent accidental starting of the engine.
- Be aware of the location of all moving parts, especially the crankshaft pulley, alternator pulley, and tensioner pulley. These components can cause serious injury if they come into contact with your hands or clothing.
- The tensioner pulley is spring-loaded and can snap back forcefully. Use appropriate tools to relieve tension and avoid injury.
- Wear safety glasses to protect your eyes from debris.
The crankshaft pulley is especially dangerous when the engine is running. Exercise extreme caution.
Remember, this guide is for informational purposes only. Always consult your vehicle's repair manual and a qualified mechanic if you are unsure about any aspect of serpentine belt maintenance or repair.
We have the detailed serpentine belt diagram file available for download. This diagram provides a clear and comprehensive visual aid for your maintenance and repair endeavors.