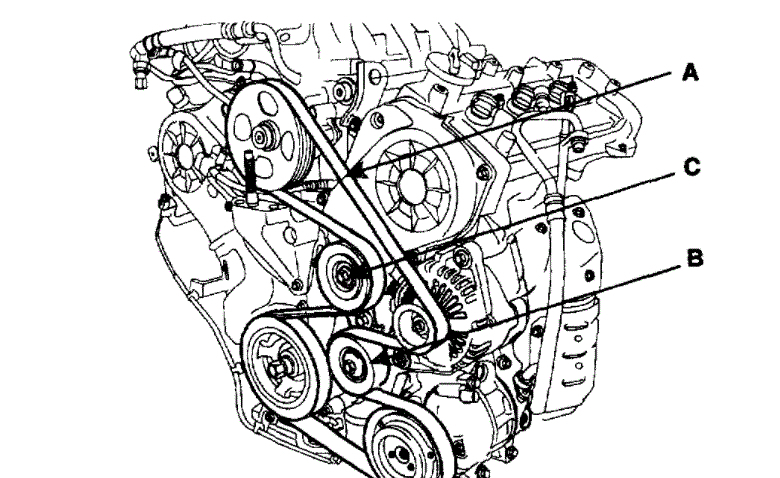
2008 Hyundai Santa Fe Serpentine Belt Diagram
Replacing the serpentine belt on your 2008 Hyundai Santa Fe can seem daunting, but with the right information and a little know-how, it's a manageable DIY project. This guide provides a detailed explanation of the serpentine belt diagram, empowering you to confidently tackle this task and understand the belt's crucial role in your vehicle's operation.
Purpose of the Serpentine Belt Diagram
The serpentine belt diagram is your roadmap to navigating the complex system of pulleys and accessories driven by the engine's crankshaft. It serves several key purposes:
- Repair and Replacement: The primary function is to guide you during serpentine belt replacement. A correctly routed belt ensures all accessories function properly and prevents premature wear.
- Troubleshooting: The diagram helps diagnose issues related to belt slippage, noise, or accessory malfunction. By identifying the components driven by the belt, you can narrow down the source of the problem.
- Understanding System Operation: The diagram provides a visual representation of how the belt interacts with various engine accessories, enhancing your understanding of the vehicle's mechanical systems.
- Prevention: Periodic inspection, guided by the diagram, allows you to catch potential problems before they lead to costly breakdowns.
Key Specs and Main Parts
The 2008 Hyundai Santa Fe came with several engine options, primarily the 2.7L V6 and the 3.3L V6. The serpentine belt routing varies slightly depending on the engine. It's crucial to always refer to the specific diagram for your engine type, usually found on a sticker under the hood or in the owner's manual. Here are the main components involved:
- Crankshaft Pulley (Harmonic Balancer): Located at the bottom of the engine, this pulley is directly connected to the crankshaft and drives the serpentine belt.
- Alternator: The alternator generates electricity to power the vehicle's electrical system and charge the battery. It's driven by the serpentine belt.
- Power Steering Pump: This pump provides hydraulic pressure to assist with steering. It's also belt-driven.
- Air Conditioning Compressor: The A/C compressor circulates refrigerant in the air conditioning system. The serpentine belt powers it.
- Tensioner Pulley: The tensioner maintains the correct tension on the serpentine belt, preventing slippage and ensuring proper accessory operation. It usually consists of a spring-loaded arm and a pulley.
- Idler Pulley: Idler pulleys provide support and guide the belt along its path. They do not drive any accessories.
- Serpentine Belt: This is a single, continuous belt that snakes around all the pulleys, transmitting power from the crankshaft to the various accessories. The "serpentine" name comes from its snake-like path.
Symbols and Diagram Conventions
Serpentine belt diagrams often employ specific symbols and conventions to convey information concisely. Understanding these symbols is key to interpreting the diagram correctly:
- Solid Lines: Solid lines represent the path of the outside surface of the serpentine belt.
- Dotted Lines: Dotted lines typically indicate the path of the inside surface of the serpentine belt, where it makes contact with the pulley grooves.
- Arrows: Arrows indicate the direction of rotation for each pulley. Pay close attention to these, as incorrect belt routing will reverse the rotation of some accessories, leading to malfunction.
- Component Icons: Simple icons represent each accessory, such as an alternator, A/C compressor, or power steering pump. These icons help you quickly identify each component in the system.
- Tensioner Indication: The tensioner pulley is usually labeled and may include an arrow indicating the direction to move the tensioner to release belt tension.
How It Works
The serpentine belt system operates on a simple principle: the rotational force of the engine's crankshaft is transferred to various accessories through the belt. The crankshaft pulley drives the serpentine belt, which in turn rotates the pulleys attached to the alternator, power steering pump, A/C compressor, and other accessories.
The tensioner pulley plays a crucial role in maintaining optimal belt tension. Insufficient tension can cause the belt to slip, resulting in reduced accessory performance (e.g., weak A/C, poor power steering) and increased belt wear. Excessive tension can place undue stress on the accessory bearings and the belt itself, leading to premature failure. The spring-loaded tensioner automatically adjusts to compensate for belt stretch and wear, maintaining consistent tension.
The routing of the belt is critical. The diagram shows the precise path the belt must follow to ensure all accessories rotate in the correct direction and receive sufficient power. An incorrectly routed belt can cause accessories to rotate backward or not at all, leading to serious operational problems.
Real-World Use: Basic Troubleshooting Tips
The serpentine belt diagram can be invaluable for troubleshooting various issues. Here are a few common scenarios:
- Squealing Noise: A squealing noise, especially when starting the engine or during acceleration, often indicates a slipping serpentine belt. Check the belt for signs of wear (cracks, fraying, glazing) and ensure the tensioner is functioning correctly. Use the diagram to verify the belt is properly routed and contacting all pulleys correctly.
- Accessory Malfunction: If one or more accessories are not working properly (e.g., weak A/C, hard steering, dim headlights), the serpentine belt could be the culprit. Inspect the belt for damage and check the tension. Use the diagram to identify which accessories are driven by the belt and investigate those components further. For instance, a seized A/C compressor can cause the belt to break.
- Belt Breakage: A broken serpentine belt will immediately disable several accessories, including the alternator and power steering. This is a serious issue that requires immediate attention. Before replacing the belt, inspect all pulleys for damage and ensure they rotate freely. A seized pulley can cause a new belt to break almost immediately.
- Visual Inspection: Regularly inspect the serpentine belt for signs of wear, such as cracks, fraying, glazing (a shiny, smooth surface), or missing chunks. Replace the belt if any of these conditions are present. A well-maintained belt is less likely to fail unexpectedly.
Safety Precautions
Working on the serpentine belt system involves inherent risks. Take the following precautions:
- Disconnect the Battery: Before working on the serpentine belt, disconnect the negative battery cable to prevent accidental starting of the engine.
- Hot Engine: Never work on the serpentine belt while the engine is hot. Allow the engine to cool completely before starting any repairs.
- Moving Parts: Be extremely careful around moving parts, especially the crankshaft pulley. Keep your hands and tools clear of the belt and pulleys while the engine is running. Never attempt to adjust the belt tension while the engine is running.
- Sharp Edges: Some components in the engine compartment may have sharp edges. Wear gloves to protect your hands.
- Eye Protection: Wear safety glasses to protect your eyes from debris.
- Tensioner Spring: The tensioner pulley is spring-loaded and can snap back forcefully when released. Use the correct tools to relieve tension gradually and safely.
Working on your car can be a rewarding experience. However, if you are not comfortable performing any of these tasks, it is best to consult with a qualified mechanic.
Remember the specific routing diagram is essential for your 2008 Hyundai Santa Fe engine type. We have the file and you can download the serpentine belt diagram specific to your 2.7L or 3.3L V6 2008 Hyundai Santa Fe to ensure correct belt routing and proper accessory function.