2008 Hyundai Sonata Serpentine Belt Diagram
For the seasoned DIYer tackling maintenance on a 2008 Hyundai Sonata, understanding the serpentine belt system is crucial. This single belt snakes its way around multiple engine components, powering essential systems. A reliable serpentine belt diagram is your roadmap to successful repairs and preventative maintenance. Think of it as a treasure map, where X marks the spot for tensioner location and proper belt routing.
Purpose of a Serpentine Belt Diagram
Why is a serpentine belt diagram important? Several reasons:
- Accurate Belt Routing: The primary purpose. Incorrect routing can lead to component failure, overheating, and even engine damage. The diagram ensures the belt travels the correct path around each pulley.
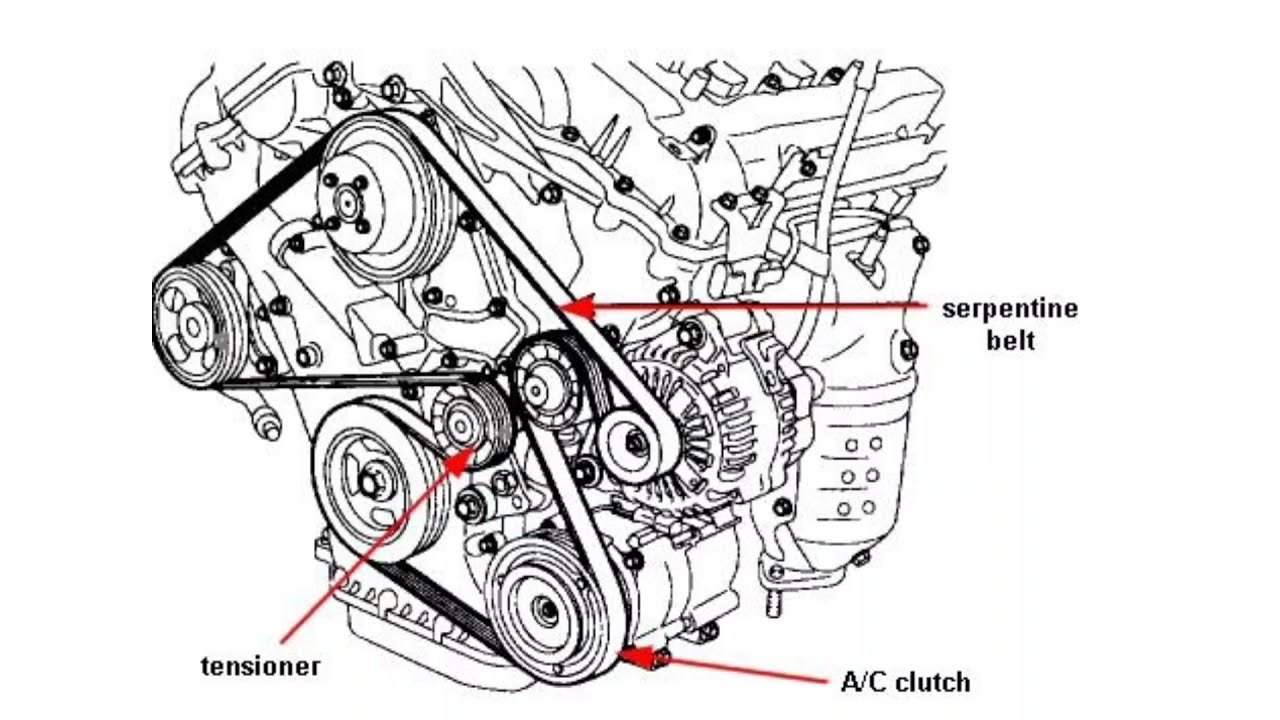
- Component Identification: The diagram labels each component within the system (alternator, power steering pump, etc.). Useful for diagnosing problems and understanding the belt's function.
- Tensioner Location: Vital for belt replacement. The diagram clearly shows the tensioner pulley’s location and how to release the tension for belt removal and installation.
- Troubleshooting: Helps diagnose issues like belt squealing, power steering failure, or charging problems by pointing to the specific component potentially affected.
- Preventative Maintenance: Allows for regular inspections of the belt and pulleys, identifying wear and tear before a catastrophic failure occurs.
Key Specs and Main Parts of the 2008 Hyundai Sonata Serpentine Belt System
Let's break down the key components involved in the 2008 Hyundai Sonata's serpentine belt system. Understanding these parts will make the diagram much easier to comprehend.
- Serpentine Belt: The heart of the system. A long, continuous belt made of reinforced rubber, responsible for transmitting power from the crankshaft to the other components. Its condition is critical for proper system function.
- Crankshaft Pulley (Harmonic Balancer): Located at the bottom of the engine, this pulley is directly connected to the crankshaft and drives the serpentine belt.
- Alternator Pulley: The alternator generates electrical power for the vehicle. The serpentine belt spins this pulley, which in turn drives the alternator.
- Power Steering Pump Pulley: Powers the power steering system. The serpentine belt drives this pulley to provide hydraulic assistance for steering.
- Air Conditioning Compressor Pulley: Engages when the air conditioning is turned on. The serpentine belt drives this pulley to compress the refrigerant.
- Idler Pulley(s): Smooth, non-driven pulleys that guide the belt around the system and maintain proper belt wrap on other pulleys. They simply rotate freely.
- Tensioner Pulley: A spring-loaded pulley that maintains constant tension on the serpentine belt. This is crucial for preventing belt slippage and ensuring proper component operation. There are typically two types of tensioners: automatic and manual. The 2008 Sonata typically uses an automatic tensioner.
Important Specs: While a diagram doesn't typically list specific dimensions, knowing the belt length and the correct routing is paramount. Always use the correct replacement belt, as specified by the manufacturer. Consult your owner’s manual or a parts catalog for the proper belt part number.
Understanding Serpentine Belt Diagram Symbols
Serpentine belt diagrams aren’t complex, but understanding the symbols used is crucial.
- Solid Lines: Represent the serpentine belt itself. The path of the line shows the routing of the belt around the pulleys.
- Pulleys: Depicted as circles. The diagram will usually label each pulley with an abbreviation (ALT for alternator, P/S for power steering, A/C for air conditioning, etc.).
- Arrows: Indicate the direction of rotation for each pulley. This helps you visualize how the belt transfers power.
- Tensioner Pulley Symbol: Often shown with a spring or a special symbol to differentiate it from idler pulleys. It might also include an arrow indicating the direction to move the tensioner to release belt tension.
- Dashed Lines: May represent the back side (smooth side) of the belt making contact with a pulley.
Colors aren't typically used in serpentine belt diagrams, but some enhanced diagrams might use color coding to distinguish between different sections of the belt or different components. Always refer to the diagram's legend if colors are used.
How the Serpentine Belt System Works
The serpentine belt system is elegantly simple in its operation. The crankshaft, driven by the engine's combustion process, spins the crankshaft pulley. The serpentine belt, in constant contact with this pulley, is forced to rotate along with it. As the belt moves, it transfers this rotational force to the other pulleys in the system – the alternator pulley, the power steering pump pulley, and the air conditioning compressor pulley (when engaged). Each of these components then performs its specific function, powered by the belt. The tensioner pulley ensures the belt remains taut, preventing slippage and maintaining optimal power transfer.
If the belt slips, these components won't operate efficiently. For example, a slipping alternator pulley results in reduced charging capacity, leading to a dead battery. A slipping power steering pump pulley causes stiff steering, making the vehicle difficult to control.
Real-World Use and Basic Troubleshooting
The serpentine belt diagram is invaluable during troubleshooting.
- Squealing Noise: A common symptom of a worn, glazed, or loose serpentine belt. Check the belt for cracks, fraying, or glazing. Also, inspect the tensioner to ensure it's providing adequate tension. A diagram helps you locate the tensioner easily. Sometimes, applying belt dressing can temporarily alleviate the squeal, but it's not a permanent fix. Replacing the belt and/or tensioner is usually required.
- Component Failure: If the power steering suddenly fails, the air conditioning stops working, or the battery isn't charging, suspect the serpentine belt. A visual inspection, guided by the diagram, can reveal if the belt is broken or has slipped off a pulley.
- Belt Wear: Regularly inspect the belt for signs of wear and tear. Cracks, fraying, and missing chunks are all indicators that the belt needs replacement. Use the diagram to trace the entire belt length and identify any potential problem areas.
- Misalignment: Use a straight edge to check the alignment of pulleys. Misaligned pulleys can cause premature belt wear and noise.
Safety Considerations
Working on the serpentine belt system can be hazardous if safety precautions are not followed.
- Disconnect the Battery: Always disconnect the negative battery cable before working on any electrical components, including the alternator. This prevents accidental shorts and potential injury.
- Hot Engine: Never work on the serpentine belt system when the engine is hot. Allow the engine to cool completely before starting any repairs.
- Moving Parts: Keep your hands, clothing, and tools away from the serpentine belt and pulleys while the engine is running. The rotating belt can cause serious injury.
- Tensioner Spring: The tensioner pulley is spring-loaded and can snap back with considerable force when released. Use the correct tool and technique to release the tension safely. Always wear safety glasses.
- Proper Tools: Use the appropriate tools for the job. A serpentine belt tool kit makes belt removal and installation much easier and safer.
High-Risk Components: The alternator and the crankshaft pulley carry the highest risk because of electrical connections and the direct link to the running engine, respectively. Always take extra care when working near these components.
With a clear understanding of the serpentine belt system and a reliable diagram at your fingertips, you can confidently tackle routine maintenance and repairs on your 2008 Hyundai Sonata. Remember to always prioritize safety and consult a professional mechanic if you're unsure about any aspect of the repair.
We have a high-resolution, printable serpentine belt diagram specifically for the 2008 Hyundai Sonata available for download. This diagram will be an invaluable resource for your DIY projects.