2008 Land Rover Lr2 Fuse Box Diagram
Alright, let's dive into the 2008 Land Rover LR2 fuse box diagram. This isn't just some pretty picture; it's your roadmap to understanding and troubleshooting your electrical system. Whether you're dealing with a blown fuse, planning some aftermarket modifications, or just trying to get a better handle on your LR2's inner workings, knowing your way around the fuse box is crucial.
Purpose of the Fuse Box Diagram
The fuse box diagram serves several critical purposes:
- Diagnosis and Repair: The most obvious reason. When something electrical stops working, the diagram helps you pinpoint the correct fuse to check, saving you time and frustration.
- Preventing Electrical Overload: Fuses are designed as the weak link in the circuit. They blow before more expensive components are damaged by excessive current. The diagram tells you the amperage rating of each fuse, vital when replacing them. Never replace a fuse with a higher amperage rating unless you know exactly what you're doing – you risk serious damage or even fire.
- Aftermarket Modifications: Adding a new accessory like a driving light, an upgraded sound system, or a trailer wiring harness? You'll need to tap into the existing electrical system. The diagram shows you where you *can* and *cannot* safely draw power.
- Learning and Understanding: Even if nothing's broken, studying the diagram is a great way to deepen your understanding of your vehicle's electrical architecture.
Key Specs and Main Parts
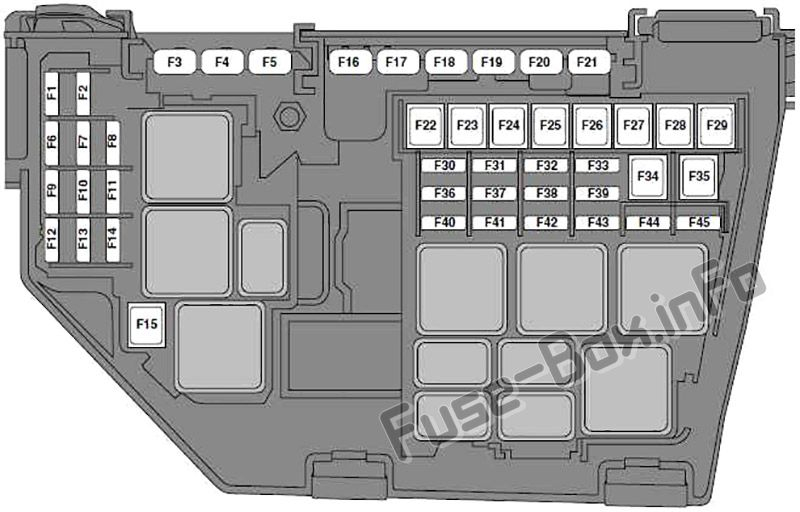
The 2008 LR2 has two main fuse boxes: one located in the engine compartment and another inside the passenger compartment, typically under the glove box or on the driver's side dash. Each fuse box contains an array of fuses, relays, and potentially some circuit breakers.
- Fuses: These are the sacrificial components. They contain a thin wire filament designed to melt and break the circuit when the current exceeds its rated amperage.
- Relays: Relays are electrically operated switches. They allow a low-current circuit to control a high-current circuit. For example, the headlight switch activates a relay, which then sends power to the headlights. This protects the headlight switch from carrying the full headlight current.
- Circuit Breakers: Circuit breakers, unlike fuses, can be reset. They trip (open the circuit) when overloaded but can be manually reset once the overload condition is resolved. The LR2 uses circuit breakers in some systems, although fuses are more common.
- Fuse Box Housing: The plastic housing that contains all the fuses and relays. It provides physical protection and often includes the fuse diagram itself (though this can sometimes be missing or faded).
You'll also need to know about amperage. This is the measure of electrical current flowing through a circuit, typically expressed in amps (A). Fuses are rated by their amperage, indicating how much current they can handle before blowing. Common fuse ratings in the LR2 include 5A, 7.5A, 10A, 15A, 20A, 25A, 30A, and 40A. Pay very careful attention to the amperage rating listed on your fuse diagram, and always replace a blown fuse with a fuse of the exact same amperage.
Understanding the Symbols
Fuse box diagrams aren't written in plain English; they use a system of symbols and abbreviations. Here's a breakdown of some common ones:
- Lines: Lines represent electrical wires or circuits. A solid line typically indicates a direct connection, while a dashed line might indicate a ground connection or a connection through a switch.
- Colors: Wires are color-coded, and the diagram will indicate these colors. Common colors include Red (power), Black (ground), Blue, Green, Yellow, and White. Knowing the wire color helps you trace the circuit through the vehicle.
- Fuse Symbols: The standard fuse symbol is a squiggly line inside a rectangle. The amperage rating is usually printed next to the symbol.
- Relay Symbols: Relay symbols typically consist of a coil (representing the electromagnet) and a switch (representing the contacts that open and close the circuit).
- Component Icons: The diagram will often include simplified icons representing the components that the fuse protects – headlights, windshield wipers, radio, etc. These icons can vary, so consult the diagram's legend if you're unsure.
- Abbreviations: Expect to see abbreviations like "IGN" (ignition), "ACC" (accessory), "BATT" (battery), and "GND" (ground).
How It Works: A Circuit Overview
To understand how the fuse box fits into the bigger picture, let's look at a simplified electrical circuit. The circuit starts with the battery, which provides the electrical power. From the battery, power flows through a fuse (located in the fuse box) to protect the circuit. Next, it goes to a switch, which controls whether the component receives power. Finally, the power reaches the component itself (e.g., a headlight bulb) and then returns to the battery through a ground connection, completing the circuit.
If there's a short circuit (e.g., a wire chafes and touches the metal body of the car, creating a low-resistance path to ground), a large amount of current will flow. This is where the fuse comes in. The excessive current causes the fuse's filament to melt, breaking the circuit and preventing damage to the battery, wiring, and other components.
Real-World Use: Basic Troubleshooting Tips
Here's how to use the fuse box diagram to troubleshoot a common electrical problem:
- Identify the Problem: What's not working? Headlights? Radio? Windows?
- Consult the Diagram: Locate the fuse box diagram (either in the owner's manual or the downloadable diagram we have). Identify the fuse that controls the malfunctioning component.
- Locate the Fuse: Find the corresponding fuse in the fuse box. The diagram will tell you the fuse number and its location within the box.
- Inspect the Fuse: Visually inspect the fuse. Look for a broken filament. If the filament is broken, the fuse is blown. It's often helpful to use a test light or multimeter to confirm continuity.
- Replace the Fuse: If the fuse is blown, replace it with a new fuse of the exact same amperage rating.
- Test: Test the component to see if it now works.
- If the Fuse Blows Again: If the new fuse blows immediately or shortly after replacement, there's likely a short circuit or overload in the system. Do not keep replacing fuses; this will not fix the underlying problem and could cause further damage. You'll need to investigate the wiring and components in that circuit to find the source of the short. This might require specialized tools and knowledge, so consider consulting a professional.
Safety First
Working with electrical systems can be dangerous. Here are some essential safety precautions:
- Disconnect the Battery: Before working on any electrical components, disconnect the negative terminal of the battery. This prevents accidental shorts and electrical shocks.
- Use Insulated Tools: Use tools with insulated handles to minimize the risk of electric shock.
- Avoid Wet Conditions: Never work on electrical systems in wet or damp conditions.
- High-Current Components: Be extremely cautious when working near high-current components like the starter motor, alternator, and battery. These components can deliver a powerful shock.
- SRS/Airbag Systems: Airbag systems are electronically controlled and can deploy unexpectedly if mishandled. Refer to the vehicle's service manual for specific safety procedures before working near airbags.
- Double Check: Always double-check the fuse diagram and component locations before disconnecting or replacing anything.
Warning: Working on your vehicle's electrical system can be dangerous. If you're not comfortable with these procedures, it's best to consult a qualified mechanic. Incorrect repairs can damage your vehicle and could even cause injury.
We've got the complete 2008 Land Rover LR2 fuse box diagram ready for you. You can download it and keep it handy for your future DIY adventures. Having this resource at your fingertips will empower you to diagnose and fix common electrical issues, saving you time and money in the long run.