2008 Mitsubishi Lancer Serpentine Belt Diagram
If you're tackling some maintenance on your 2008 Mitsubishi Lancer, or just want to deepen your understanding of its engine, knowing the serpentine belt routing is crucial. This guide provides a comprehensive overview of the 2008 Lancer's serpentine belt system, empowering you to diagnose issues, replace the belt, and generally keep your engine running smoothly. We'll break down the diagram, components, and practical troubleshooting tips. And, for your convenience, we have a printable diagram available for download at the end of this article.
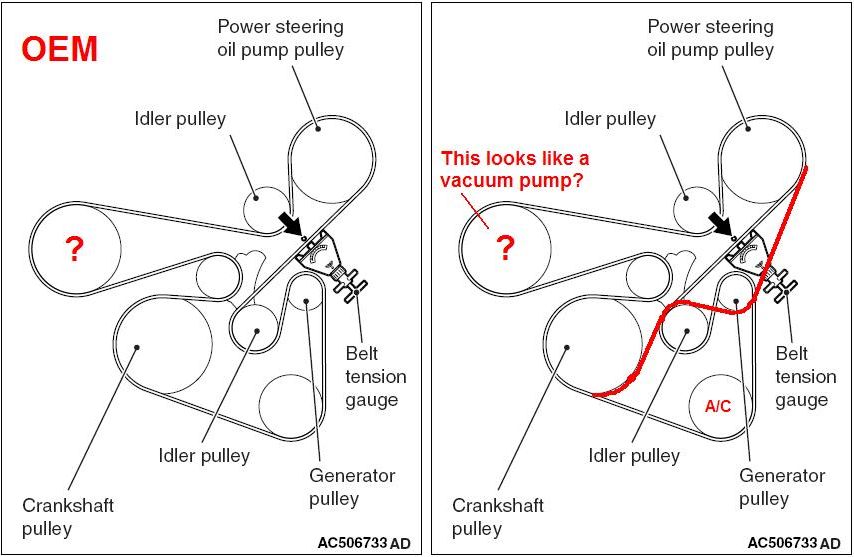
Purpose of the Serpentine Belt Diagram
The serpentine belt diagram is your roadmap to understanding how the serpentine belt winds its way around various engine components. Why is this important? Several reasons:
- Belt Replacement: If your belt is cracked, worn, or squealing, you'll need to replace it. The diagram shows you the correct routing to ensure proper operation of all driven accessories.
- Troubleshooting Accessory Issues: If your power steering fails, your A/C stops working, or your alternator isn't charging, the serpentine belt might be the culprit. The diagram helps you isolate which component is affected.
- Preventative Maintenance: Regularly inspecting the belt's condition and verifying its proper tension is a key part of preventative maintenance. Knowing the routing allows you to visually inspect the entire belt run.
- Learning Engine Mechanics: Understanding the serpentine belt system is a fundamental aspect of understanding basic engine mechanics.
Key Specs and Main Parts of the 2008 Lancer Serpentine Belt System
The 2008 Mitsubishi Lancer typically uses a single serpentine belt to drive multiple engine accessories. Here's a breakdown of the key components and their typical specifications:
- Serpentine Belt: The main component, usually made of EPDM rubber (Ethylene Propylene Diene Monomer rubber) for durability and heat resistance. Belt length varies depending on the engine (2.0L or 2.4L). Refer to your specific owner's manual or a parts catalog for the correct belt length. Common part numbers include those from Gates, Dayco, and Goodyear.
- Crankshaft Pulley (Harmonic Balancer): Located at the bottom of the engine, driven directly by the engine's crankshaft. It provides the rotational force to drive the serpentine belt.
- Alternator Pulley: The alternator converts mechanical energy into electrical energy to charge the battery and power the car's electrical systems.
- Power Steering Pump Pulley: Provides hydraulic pressure for power-assisted steering.
- Air Conditioning Compressor Pulley: Drives the A/C compressor, which circulates refrigerant to cool the car's cabin.
- Tensioner Pulley: This spring-loaded pulley maintains the correct tension on the serpentine belt. Proper tension is critical for preventing slippage and premature belt wear. There are two main types: automatic tensioners, which use a spring to maintain constant tension, and manual tensioners, which require manual adjustment. The 2008 Lancer typically utilizes an automatic tensioner.
- Idler Pulley: A smooth pulley that provides additional wrap around other pulleys, increasing the contact area and improving belt grip.
Serpentine Belt Diagram Symbols Explained
Understanding the symbols used in the serpentine belt diagram is essential for correct interpretation. While specific diagrams might vary slightly, the following conventions are generally used:
- Solid Line: Represents the serpentine belt itself. The path of the line shows the routing around each pulley.
- Arrows: Indicate the direction of belt travel. Follow these arrows to understand how the belt is driven.
- Pulleys: Each pulley is represented by a circle. Often, the component name (e.g., ALT for alternator, P/S for power steering) is abbreviated inside or near the circle.
- Tensioner: The tensioner pulley is usually indicated with a circle and labeled "Tensioner" or "TENS." The tensioner assembly itself may be depicted with a spring symbol.
- Idler Pulley: Similar to other pulleys, often labeled "Idler" or "IDL."
- Rotation Direction Indicators: Small arrows might be present near the pulleys, indicating their direction of rotation. Note that some pulleys rotate clockwise, while others rotate counter-clockwise.
How the Serpentine Belt System Works
The serpentine belt system is a closed-loop system that transfers rotational power from the engine's crankshaft to various accessories. The crankshaft pulley, driven by the engine, spins, causing the serpentine belt to rotate. The belt then passes around each accessory pulley (alternator, power steering pump, A/C compressor), transferring rotational force to them. The tensioner pulley maintains the correct belt tension to prevent slippage and ensure efficient power transfer. The idler pulley provides extra wrap around the driven pulleys for better grip.
The correct routing is critical. An incorrectly routed belt will not drive the accessories properly, leading to malfunctions. For example, if the belt isn't properly wrapped around the alternator pulley, the alternator won't charge the battery, resulting in a dead battery. Similarly, improper routing around the A/C compressor pulley will prevent the A/C from functioning. The tension on the belt is also crucial. Too loose, and the belt will slip; too tight, and it can damage the pulleys and the belt itself.
Real-World Use and Basic Troubleshooting
Here are some common issues you might encounter with your serpentine belt system and how to diagnose them using the diagram:
- Squealing Noise: A squealing noise, especially upon starting the engine or when turning the steering wheel, is often a sign of a loose or worn serpentine belt. Use the diagram to inspect the belt for cracks, glazing, or missing chunks. Also, check the tensioner to ensure it's functioning properly and maintaining adequate tension.
- Accessory Malfunction: If one of your accessories (A/C, power steering, alternator) stops working, first check the serpentine belt. If the belt is broken or slipping on the affected pulley, it's likely the cause. Use the diagram to verify that the belt is correctly routed around the pulley.
- Belt Slippage: Excessive belt dust or debris around the pulleys is an indication of belt slippage. This can be caused by a loose belt, worn pulleys, or a malfunctioning tensioner. Inspect the belt for wear and tear, and check the tensioner.
- Visual Inspection: Regularly inspect the serpentine belt for cracks, fraying, glazing, or missing ribs. Any of these signs indicate that the belt needs to be replaced. The recommended replacement interval is typically between 60,000 and 100,000 miles, but it's wise to inspect it more frequently, especially in harsh climates.
Safety Precautions
Working on the serpentine belt system involves some risks. Here are some important safety precautions:
- Disconnect the Battery: Always disconnect the negative battery terminal before working on any electrical components, including the alternator.
- Hot Engine: Allow the engine to cool completely before working on the serpentine belt system. The engine components can be extremely hot and cause burns.
- Moving Parts: Never put your hands or tools near the serpentine belt while the engine is running. The belt can grab clothing or tools, causing serious injury.
- Eye Protection: Wear safety glasses to protect your eyes from debris.
- Tensioner Spring: Be extremely careful when releasing the tension on the serpentine belt tensioner. The spring can be very strong and could cause injury if it snaps back unexpectedly. Use the correct tool to safely relieve the tension.
By understanding the serpentine belt diagram and the components of the system, you can confidently diagnose and address common issues. Remember to always prioritize safety and consult a professional mechanic if you're unsure about any aspect of the repair.
As promised, you can download a printable PDF of the 2008 Mitsubishi Lancer Serpentine Belt Diagram here. (Link to diagram file)