2008 Nissan Altima 2.5 Belt Diagram
Understanding the serpentine belt system in your 2008 Nissan Altima 2.5 is crucial for preventative maintenance, troubleshooting issues, and performing repairs. This article delves into the specifics of the 2.5-liter engine's belt diagram, providing you with the knowledge to confidently tackle belt-related tasks. Having a clear understanding of the belt routing and components is essential for successful DIY repairs and modifications. We have the complete belt diagram file available for download, which you'll find link at the end of this article.
Purpose of the Belt Diagram
The belt diagram serves as a visual roadmap for the serpentine belt's path around various engine components. It's indispensable for several reasons:
- Belt Replacement: Replacing a worn or damaged belt requires proper routing. An incorrect belt path can damage components, lead to belt slippage, and result in system failures.
- Troubleshooting: Squealing belts or malfunctioning accessories often stem from incorrect belt tension or routing. The diagram helps diagnose these issues by verifying correct installation.
- Component Identification: The diagram clearly labels each component driven by the belt, allowing you to identify and inspect them easily.
- Learning and Modification: For DIY enthusiasts, understanding the belt system is a foundational step for engine modifications or performance upgrades.
Key Specs and Main Parts of the 2008 Altima 2.5 Belt System
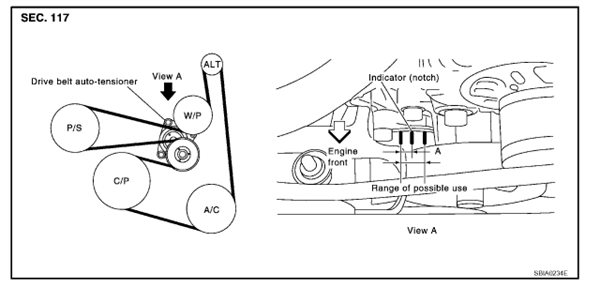
The 2008 Nissan Altima 2.5-liter engine utilizes a single serpentine belt to drive several critical engine accessories. Here's a breakdown of the key components:
- Crankshaft Pulley (or Damper): This pulley is directly connected to the crankshaft and is the driving force behind the entire belt system. It transmits engine power to the other components.
- Alternator: The alternator generates electrical power to charge the battery and run the car's electrical systems. The belt turns the alternator's rotor, creating the electrical current.
- Power Steering Pump: The power steering pump provides hydraulic pressure to assist steering. The belt drives the pump, ensuring smooth and effortless steering.
- Air Conditioning (A/C) Compressor: The A/C compressor circulates refrigerant to cool the cabin air. The belt turns the compressor's internal mechanisms.
- Idler Pulley(s): Idler pulleys are smooth, non-driven pulleys that guide the belt and maintain optimal tension. They play a crucial role in belt routing and preventing excessive wear.
- Tensioner Pulley: The tensioner pulley is spring-loaded and automatically adjusts belt tension. It's essential for proper belt operation and prevents slippage. Typically, it includes a spring-loaded arm and pulley which maintains the optimal tension on the belt. A faulty tensioner can cause belt noise, premature wear, and accessory malfunction.
The serpentine belt itself is typically a multi-ribbed belt made of reinforced rubber compounds. Its ribbed design increases surface area for better grip on the pulleys.
Decoding Belt Diagram Symbols
The belt diagram uses a standardized set of symbols to convey information effectively:
- Solid Lines: Indicate the path of the serpentine belt.
- Dotted Lines: Often represent the back side of the belt, indicating that the belt is contacting the pulley on its smooth, non-ribbed surface.
- Arrows: Show the direction of belt rotation around each pulley. Understanding the rotation direction is crucial when installing a new belt.
- Component Labels: Each pulley is labeled with its corresponding component (e.g., ALT for Alternator, P/S for Power Steering, A/C for Air Conditioning).
- Tensioner Indicator: The tensioner is typically represented with a symbol that indicates the direction of movement for tension adjustment.
While color-coding isn't always present on belt diagrams, some manufacturers may use different colors to highlight specific sections of the belt path or to differentiate between the front and back sides of the belt. Always refer to the diagram legend if color-coding is used.
How the Serpentine Belt System Works
The serpentine belt system is a relatively simple, yet crucial, system. The crankshaft pulley receives power directly from the engine. This rotational force is then transferred to the serpentine belt, which in turn drives all the other accessories. The tensioner pulley maintains constant tension on the belt, preventing slippage and ensuring efficient power transfer. The idler pulleys guide the belt along the correct path, ensuring it makes proper contact with all the driven components. All of these components must be in good operating condition for the whole system to function properly. If a pulley is faulty or the tensioner is not operating correctly, it can put strain on the belt, cause it to slip or fail, or damage the other components of the engine.
Real-World Use: Basic Troubleshooting Tips
Here's how you can use the belt diagram for troubleshooting:
- Belt Squealing: A squealing belt often indicates slippage. Check the belt tensioner for proper operation. The diagram will help you locate the tensioner. Also, inspect the belt for cracks, glazing, or damage. Ensure the belt is correctly routed according to the diagram.
- Accessory Malfunction: If the alternator, power steering, or A/C is not working, check the belt for breakage or slippage. Use the diagram to verify the belt is properly engaged with the corresponding pulley. A loose belt can prevent these accessories from functioning correctly.
- Visual Inspection: Regularly inspect the belt for wear and tear. Look for cracks, fraying, missing ribs, or signs of oil contamination. Replace the belt if you notice any of these issues.
- Tensioner Inspection: Examine the tensioner pulley for smooth operation. It should move freely without binding or excessive play. A faulty tensioner can cause belt noise and premature wear.
When replacing the belt, always refer to the belt diagram. Before removing the old belt, take a picture or draw a diagram of the existing belt routing. This will serve as a reference during installation.
Safety Precautions
Working on the serpentine belt system can be hazardous if proper safety precautions are not followed:
- Disconnect the Battery: Always disconnect the negative battery cable before working on the engine to prevent electrical shocks.
- Hot Engine: Never work on the belt system while the engine is hot. Allow the engine to cool completely before starting any repairs.
- Moving Parts: Keep your hands and clothing away from moving parts, especially when the engine is running.
- Eye Protection: Wear safety glasses to protect your eyes from debris.
- Belt Tensioner: Be cautious when releasing the belt tensioner. It is spring-loaded and can snap back forcefully. Use the appropriate tools and follow the manufacturer's instructions.
- Flammable Liquids: Keep flammable liquids away from the engine compartment.
The crankshaft pulley is especially risky as it's directly connected to the engine. Accidental contact while the engine is running can cause serious injury. Always ensure the engine is off and cool before working near this component.
Properly understanding and utilizing the 2008 Nissan Altima 2.5 belt diagram is essential for maintaining your vehicle's performance and longevity. By following the guidelines outlined in this article and adhering to safety precautions, you can confidently perform belt-related tasks and ensure your Altima remains in optimal condition.
As mentioned, we have the complete 2008 Nissan Altima 2.5 belt diagram file ready for you to download. You can access it [hyperlink to the file - placeholder]. This diagram will provide you with a detailed visual aid for your repairs and maintenance.