2008 Nissan Altima 2.5 Serpentine Belt Diagram
The serpentine belt, sometimes referred to as the accessory drive belt, is a critical component in your 2008 Nissan Altima 2.5. This article will provide a detailed explanation of the serpentine belt diagram, equipping you with the knowledge to diagnose issues, perform replacements, and better understand your vehicle's accessory drive system.
Purpose of the Serpentine Belt Diagram
A serpentine belt diagram is essentially a roadmap of how the belt is routed around various engine accessories. Understanding this diagram is invaluable for several reasons:
- Repair and Replacement: The most common use is ensuring the belt is properly installed after replacement. Incorrect routing can lead to damage to the belt, accessories, or even engine failure.
- Diagnosis: By comparing the actual belt routing to the diagram, you can identify if the belt has been installed incorrectly in the past or if a pulley has been replaced with an incompatible one.
- Learning: Understanding the diagram allows you to grasp the overall functionality of the accessory drive system and how the engine powers various components.
- Troubleshooting: The diagram helps you pinpoint which accessory might be causing issues based on the belt's performance. For example, a squealing belt after starting the AC could indicate a problem with the AC compressor pulley.
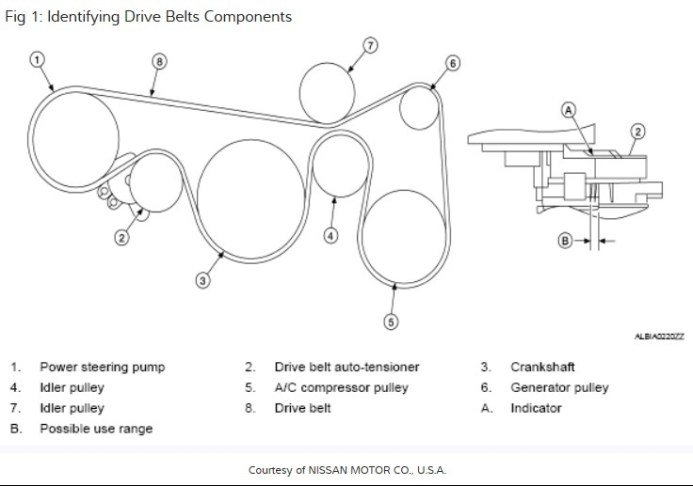
Key Specs and Main Parts
Before diving into the diagram, let's review the key components involved in the 2008 Nissan Altima 2.5's serpentine belt system:
- Serpentine Belt: The continuous belt that transmits power from the crankshaft pulley to the various accessories. These belts are typically made of a reinforced rubber compound.
- Crankshaft Pulley (Crank Pulley): The pulley attached to the engine's crankshaft. This pulley is driven directly by the engine and provides the rotational force to drive the serpentine belt.
- Alternator Pulley: The alternator is responsible for charging the battery and powering the electrical system. The serpentine belt spins the alternator pulley, enabling it to generate electricity.
- Power Steering Pump Pulley: The power steering pump provides hydraulic assistance for steering. The belt turns this pulley, driving the pump.
- Air Conditioning (AC) Compressor Pulley: The AC compressor is responsible for cooling the air in the cabin. The belt drives the AC compressor pulley to compress the refrigerant.
- Idler Pulley(s): Smooth, non-driven pulleys used to guide the belt and maintain proper tension. They provide the correct angle and wrap around other pulleys.
- Tensioner Pulley: A spring-loaded pulley that automatically maintains the correct tension on the serpentine belt. This is critical for proper operation and belt longevity. A failing tensioner is a common cause of serpentine belt issues.
Symbols in the Serpentine Belt Diagram
Serpentine belt diagrams use specific conventions to convey information. Here's a breakdown of common symbols:
- Solid Lines: Represent the path of the belt. The thickness of the line usually doesn't have any special meaning.
- Dashed Lines: Sometimes used to indicate the back side of the belt, showing where it travels behind or underneath a component. They can also indicate a path the belt might take if the diagram is showing multiple possible configurations (though this is uncommon for a specific vehicle like the 2008 Altima).
- Arrows: Indicate the direction of belt rotation. This is crucial for ensuring proper accessory function. Make sure to double-check that the belt is running in the correct direction during installation.
- Component Icons: Each component (alternator, AC compressor, etc.) is usually represented by a simplified icon or outline. These are labeled with abbreviations (ALT, AC, PS, etc.) to identify them.
- Pulley Surface: The diagram clearly shows if the smooth side or the grooved side of the belt makes contact with each pulley.
How the Serpentine Belt System Works
The 2008 Nissan Altima 2.5 uses a single serpentine belt to drive all the engine accessories. The process is quite simple:
- The engine's crankshaft rotates the crankshaft pulley.
- The serpentine belt is wrapped around the crankshaft pulley, transferring the rotational force.
- As the crankshaft pulley turns, it drives the serpentine belt.
- The serpentine belt, in turn, drives all the other accessory pulleys (alternator, power steering pump, AC compressor).
- The tensioner pulley maintains the correct tension on the belt to prevent slipping and ensure efficient power transfer.
Real-World Use & Basic Troubleshooting
Here's how you can use the serpentine belt diagram for troubleshooting and maintenance:
- Squealing Belt: A squealing belt is often a sign of slippage. Check the belt tension, look for glazing or cracks on the belt, and inspect the pulleys for damage or misalignment. A worn tensioner can also cause slippage.
- Cracked or Frayed Belt: Replace the belt immediately. Cracks and fraying indicate the belt is nearing the end of its life and is at risk of breaking. A broken serpentine belt can leave you stranded and can cause damage to other components if the belt whips around the engine bay.
- Accessory Failure: If an accessory (e.g., the alternator) is not working, first check the serpentine belt and its routing. A broken or incorrectly routed belt can prevent the accessory from functioning. Also, verify the pulley is spinning freely. A seized pulley can cause the belt to slip or break.
- Belt Alignment: Use a straight edge to check the alignment of all pulleys. Misalignment can cause premature belt wear and noise.
Safety Precautions
Working on the serpentine belt system involves certain risks:
- Hot Engine: Never work on the serpentine belt system when the engine is hot. Allow the engine to cool completely before starting any work.
- Moving Parts: Keep your hands, tools, and clothing away from the serpentine belt and pulleys when the engine is running. Serious injury can result from contact with moving parts.
- Battery Disconnect: Disconnect the negative battery terminal before working on the electrical components of the system (e.g., alternator). This prevents accidental shorts and electrical shocks.
- Tensioner Spring: Be extremely careful when releasing the tension on the tensioner pulley. The spring is under significant force and can cause injury if released improperly. Use the correct tools and follow the manufacturer's instructions. The spring loaded tensioner can snap back with considerable force.
Note: This information is intended as a general guide. Always refer to the specific service manual for your 2008 Nissan Altima 2.5 for detailed instructions and torque specifications.
We have the 2008 Nissan Altima 2.5 Serpentine Belt Diagram available for download. It's a valuable resource to keep on hand for maintenance and repairs.