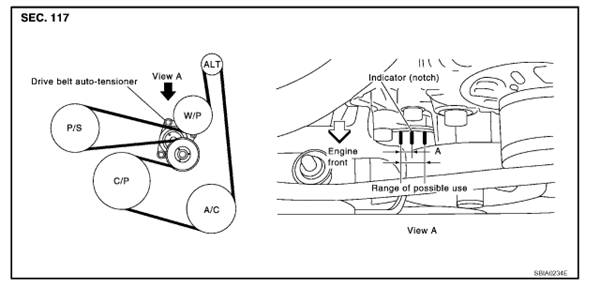
2008 Nissan Altima 3.5 Serpentine Belt Diagram
The serpentine belt in your 2008 Nissan Altima 3.5 SE is a critical component responsible for powering several essential engine accessories. Understanding its routing and function, particularly through a detailed serpentine belt diagram, is invaluable for preventative maintenance, troubleshooting, and DIY repairs. This article will provide a comprehensive breakdown of the 2008 Altima 3.5 SE serpentine belt diagram, enabling you to confidently tackle related tasks.
Purpose of the Serpentine Belt Diagram
A serpentine belt diagram isn't just a pretty picture; it's an essential tool for several reasons:
- Belt Replacement: The most common use. When your belt shows signs of wear (cracks, fraying, glazing) or breaks, the diagram shows the correct path for the new belt. Installing it incorrectly can lead to serious engine damage.
- Accessory Troubleshooting: If you're experiencing issues with your power steering, air conditioning, or alternator, a misaligned or damaged serpentine belt is a likely culprit. The diagram helps you visualize how these components relate to the belt's operation.
- Preventative Maintenance: Regularly inspecting the belt's condition and tension is crucial. The diagram helps you identify all pulleys and components to inspect during your routine maintenance.
- Understanding Engine Systems: Even if you're not actively working on the belt, the diagram provides a visual understanding of how the engine's accessories are driven.
Key Specs and Main Parts
Before diving into the diagram, let's define the key components and specs involved:
Key Specs
- Belt Length: The correct belt length is crucial. Use the manufacturer's specified part number. Installing a belt that is too short or too long will prevent proper tensioning and accessory operation.
- Belt Width: Matching the correct width ensures proper grip and prevents the belt from slipping off the pulleys.
- Belt Material: Typically made of EPDM (ethylene propylene diene monomer) rubber for its durability and resistance to heat and wear.
Main Parts
- Crankshaft Pulley: The driving force of the serpentine belt system. Connected directly to the engine's crankshaft.
- Alternator Pulley: Powers the vehicle's electrical system and charges the battery.
- Power Steering Pump Pulley: Provides hydraulic pressure for power-assisted steering.
- Air Conditioning Compressor Pulley: Drives the AC compressor to cool the vehicle's cabin.
- Tensioner Pulley: An automatic or manual tensioner pulley applies the necessary tension to the belt, preventing slippage and ensuring proper operation of all accessories. The tensioner is spring-loaded and pivots, maintaining constant tension.
- Idler Pulley: A smooth pulley used to guide the belt around other components or to change its direction.
Understanding Symbols in the Diagram
Serpentine belt diagrams use a variety of symbols to convey information. Here's a breakdown:
- Solid Lines: Represent the main path of the serpentine belt.
- Dashed Lines: May indicate the back side (smooth side) of the belt contacting a pulley or a reference point.
- Arrows: Show the direction of rotation for each pulley. This is critical for understanding how the belt should be routed.
- Component Labels: Each pulley is labeled with its corresponding component (e.g., ALT for Alternator, AC for Air Conditioning Compressor, PS for Power Steering).
- Tensioner Indicator: The diagram will clearly identify the tensioner pulley and show its direction of movement when tensioning the belt.
- Icons: Some diagrams use icons to represent the various components, such as a battery icon for the alternator.
Color coding, although less common in some diagrams, can also provide clarity. For instance, the belt path might be highlighted in a specific color to easily distinguish it from the surrounding engine components. In the download available at the end of this article, the belt path is black, and the pulleys are grey.
How It Works: The Serpentine Belt System
The serpentine belt system operates on a simple principle: the rotational energy from the engine's crankshaft is transferred to various accessories via the serpentine belt.
- The crankshaft pulley, driven by the engine, initiates the process.
- The belt wraps around the crankshaft pulley and then loops around the various accessory pulleys (alternator, power steering, AC compressor).
- As the crankshaft pulley rotates, it drives the belt, which in turn rotates the accessory pulleys.
- The tensioner pulley maintains the proper tension on the belt, ensuring optimal grip and preventing slippage. Without proper tension, the accessories will not function correctly, and the belt can wear prematurely.
- The idler pulley guides the belt around the other components, optimizing the belt's wrap angle and preventing interference.
The serpentine belt is aptly named because it "snakes" its way around all these components in a single, continuous loop. This design is more efficient than older systems that used multiple belts to drive individual accessories.
Real-World Use: Troubleshooting Tips
Here are some practical troubleshooting tips using the serpentine belt diagram:
- Squealing Noise: A common symptom of a loose or worn belt. Check the tensioner pulley's condition and operation. Use the diagram to verify the correct belt routing.
- Accessory Malfunction: If your power steering is stiff, AC is not cooling, or the battery is not charging, inspect the belt for damage or slippage. The diagram will confirm that the belt is properly routed around the affected accessory's pulley.
- Belt Slippage: Look for signs of belt dust or debris around the pulleys. A glazed or worn belt will slip, especially under heavy load. The diagram helps you identify the pulleys most susceptible to slippage.
- Visual Inspection: Regularly inspect the belt for cracks, fraying, or missing chunks. Replace the belt immediately if you find any significant damage. Use the diagram as a reference to make sure nothing is obstructing the belt's path.
Safety Precautions
Working on the serpentine belt system requires caution. Here are some important safety points:
- Disconnect the Battery: Always disconnect the negative battery terminal before working on any electrical components. This prevents accidental shorts and potential electrocution.
- Engine Must Be Cool: Never work on the engine while it is hot. Allow it to cool completely to avoid burns.
- Keep Hands Clear: Be extremely cautious when the engine is running, even briefly. The rotating belt and pulleys can cause serious injury. Avoid wearing loose clothing or jewelry that could get caught in the system.
- Tensioner Safety: Be aware of the spring-loaded tensioner. When releasing the tensioner to remove the belt, use the proper tool and maintain a firm grip to prevent it from snapping back unexpectedly.
The alternator, in particular, should be handled with care. Even after the engine is turned off, it can retain a residual charge. Follow proper procedures for discharging capacitors if necessary.
Remember, if you're uncomfortable performing these tasks yourself, consult a qualified mechanic.
Having access to the correct serpentine belt diagram for your 2008 Nissan Altima 3.5 SE is paramount for successful repairs and maintenance. To help, we have the complete, high-resolution diagram available for download. This will serve as an invaluable visual aid as you work on your vehicle. Click [link] to download the diagram. This resource, combined with the information provided in this article, will empower you to confidently address any serpentine belt related issues.