2008 Nissan Rogue Fuse Box Diagram
The 2008 Nissan Rogue, while a reliable vehicle, isn't immune to electrical hiccups. When a light goes out, a system malfunctions, or an accessory refuses to power on, your first suspect should always be the fuses. Navigating the fuse boxes without a guide can be a frustrating, even dangerous, endeavor. That's where the fuse box diagram comes in. This guide serves as your roadmap to understanding the electrical arteries of your Rogue, enabling you to diagnose, repair, and even customize your vehicle safely and efficiently.
Purpose of a Fuse Box Diagram
Why is a fuse box diagram so crucial? The answer is threefold:
- Troubleshooting: When an electrical component fails, the diagram points you directly to the corresponding fuse. Knowing which fuse controls what allows you to quickly isolate the problem, saving you time and money on potentially unnecessary mechanic visits.
- Repair: Replacing a blown fuse is often a straightforward task, but you need to be certain you're replacing the *correct* fuse with the *correct* amperage rating. The diagram provides this critical information.
- Modification and Customization: Adding aftermarket accessories, such as auxiliary lights or a new stereo system, requires tapping into the vehicle's electrical system. The diagram helps you identify appropriate circuits and fuse locations for safe and reliable integration. Without it, you risk overloading circuits, damaging components, or even starting a fire.
Key Specs and Main Parts of the 2008 Rogue Fuse Boxes
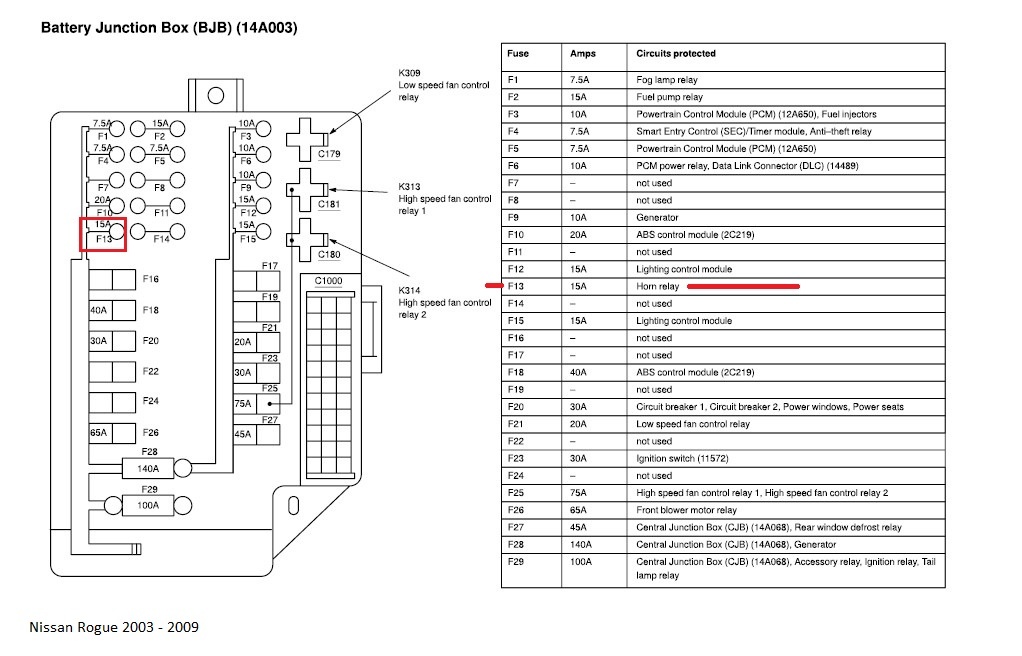
The 2008 Nissan Rogue actually has two fuse boxes: one located inside the cabin, typically under the dashboard on the driver's side, and another located under the hood, usually near the battery. Each box protects different circuits and systems. The in-cabin fuse box primarily protects interior accessories, while the under-hood fuse box protects engine and powertrain related systems.
Here's a breakdown of the key components:
- Fuse Box Housing: The physical container holding the fuses and relays. It's usually made of durable plastic and protects the components from the elements.
- Fuses: The sacrificial components designed to protect circuits from overcurrents. They consist of a thin wire or strip that melts and breaks the circuit when the current exceeds a safe level. Fuses are rated in amperes (amps or A), indicating the maximum current they can handle. Common amperage ratings include 5A, 7.5A, 10A, 15A, 20A, 25A, and 30A.
- Relays: Electromagnetic switches that control high-current circuits using a low-current signal. They allow you to switch on components like headlights or the fuel pump without running high-current wires to the dashboard switches. Relays usually have a specific function printed on them.
- Fuse Puller: A small plastic tool designed to safely remove fuses without damaging them or the fuse box.
- Diagram Label: A printed label, often located on the inside of the fuse box cover, that identifies the function and amperage of each fuse and relay. This is the *most important* part, as it's your key to understanding the system. This label is what we are discussing in detail.
Understanding Fuse Box Symbols
Fuse box diagrams use a combination of lines, colors, and icons to represent different circuits and components. Deciphering these symbols is crucial for accurate troubleshooting. Because they can be somewhat cryptic here are some common symbols:
- Solid Lines: Generally indicate a direct connection between components.
- Dashed Lines: Can represent a ground connection or a secondary circuit.
- Colors: Fuse bodies are color-coded to indicate their amperage rating. This is a universal standard, but it's always best to double-check the rating printed on the fuse itself. For example, a red fuse is typically 10A, blue is typically 15A, and yellow is typically 20A.
- Icons: These represent the component or system that the fuse protects. Common icons include:
- Light Bulb: Headlights, taillights, interior lights.
- Fan: Cooling fan, blower motor.
- Steering Wheel: Power steering system.
- Engine: Engine control unit (ECU) or other engine-related components.
- Radio: Audio system.
- Cigarette Lighter: Power outlet/accessory socket.
- Windshield Wiper: Windshield wiper system.
The fuse box diagram will show each fuse position and the icon associated with it. By matching the icon to the corresponding system in your car, you can identify the fuse responsible for that system.
It's important to remember that diagrams may vary slightly depending on the exact trim level and options package of your 2008 Rogue. Always refer to the diagram specific to *your* vehicle, which should be located inside the fuse box cover or in your owner's manual.
How Fuse Boxes Work
The fuse box is essentially a central distribution point for electrical power within the vehicle. Power flows from the battery, through the ignition switch (or other power source), and then branches out to various circuits, each protected by a fuse. When an electrical fault occurs, such as a short circuit (a low-resistance path to ground), the current flow increases dramatically. This excessive current heats up the fuse element, causing it to melt and break the circuit. This prevents damage to the wiring, components, and potentially even the battery. A blown fuse is a good thing – it’s sacrificing itself to protect more expensive components.
Relays, on the other hand, use a small electrical current to control a larger electrical current. When the low-current circuit is energized, it creates an electromagnetic field that pulls a switch closed, completing the high-current circuit. This allows a small switch on the dashboard to control a powerful component like the headlights without the risk of overheating the switch or requiring heavy-gauge wiring.
Real-World Use: Basic Troubleshooting Tips
Here’s how to use the fuse box diagram to troubleshoot common electrical problems:
- Identify the Symptom: What isn't working? Headlights? Radio? Power windows?
- Consult the Diagram: Locate the fuse box diagram for your 2008 Rogue. Match the symptom to the corresponding icon on the diagram.
- Locate the Fuse: Find the fuse in the fuse box that corresponds to the icon and location on the diagram.
- Inspect the Fuse: Remove the fuse using the fuse puller. Visually inspect the fuse. If the thin wire or strip inside is broken or blackened, the fuse is blown and needs to be replaced.
- Replace the Fuse: Replace the blown fuse with a new fuse of the exact same amperage rating. Using a fuse with a higher amperage rating can bypass the circuit protection and lead to serious damage or fire.
- Test: Turn on the affected system to see if it now works. If the new fuse blows immediately, there's a more serious problem in the circuit that needs further investigation by a qualified mechanic.
Safety Considerations
Working with automotive electrical systems can be dangerous. Here are some important safety precautions:
- Disconnect the Battery: Before working on any electrical component, disconnect the negative (-) battery cable to prevent accidental shorts or electrical shocks.
- Use the Correct Fuse: Always replace a blown fuse with a fuse of the *exact same amperage rating*. Never use a fuse with a higher rating, as this can overload the circuit and cause a fire.
- Avoid Working in Wet Conditions: Water and electricity don't mix. Work in a dry environment.
- Be Cautious with Relays: Relays can sometimes be hot to the touch. Allow them to cool down before handling them.
- High-Risk Components: The airbag system is a particularly sensitive and potentially dangerous system. If you suspect a problem with the airbag system, consult a qualified mechanic immediately. Do not attempt to diagnose or repair the airbag system yourself.
Disclaimer: This information is intended for general guidance only. Always consult your vehicle's owner's manual and a qualified mechanic for specific repair procedures. Working on automotive electrical systems carries inherent risks. Proceed with caution and at your own risk.
We have a downloadable 2008 Nissan Rogue fuse box diagram file available. It provides a clear and detailed view of both the in-cabin and under-hood fuse box layouts. You can use this file as a quick reference guide during your electrical troubleshooting and repair projects. This will save you valuable time and effort, ensuring you correctly identify and address any fuse-related issues in your Rogue.