2008 Nissan Titan Fuse Box Diagram
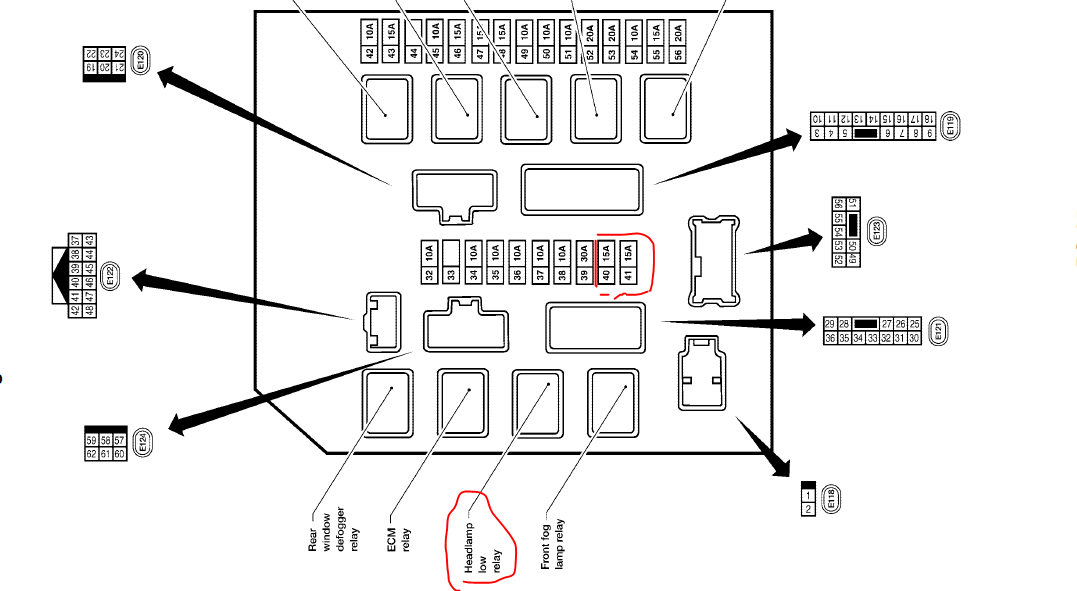
Let's dive into the often-overlooked but critically important fuse box diagram for the 2008 Nissan Titan. Whether you're troubleshooting electrical gremlins, planning modifications, or just want a deeper understanding of your truck, this diagram is your roadmap. This isn't just a pretty picture; it's the key to understanding your Titan's electrical nervous system.
Purpose: Why You Need This Diagram
The fuse box diagram serves several crucial purposes:
- Troubleshooting Electrical Issues: When a component fails (e.g., headlights, radio, power windows), the fuse box is often the first place to look. The diagram identifies which fuse protects that circuit, allowing you to quickly check for a blown fuse.
- Preventing Further Damage: Replacing a blown fuse with one of a higher amperage can cause serious damage to your wiring harness and potentially start a fire. The diagram specifies the correct amperage for each fuse, ensuring safe repairs.
- Planning Modifications: Adding aftermarket accessories like lights, stereos, or auxiliary power outlets requires tapping into the electrical system. The diagram helps you identify suitable power sources and fuse them appropriately.
- Understanding Vehicle Systems: Even without immediate problems, understanding the diagram gives you a better overall understanding of how your Titan's electrical systems are organized and protected.
Key Specs and Main Parts of the Fuse Box
The 2008 Nissan Titan typically has two fuse boxes:
- Interior Fuse Box: Located inside the cabin, often under the dashboard on the driver's side. This box primarily protects circuits for interior components like the radio, instrument panel, power windows, and interior lighting.
- Engine Compartment Fuse Box: Located in the engine bay, usually near the battery. This box protects circuits for critical engine components, headlights, cooling fans, and other high-current systems.
Key Specs to Note:
- Fuse Ampere Rating: This is the maximum current a fuse can handle before it blows (breaks the circuit). It's measured in Amperes (A). The diagram will show this number next to each fuse location. Never replace a fuse with one of a higher amperage.
- Fuse Type: Titans typically use blade-type fuses, but different sizes (e.g., mini, standard, maxi) may be present. The diagram often identifies the fuse type.
- Relay Locations: Relays are electromechanical switches that control high-current circuits using a low-current signal. The diagram will show the locations of relays and their corresponding functions (e.g., fuel pump relay, starter relay).
- Circuit Identification: The diagram clearly labels each fuse and relay with the component or system it protects (e.g., "Headlight (RH)," "Fuel Pump," "ABS").
Symbols: Deciphering the Diagram
Fuse box diagrams use a standard set of symbols and conventions. Understanding these symbols is crucial for accurate interpretation:
- Lines: Lines represent electrical wires or circuits. Heavier lines often indicate higher-current circuits.
- Colors: Different colored wires are often used to differentiate circuits. The diagram may include a color code key, but generally, you'll need to cross-reference with the vehicle's wiring harness for precise identification.
- Fuse Symbol: The fuse symbol is typically a rectangle with a squiggly line inside. It visually represents the fuse element that melts when overcurrent occurs.
- Relay Symbol: The relay symbol usually shows a coil and a set of contacts. The coil represents the electromagnet that activates the relay, and the contacts represent the switch that controls the high-current circuit.
- Ground Symbol: The ground symbol indicates a connection to the vehicle's chassis ground, which serves as the return path for electrical current.
Understanding Circuit Flow:
The diagram shows how electrical current flows from the battery, through the fuse (for protection), through the switch or control module, to the component, and then back to ground, completing the circuit. If any part of this path is broken (e.g., blown fuse, broken wire, faulty component), the circuit will not function.
How It Works: Fuse Box Functionality
The fuse box acts as the central distribution and protection point for the vehicle's electrical system. It distributes power from the battery to various components while safeguarding against overcurrent conditions.
Fuses: A fuse contains a thin wire or strip that is designed to melt and break the circuit if the current exceeds its rated amperage. This protects the wiring and components from damage due to short circuits or overloads.
Relays: Relays allow low-current circuits to control high-current circuits. For example, the headlight switch only needs to handle a small current to activate the headlight relay, which then switches on the high-current circuit that powers the headlights. This prevents the headlight switch from being overloaded.
Circuit Breakers: Some circuits may be protected by circuit breakers instead of fuses. Circuit breakers are resettable devices that interrupt the circuit when an overcurrent condition occurs. They can be manually reset after the fault is cleared.
Real-World Use: Basic Troubleshooting Tips
Here's how to use the fuse box diagram to troubleshoot common electrical problems:
- Identify the Problem: Determine which component is not working (e.g., headlights, power windows, radio).
- Consult the Diagram: Locate the fuse or relay that corresponds to the affected component in the fuse box diagram.
- Inspect the Fuse: Remove the fuse and visually inspect it. If the wire inside the fuse is broken, the fuse is blown. You can also use a multimeter to test continuity across the fuse. A good fuse will have continuity (near zero resistance), while a blown fuse will have no continuity (infinite resistance).
- Replace the Fuse: If the fuse is blown, replace it with a new fuse of the exact same amperage rating.
- Test the Component: After replacing the fuse, test the component to see if it is now working.
- If the Fuse Blows Again: If the new fuse blows immediately or shortly after replacement, there is likely a short circuit or overload in the circuit. Further diagnostics are required to identify and repair the underlying problem. Do not keep replacing fuses without addressing the root cause.
Safety: Highlighting Risky Components
Working with the electrical system can be dangerous. Here are some safety precautions:
- Disconnect the Battery: Always disconnect the negative battery terminal before working on the electrical system to prevent accidental shorts or shocks.
- Use Proper Tools: Use insulated tools designed for electrical work.
- Avoid Water: Never work on the electrical system in wet conditions.
- Identify High-Current Circuits: Be especially cautious when working with high-current circuits, such as those for the starter motor, alternator, and headlights. These circuits can deliver a significant electrical shock.
- Relays Can Be Hot: Some relays, especially those controlling high-current components, can get very hot during operation. Be careful when handling them.
- Never Bypass a Fuse: Never bypass a fuse with a wire or other conductive material. This removes the circuit protection and can cause serious damage or fire.
Always remember that if you're uncomfortable working on the electrical system, it's best to consult a qualified mechanic. Electrical problems can be complex, and improper repairs can be dangerous and costly.
For your convenience, we have a downloadable 2008 Nissan Titan Fuse Box Diagram file available. This resource will undoubtedly prove invaluable in your future automotive endeavors.