
2008 Saturn Vue Serpentine Belt Diagram
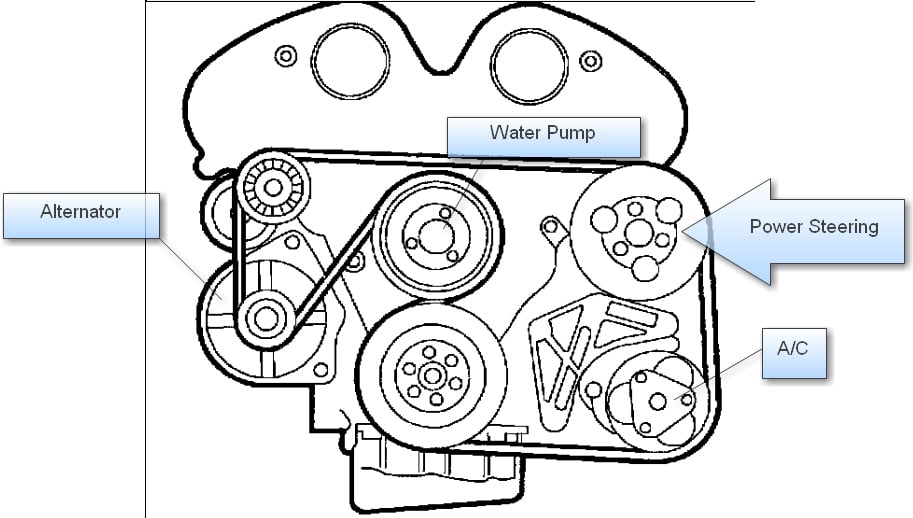
For the experienced DIY mechanic tackling maintenance or repairs on a 2008 Saturn Vue, understanding the serpentine belt system is crucial. This article provides a comprehensive guide to the 2008 Saturn Vue serpentine belt diagram, covering its purpose, components, functionality, troubleshooting, and safety considerations. We'll focus on clarity and practical application, assuming a baseline level of automotive knowledge.
Purpose of the Serpentine Belt Diagram
The serpentine belt diagram is your roadmap for understanding the belt's routing. It's not just a pretty picture; it's essential for several reasons:
- Proper Belt Installation: Ensures the belt is correctly routed around all pulleys, crucial for proper operation of accessories. A misrouted belt will cause issues, noise, and potentially component damage.
- Troubleshooting: Helps diagnose problems like squealing belts, accessory malfunctions (power steering, AC, etc.), and unusual noises. By visually verifying the belt's path and condition, you can narrow down potential causes.
- Preventive Maintenance: Allows you to quickly inspect the belt for wear and tear, cracks, or glazing. Early detection allows for timely replacement, preventing catastrophic failures.
- Component Identification: The diagram labels the various pulleys driven by the belt, allowing you to understand the function of each accessory.
- Correct Replacement: When replacing the belt, having the diagram prevents installation errors. Even experienced mechanics refer to diagrams to confirm the correct routing, especially after working on multiple vehicle types.
Key Specs and Main Parts
The 2008 Saturn Vue came with a few different engine options, which affect the serpentine belt routing. Here's a breakdown of the common components and considerations:
- Engines: The most common engine options include the 2.4L inline-4 (LE5) and the 3.5L V6 (LZ4). The 3.6L V6 (LY7) was also available, but less common. *Always* confirm your engine type before referencing a diagram. The belt routing is different for each.
- Serpentine Belt: This is the single, continuous belt that drives multiple engine accessories. Quality belts are made from reinforced rubber compounds designed to withstand heat and tension.
- Crankshaft Pulley (Harmonic Balancer): Located at the bottom of the engine, driven directly by the crankshaft. It's the starting point for the serpentine belt's rotation. This also dampens engine vibrations, protecting other components.
- Alternator Pulley: Drives the alternator, which charges the battery and powers the electrical system.
- Power Steering Pump Pulley: Powers the hydraulic power steering system, assisting in steering.
- Air Conditioning Compressor Pulley: Drives the AC compressor, responsible for cooling the vehicle's cabin.
- Tensioner Pulley: A spring-loaded pulley that maintains consistent tension on the serpentine belt. Proper tension is crucial for preventing slippage and belt wear. It often includes a mechanism for releasing tension during belt installation and removal.
- Idler Pulley(s): Smooth, non-driven pulleys that guide the belt around the engine. They help optimize belt routing and prevent interference with other components.
The belt length is critical. Using the wrong length can lead to improper tension, premature wear, and potential accessory damage. Always verify the correct part number for your specific engine and model year.
Symbols Explained
Serpentine belt diagrams use a standardized set of symbols to convey information:
- Solid Lines: Represent the path of the serpentine belt. The thicker the line, the more prominent the belt section may be considered.
- Arrows: Indicate the direction of belt rotation around each pulley. This is vital for understanding how the belt transfers power.
- Pulleys: Typically depicted as circles or ovals. Labels next to each pulley identify the component it drives (e.g., ALT for alternator, P/S for power steering).
- Tensioner: Usually represented by a spring symbol near the tensioner pulley, indicating its adjustable nature.
- Idler Pulley: Shown as a smooth pulley with no additional markings.
- Component Abbreviations: Common abbreviations include ALT (alternator), P/S (power steering), A/C (air conditioning), CRANK (crankshaft), and TENS (tensioner).
While colors aren't generally used on these diagrams, some enhanced versions might highlight specific belt sections or pulley types with different colors. However, relying solely on color is not recommended.
How It Works
The serpentine belt system is a relatively simple but crucial system. The engine's crankshaft rotates, driving the crankshaft pulley. The serpentine belt is wrapped around this pulley and several other accessory pulleys. As the crankshaft pulley turns, it transfers rotational force to the belt, which in turn drives the alternator, power steering pump, AC compressor, and other accessories.
The tensioner pulley is essential for maintaining the correct belt tension. It automatically adjusts to compensate for belt stretch and wear, ensuring consistent power delivery to the accessories. Without proper tension, the belt can slip, leading to reduced accessory performance and potential damage to the belt itself.
Real-World Use: Basic Troubleshooting
Here are some common issues and how the diagram can help:
- Squealing Belt: Often caused by a loose belt, worn belt, or misaligned pulley. Use the diagram to check belt routing and tension. Inspect the belt for glazing (a shiny, hard surface) or cracks.
- Accessory Malfunction: If the power steering is weak or the AC isn't cooling, check the belt routing to ensure it's properly engaging the respective pulleys. A slipping belt can prevent these accessories from operating at full capacity.
- Belt Slippage Noise: A loud, flapping noise can indicate a severely worn or damaged belt. Inspect the belt for missing chunks or fraying. Refer to the diagram to confirm proper routing.
- Tensioner Problems: If the tensioner is visibly bouncing or making noise, it may be failing. Replace the tensioner assembly as a whole, ensuring you use the diagram for reinstallation.
When diagnosing belt problems, remember to consider the age and condition of the belt, the tensioner, and the pulleys. Any signs of wear or damage should be addressed promptly to prevent more serious issues.
Safety Considerations
Working on the serpentine belt system involves potential hazards:
- Engine Heat: Always allow the engine to cool completely before working on the belt. Exhaust manifolds and other engine components can remain extremely hot for a significant time.
- Moving Parts: Never start the engine with your hands or tools near the serpentine belt or pulleys. Serious injury can result. Disconnect the negative battery terminal before working on the system to prevent accidental starting.
- Spring Tension: The tensioner pulley is spring-loaded and can snap back forcefully when released. Use the correct tool (usually a serpentine belt tool or wrench) to carefully relieve tension.
- Eye Protection: Wear safety glasses to protect your eyes from debris.
- Proper Tools: Use the correct tools for the job. Attempting to force components with incorrect tools can lead to damage and injury.
The area around the crankshaft pulley can be especially dangerous due to its proximity to the engine block and the potential for clothing or tools to get caught. Exercise extreme caution when working in this area.
Remember, if you're uncomfortable with any aspect of this repair, it's always best to consult a qualified mechanic.
We have the 2008 Saturn Vue Serpentine Belt Diagram files available for download. Please contact us and specify your engine type to receive the correct diagram for your vehicle.