2008 Toyota Avalon Serpentine Belt Diagram
The serpentine belt, also known as the accessory drive belt, is a crucial component in your 2008 Toyota Avalon's engine. It's responsible for powering various essential systems, including the alternator, power steering pump, air conditioning compressor, and (in some cases) the water pump. Understanding its layout, function, and how to diagnose issues is vital for maintaining your Avalon's reliability. This article provides a detailed look at the serpentine belt diagram for the 2008 Toyota Avalon, enabling informed DIY maintenance and troubleshooting.
Purpose of the Serpentine Belt Diagram
A serpentine belt diagram is more than just a pretty picture. It serves several critical purposes:
- Repair and Replacement: When replacing a worn or broken serpentine belt, the diagram is your roadmap. It shows the precise routing of the belt around the various pulleys, ensuring proper installation. Incorrect routing can lead to belt slippage, system failures, and even engine damage.
- Troubleshooting: If you're experiencing issues like squealing noises, loss of power steering, or overheating (if the water pump is belt-driven), the diagram helps you identify potential problem areas. You can visually inspect the belt and pulleys for wear, damage, or misalignment.
- Understanding System Interdependencies: The diagram illustrates how the different engine accessories are linked. This understanding is crucial for diagnosing related issues. For instance, a faulty alternator pulley can affect the entire system, causing belt wear and potential failure.
- Preventative Maintenance: Regularly referring to the diagram during routine inspections can help you spot potential problems early. Catching a worn belt or a misaligned pulley before it fails can save you significant time and money in the long run.
Key Specs and Main Parts
Understanding the key specifications and components of the serpentine belt system is essential for effective maintenance. While specific belt dimensions may vary slightly based on engine option, the core components remain consistent.
Components
- Serpentine Belt: The heart of the system, typically made of reinforced rubber. It's designed to be flexible and durable, but it will eventually wear out and need replacement.
- Crankshaft Pulley (Damper Pulley): Connected to the crankshaft, this pulley drives the entire serpentine belt system. It also functions as a torsional damper, reducing vibrations from the engine.
- Alternator Pulley: Powers the alternator, which charges the battery and provides electricity to the vehicle's electrical systems.
- Power Steering Pump Pulley: Drives the power steering pump, which provides hydraulic assistance for steering.
- Air Conditioning Compressor Pulley: Powers the air conditioning compressor, which is responsible for cooling the cabin air.
- Water Pump Pulley (Potentially): In some configurations, the water pump is driven by the serpentine belt. This circulates coolant through the engine to prevent overheating. Refer to your specific diagram to confirm if the water pump is on the belt loop.
- Tensioner Pulley: A spring-loaded pulley that maintains constant tension on the serpentine belt. It is crucial for preventing belt slippage and ensuring proper operation of all accessories. There are often *two* tensioners, an *automatic* and a *manual* one.
- Idler Pulley(s): Smooth, non-driven pulleys used to guide the belt around the engine and ensure proper wrap angle on the driven pulleys.
Key Specs
- Belt Length: The most critical specification. Using the wrong length belt will result in either too much or too little tension, leading to premature wear or system failure. This information is typically found in your owner's manual or on a sticker in the engine compartment.
- Belt Width: The width of the belt must match the grooves on the pulleys.
- Number of Ribs: Serpentine belts have multiple ribs that fit into the grooves on the pulleys. The number of ribs must match the pulley design.
- Tensioner Range: The tensioner pulley has a specific range of motion. It should be within this range after the belt is installed to ensure proper tension. This can be checked by observing the indicator marks on the tensioner.
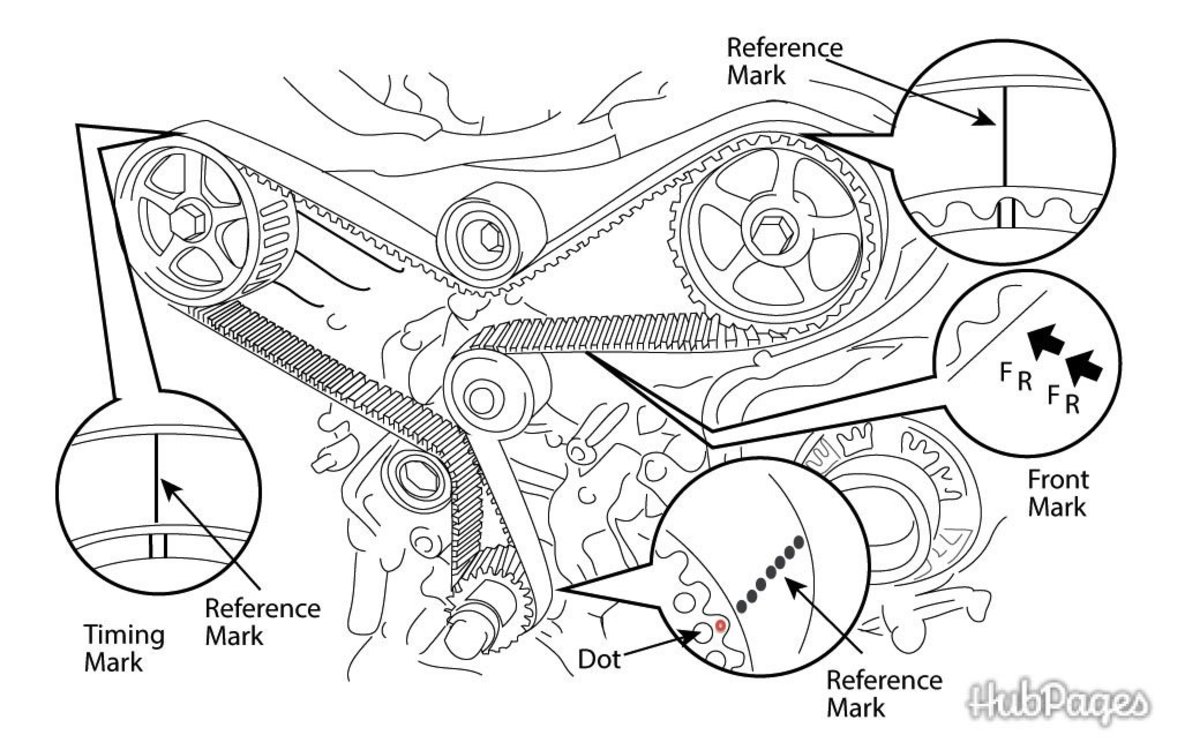
Symbols and Diagram Interpretation
Understanding the symbols and conventions used in the serpentine belt diagram is crucial for accurate interpretation.
- Solid Lines: Represent the belt itself. The path of the solid line shows the belt's routing around the pulleys.
- Pulleys: Depicted as circles. Smaller circles are usually the idler pulleys. Larger ones the driven pulleys.
- Arrows: Indicate the direction of rotation for each pulley. This is crucial for understanding how the belt drives each accessory.
- Tensioner Symbol: The tensioner pulley is often represented with a spring symbol, indicating its spring-loaded mechanism. Sometimes a small arrow will indicate the direction to move the tensioner to release the belt.
- Component Labels: Each pulley is typically labeled with an abbreviation or full name indicating the accessory it drives (e.g., ALT for alternator, P/S for power steering).
- Routing Details: The diagram will clearly show which side of the belt (ribbed or smooth) contacts each pulley. It will also illustrate how the belt wraps around each pulley to maximize grip.
How It Works
The serpentine belt system is relatively simple in principle. The crankshaft pulley, driven by the engine's rotation, acts as the primary driver. The serpentine belt wraps around this pulley and transfers the rotational force to the other pulleys connected to the various accessories.
The tensioner pulley plays a vital role in maintaining the correct belt tension. As the belt stretches over time or as temperatures fluctuate, the tensioner automatically adjusts to keep the belt taut and prevent slippage. Without proper tension, the accessories may not function correctly, leading to problems like a weak alternator output, noisy power steering, or ineffective air conditioning.
The idler pulleys guide the belt around the engine compartment, ensuring sufficient wrap angle on the driven pulleys. This wrap angle is essential for maximizing friction and preventing the belt from slipping.
Real-World Use and Troubleshooting
Here are some common troubleshooting scenarios and how the serpentine belt diagram can help:
- Squealing Noise: A squealing noise, especially when the engine is cold or under load, is a common symptom of a slipping serpentine belt. Check the belt tension. Is the tensioner within range? Also, inspect the belt for cracks, glazing, or fraying. The diagram can help you identify which pulleys are most likely to be contributing to the noise based on their position in the belt's path.
- Loss of Power Steering: If you experience a sudden loss of power steering, the serpentine belt may have broken or slipped off the power steering pump pulley. Use the diagram to check the belt routing and ensure it's properly engaged with the power steering pump pulley. Also, check the power steering pump pulley for signs of damage or misalignment.
- Overheating: If your 2008 Avalon's water pump is driven by the serpentine belt (consult your specific diagram), a broken or slipping belt can cause the engine to overheat rapidly. Immediately stop the vehicle and check the belt.
- Battery Not Charging: A faulty alternator or a slipping belt on the alternator pulley can prevent the battery from charging. Check the belt tension and inspect the alternator pulley for damage. Use a voltmeter to test the alternator's output to confirm if it's functioning correctly.
- Visual Inspection: Regularly inspect the serpentine belt for cracks, fraying, glazing, or missing chunks. Any of these conditions warrant immediate replacement. Also, check the pulleys for signs of damage or misalignment. Spin each pulley by hand (with the engine off!) to check for smooth rotation. Roughness or excessive play indicates a potential bearing issue.
Safety Precautions
Working on the serpentine belt system involves some inherent risks. It's crucial to take the following safety precautions:
- Disconnect the Negative Battery Terminal: Before working on any electrical components, disconnect the negative battery terminal to prevent accidental shocks or short circuits.
- Ensure the Engine is Cool: Never work on the serpentine belt system while the engine is hot. Allow the engine to cool down completely before starting any repairs.
- Keep Hands and Clothing Clear: The serpentine belt and pulleys are rotating components. Keep your hands, clothing, and tools clear of the belt while the engine is running.
- Wear Safety Glasses: Flying debris can cause serious eye injury. Always wear safety glasses when working on the serpentine belt system.
- Be Aware of Spring Tension: The tensioner pulley is spring-loaded and can snap back with considerable force. Use the correct tools and techniques to release the tension safely.
- Properly Support the Vehicle: If you need to access the serpentine belt system from underneath the vehicle, always use jack stands to support the vehicle securely. Never rely solely on a jack.
By understanding the serpentine belt diagram, you can confidently tackle routine maintenance and troubleshooting on your 2008 Toyota Avalon. Remember to always prioritize safety and consult your owner's manual or a qualified mechanic if you're unsure about any aspect of the repair process.
We have a high-resolution PDF file of the 2008 Toyota Avalon Serpentine Belt Diagram available for download. This diagram provides a clear and detailed visual aid for your maintenance and repair tasks. Contact us to download the file.