2008 Toyota Corolla Serpentine Belt Diagram
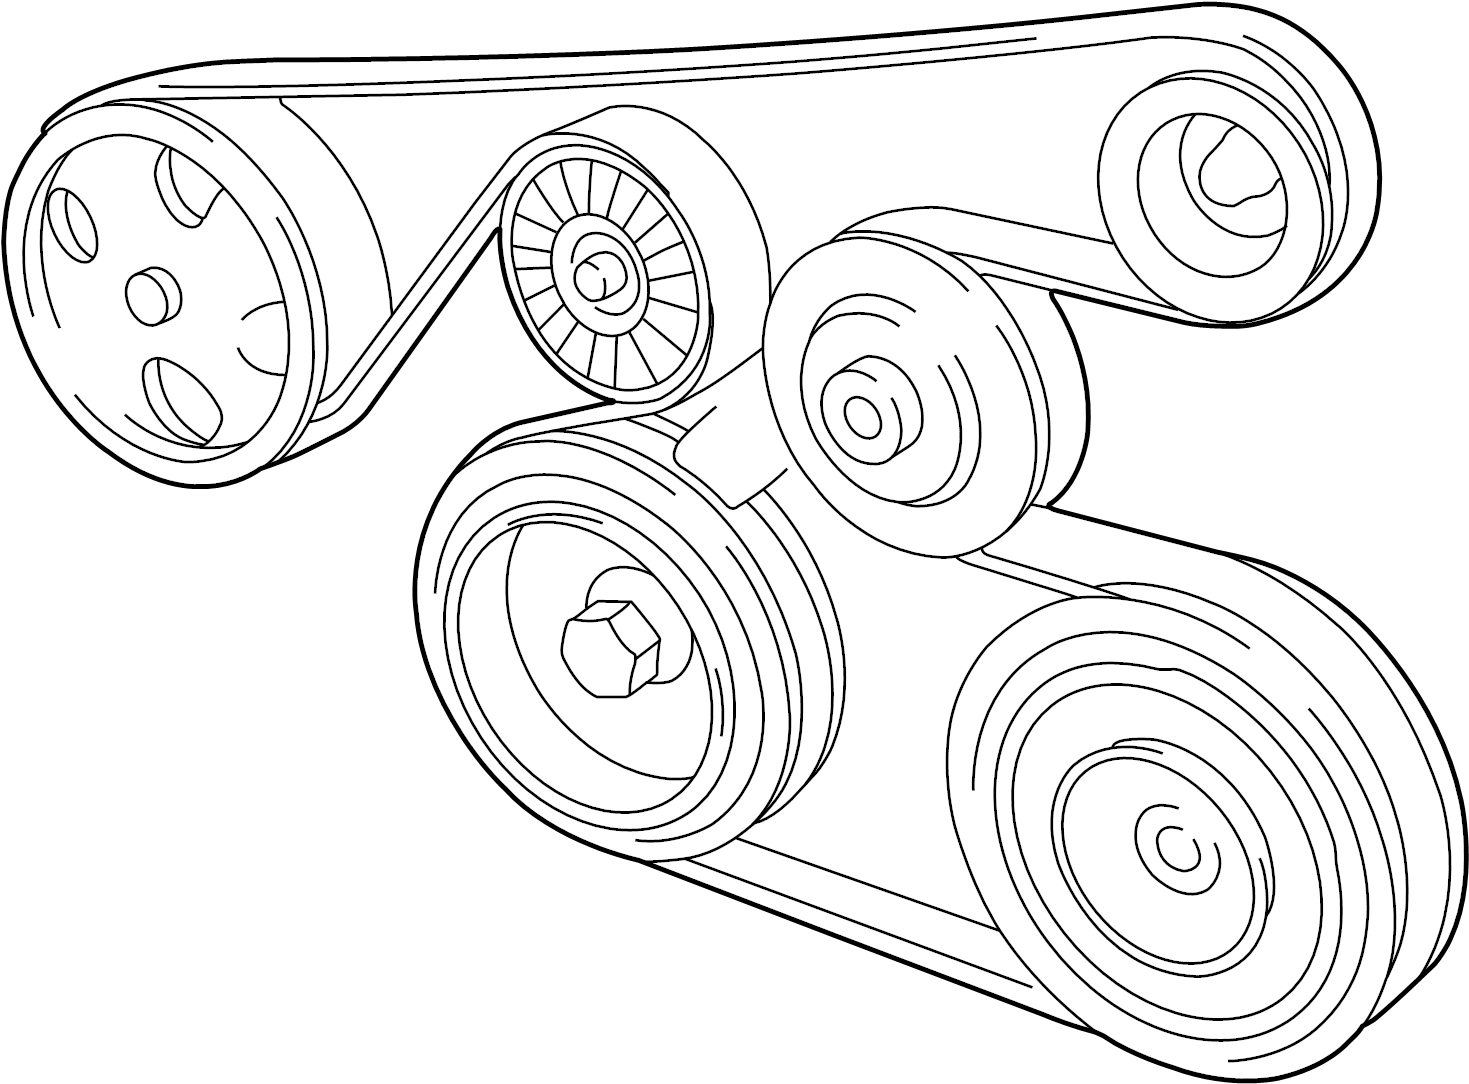
For the experienced DIYer tackling maintenance on a 2008 Toyota Corolla, understanding the serpentine belt system is crucial. The serpentine belt diagram isn't just a picture; it's your roadmap to proper belt routing, tensioner location, and potential problem areas. Whether you're replacing a worn belt, diagnosing a squealing noise, or simply gaining a deeper understanding of your engine's accessories, having a clear grasp of this system is invaluable. This article will walk you through the intricacies of the 2008 Corolla's serpentine belt system, providing the knowledge and tools to confidently handle this common maintenance task. And remember, we have the downloadable diagram file available to you.
Purpose and Importance
The serpentine belt diagram serves several critical purposes:
- Replacement Guide: When replacing a worn or broken serpentine belt, the diagram ensures you route the new belt correctly around all pulleys. Incorrect routing can lead to accessory malfunctions and, in some cases, engine damage.
- Troubleshooting Aid: The diagram helps you identify the components in the system, making it easier to diagnose issues such as squealing belts, power steering failures, or alternator problems.
- Preventative Maintenance: Familiarity with the diagram allows for easier inspection of the belt, pulleys, and tensioner for signs of wear and tear, enabling proactive maintenance.
- Educational Tool: Understanding the system provides a deeper insight into how your engine accessories function and how they are driven.
Key Specs and Main Parts
The 2008 Toyota Corolla's serpentine belt system consists of the following main components. The specific dimensions of the belt (length and width) are typically printed on the belt itself (e.g., a code like "7PK1780," where "7PK" indicates the number of ribs and "1780" roughly translates to the length in millimeters). Refer to your vehicle's owner's manual or a parts catalog for the exact belt specification for your Corolla's engine (usually a 1.8L 1ZZ-FE engine). It's crucial to use the correct belt size.
- Crankshaft Pulley (or Harmonic Balancer): This pulley is directly connected to the engine's crankshaft and drives the serpentine belt.
- Alternator Pulley: The alternator converts mechanical energy into electrical energy to charge the battery and power the vehicle's electrical system.
- Water Pump Pulley: The water pump circulates coolant throughout the engine to regulate temperature.
- Power Steering Pump Pulley: The power steering pump provides hydraulic assistance for easier steering.
- Air Conditioning Compressor Pulley: The AC compressor circulates refrigerant to cool the vehicle's cabin.
- Tensioner Pulley: This spring-loaded pulley maintains the correct tension on the serpentine belt. It is *crucial* for proper belt function and preventing slippage.
- Idler Pulley (possibly): Some models may have an idler pulley, which is a smooth pulley that helps guide the belt and prevent it from contacting other components.
- Serpentine Belt: The belt itself, typically made of reinforced rubber, transmits power from the crankshaft to the various accessory pulleys.
Diagram Symbols Explained
Understanding the symbols in the serpentine belt diagram is essential for proper interpretation:
- Solid Lines: These represent the path of the serpentine belt. Follow these lines carefully to ensure correct routing.
- Arrows: Arrows indicate the direction of belt rotation around each pulley.
- Pulley Symbols: Different pulley symbols may be used to differentiate between driven pulleys (alternator, water pump, power steering pump, AC compressor) and idler/tensioner pulleys. Look for specific markings or labels on the diagram.
- Tensioner Symbol: The tensioner is usually depicted with an arrow indicating the direction of tension release (typically by rotating the tensioner arm).
- Labels: Each pulley and component is labeled with its name (e.g., "ALT" for alternator, "WP" for water pump, "PS" for power steering, "AC" for air conditioning).
How It Works
The serpentine belt system is a simple yet ingenious design. The engine's crankshaft drives the crankshaft pulley, which, in turn, drives the serpentine belt. The belt then wraps around the various accessory pulleys, transferring power to the alternator, water pump, power steering pump, and AC compressor. The tensioner pulley maintains constant tension on the belt, ensuring that it doesn't slip. Proper tension is *critical* for optimal performance. If the belt is too loose, it will slip, causing the accessories to malfunction. If the belt is too tight, it can damage the bearings in the accessories and potentially cause the belt to break.
The tensioner's spring mechanism compensates for belt stretch and wear over time. As the belt stretches, the tensioner arm automatically adjusts to maintain the correct tension. This self-adjusting feature is what makes the serpentine belt system so reliable.
Real-World Use and Basic Troubleshooting Tips
Here are some common issues and troubleshooting tips related to the serpentine belt system:
- Squealing Belt: This is often caused by a loose belt, a worn belt, or a misaligned pulley. Check the belt tension and condition. If the belt is cracked, glazed, or shows signs of wear, replace it. Use a serpentine belt tool or a socket and breaker bar to release tension on the tensioner. After replacement, ensure the belt is properly seated in all pulley grooves. A specialized serpentine belt tension gauge can be used to verify proper tension.
- Accessory Malfunctions: If you notice that your alternator isn't charging properly, your power steering is stiff, or your AC isn't cooling, check the serpentine belt. A broken or slipping belt can cause these accessories to fail.
- Belt Slippage: Belt slippage can be diagnosed by spraying a small amount of water on the belt while the engine is running. If the squealing stops temporarily, it indicates belt slippage due to lack of tension or a worn belt.
- Visual Inspection: Regularly inspect the serpentine belt for cracks, fraying, glazing, or missing chunks. Look for signs of wear on the pulleys as well. A worn or damaged pulley can cause premature belt wear.
- Tensioner Check: Examine the tensioner for smooth operation. The tensioner arm should move freely and smoothly throughout its range of motion. If the tensioner is seized or sticky, it needs to be replaced.
Safety Considerations
Working on the serpentine belt system can be dangerous if proper safety precautions are not taken:
- Disconnect the Battery: Always disconnect the negative battery terminal before working on any electrical components.
- Hot Engine: Never work on the serpentine belt system while the engine is hot. Allow the engine to cool completely before starting any work.
- Moving Parts: Keep your hands, clothing, and tools clear of the serpentine belt and pulleys while the engine is running. The rotating components can cause serious injury.
- Tensioner Spring: Be extremely careful when releasing the tension on the tensioner. The spring can be very strong, and if released suddenly, it can cause injury. Use the correct tool and technique. A long breaker bar can provide adequate leverage and control.
- Fan Blades: The cooling fan is a significant hazard. Even if the engine is off, the fan can spin if bumped. Ensure that the ignition is off and the key is removed before working near the fan.
Understanding the 2008 Toyota Corolla serpentine belt diagram is a valuable skill for any DIYer. By following the steps outlined in this article and taking the necessary safety precautions, you can confidently handle serpentine belt maintenance and repairs. We have the serpentine belt diagram file ready for you to download. This resource, combined with the knowledge shared here, will empower you to keep your Corolla running smoothly for years to come. Remember to always consult your vehicle's repair manual for specific torque specifications and procedures.