2008 Toyota Highlander Serpentine Belt Diagram
Alright, let's dive into the serpentine belt diagram for your 2008 Toyota Highlander. Knowing how this system is laid out is crucial whether you're tackling routine maintenance, troubleshooting a squealing noise, or just expanding your automotive know-how. We'll break down everything you need to understand, from the diagram's symbols to real-world troubleshooting.
Purpose of the Serpentine Belt Diagram
The serpentine belt diagram is essentially a roadmap for your Highlander's accessory drive system. It visually represents the path the serpentine belt takes, connecting the engine's crankshaft to various components. Why is this important? Think of it as your go-to reference for:
- Belt Replacement: The most common use. Knowing the routing ensures you install the new belt correctly. A misrouted belt will almost certainly lead to accessory failure or belt breakage.
- Troubleshooting: Identifying which component is causing a noise or problem related to the belt system (e.g., a seized pulley).
- Part Identification: Confirming the location of pulleys, tensioners, and other components.
- General Understanding: Gaining a better understanding of how your engine's accessories function.
Key Specs and Main Parts of the 2008 Highlander Serpentine Belt System
The 2008 Highlander came with a few engine options, and the serpentine belt routing can vary slightly depending on the engine. We'll focus on the most common: the 3.5L 2GR-FE V6. This is the engine you are most likely to encounter if you have this vehicle.
Here's a breakdown of the key components typically driven by the serpentine belt:
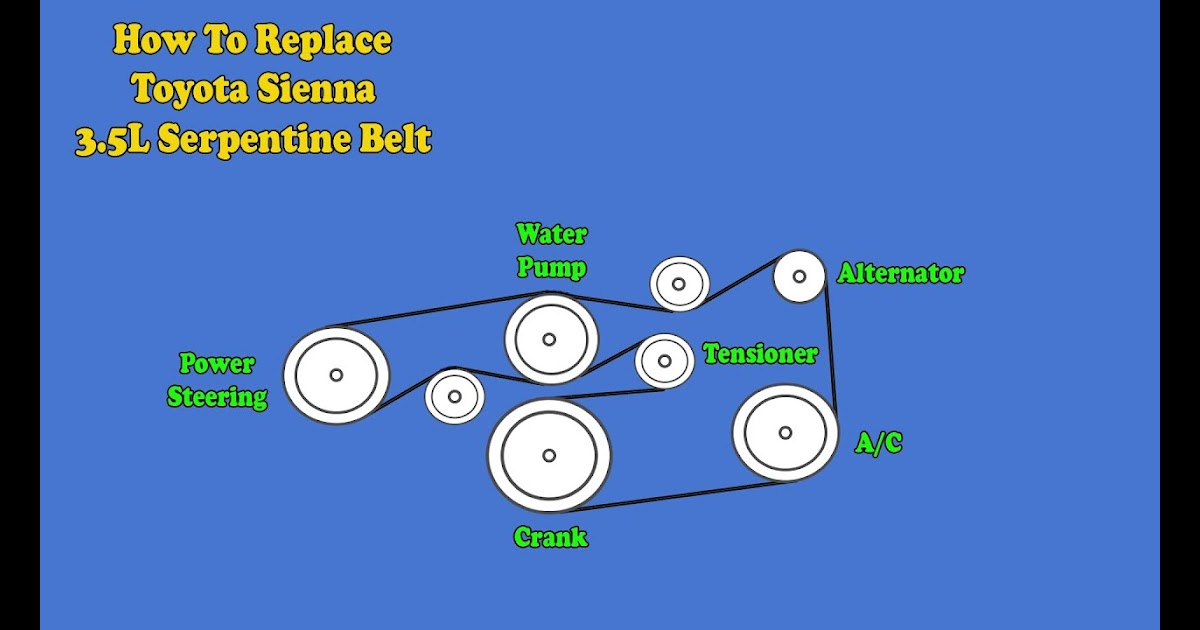
- Crankshaft Pulley (Crank Pulley): This is the driving force. Connected directly to the crankshaft, it transmits the engine's rotational power to the belt.
- Alternator: Charges the battery and powers the electrical system.
- Power Steering Pump: Provides hydraulic assistance for steering, making it easier to turn the wheel.
- Air Conditioning Compressor (A/C Compressor): Compresses refrigerant to cool the cabin air.
- Water Pump: Circulates coolant throughout the engine to regulate temperature. The 2GR-FE water pump is usually driven by the timing chain, NOT the serpentine belt. However, on some earlier or modified models, or if a previous repair has been done incorrectly, it could be included.
- Idler Pulleys: These are smooth, bearing-mounted pulleys that guide the belt's path and maintain proper tension.
- Tensioner Pulley (Belt Tensioner): This spring-loaded pulley maintains constant tension on the belt, preventing slippage and ensuring optimal accessory operation. It's a crucial component and often the culprit when belts start squealing due to a weakening spring.
Important Specs:
- Belt Length: This varies slightly depending on the presence of A/C and other options, but a typical belt length for the 3.5L engine is around 90-92 inches. Always consult the diagram and your vehicle's specifications before purchasing a replacement belt.
- Belt Type: Serpentine belts are typically made of EPDM (Ethylene Propylene Diene Monomer) rubber, offering good resistance to heat, cracking, and wear.
Understanding the Serpentine Belt Diagram: Symbols and Conventions
Diagrams use a standardized set of symbols to represent components and belt routing. Here's what to look for:
- Solid Lines: Indicate the path of the serpentine belt. The thickness of the line usually isn't significant, but it consistently represents the belt.
- Circles/Ovals: Represent pulleys. These are usually labeled with abbreviations indicating their function (e.g., ALT for Alternator, P/S for Power Steering, A/C for Air Conditioning).
- Arrows: Show the direction of rotation for each pulley. This is important for understanding how the belt transfers power.
- "Ribbed" Surface Representation: Some diagrams might show a series of short lines or shading on the pulley to indicate that the ribbed side of the belt contacts the pulley. The smooth side of the belt will always contact idler pulleys.
- Tensioner Symbol: Usually represented by a pulley symbol with an attached arrow or spring icon indicating the tensioner's arm movement.
While color-coding is rare on basic serpentine belt diagrams, some enhanced versions might use different colors to highlight specific belt sections or pulley types. Always refer to the diagram's legend for clarification if colors are used.
How the Serpentine Belt System Works
The engine's crankshaft spins the crankshaft pulley. The serpentine belt, wrapped around this pulley, transmits this rotational force to all the other pulleys connected to the accessories. The tensioner pulley maintains the necessary tension to prevent the belt from slipping, ensuring efficient power transfer. When an accessory needs power (e.g., the A/C compressor is engaged), the pulley driven by the belt begins to rotate, driving the accessory's internal components.
The belt's routing is crucial. It must be properly positioned around each pulley to ensure the correct direction of rotation and prevent interference. This is why the diagram is so vital during belt replacement.
Real-World Use: Basic Troubleshooting Tips
Here's how the serpentine belt diagram can help with common problems:
- Squealing Noise: A common symptom of a loose or worn serpentine belt. The diagram helps you inspect the tensioner pulley. If the tensioner arm is bouncing excessively, the tensioner might be failing or the belt might be stretched. Also, check the belt's condition for cracks, glazing, or missing ribs. Use the diagram to locate and inspect each pulley, one by one. If you suspect a seized pulley, turn off the engine and manually rotate the pulleys to check for free movement.
- Accessory Failure: If, for example, your power steering suddenly stops working, the diagram helps you verify that the belt is properly routed around the power steering pump pulley. If the belt is intact, the issue is likely with the pump itself.
- Belt Slippage: Can lead to overheating (if the water pump isn't turning properly) or a discharged battery (if the alternator isn't charging). The diagram helps you inspect the entire belt path for obstructions or misalignment.
- Unusual Wear Pattern: If a new belt wears out prematurely, the diagram helps you check the alignment of all the pulleys. Misaligned pulleys can cause excessive wear on one side of the belt.
Safety Precautions
Working on the serpentine belt system can be dangerous if you're not careful. Here are some key safety considerations:
- Disconnect the Negative Battery Terminal: This prevents accidental starting of the engine while you're working on the belt.
- Allow the Engine to Cool Down: Avoid touching the engine components immediately after it has been running. The exhaust manifold and other parts can be extremely hot.
- Keep Hands and Fingers Clear: Be extremely cautious when working near the belt and pulleys while the engine is running (during diagnostic tests). Never insert your hands or tools into the belt path while the engine is on.
- Beware of the Belt Tensioner: The tensioner pulley is spring-loaded and can snap back forcefully when released. Use the correct tools and techniques to relieve the tension.
- Eye Protection: Wear safety glasses to protect your eyes from debris.
- Loose Clothing: Keep clothing snug to the body or tucked into the waist, and avoid loose jewelry that could get caught in the belt or pulleys.
Specific Risky Components:
- Crankshaft Pulley: Close proximity to the engine block and spinning engine components.
- Belt Tensioner: The spring-loaded mechanism can cause injury if not handled carefully.
Remember, always consult your vehicle's repair manual for specific instructions and safety precautions. If you're not comfortable performing the work yourself, it's always best to take your Highlander to a qualified mechanic.
To help you with your project, we have the serpentine belt diagram for the 2008 Toyota Highlander 3.5L 2GR-FE V6 engine available for download. It's a PDF file that you can access by clicking [Insert Download Link Here - Placeholder]. Good luck with your repairs!