
2009 Acura Mdx Serpentine Belt Diagram
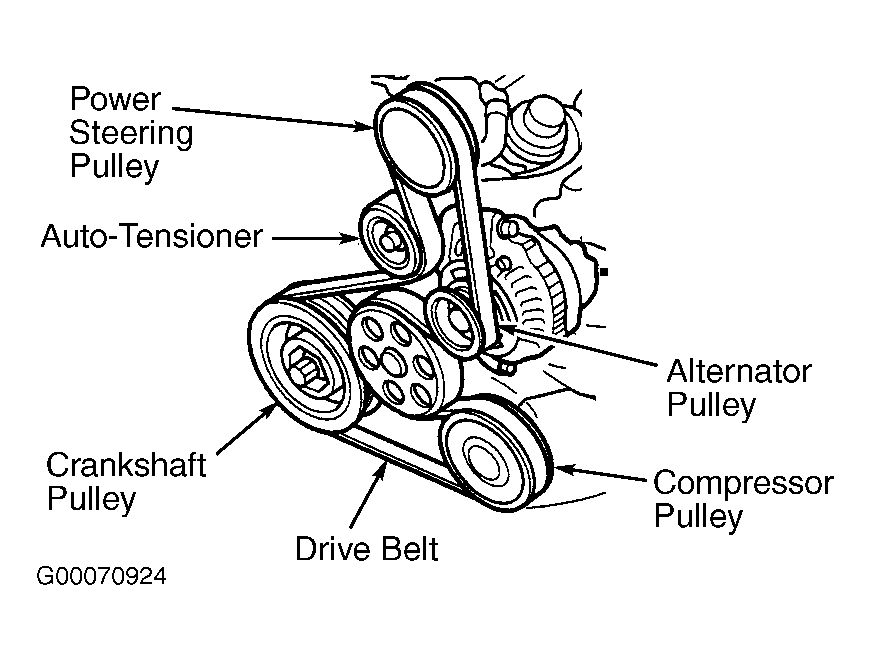
The serpentine belt in your 2009 Acura MDX is a critical component responsible for driving several essential engine accessories. Understanding its routing and function, depicted in a serpentine belt diagram, is crucial for performing maintenance, troubleshooting issues, and even for general engine familiarization. This article provides a detailed explanation of the 2009 Acura MDX serpentine belt diagram, assuming you have a solid foundation in automotive basics.
Purpose of the Serpentine Belt Diagram
The serpentine belt diagram serves several vital purposes:
- Belt Replacement: The most common use is to ensure correct belt routing when replacing a worn or damaged belt. Incorrect routing can lead to accessory malfunction and potential engine damage.
- Troubleshooting: The diagram aids in diagnosing belt-related issues, such as squealing, slipping, or accessory failure. Knowing the belt's path allows you to quickly identify which components are affected.
- Accessory Identification: The diagram identifies the location and function of each accessory driven by the belt, enabling you to troubleshoot specific system problems.
- Engine Familiarization: Studying the diagram provides a better understanding of the engine's layout and the relationship between various components.
- Preventive Maintenance: Regularly inspecting the belt and its routing, using the diagram as a reference, can help prevent unexpected breakdowns.
Key Specs and Main Parts in the 2009 Acura MDX
Before diving into the diagram itself, let's familiarize ourselves with the key components involved:
- Crankshaft Pulley (Crank Pulley): This pulley, driven directly by the engine's crankshaft, is the primary power source for the serpentine belt.
- Alternator: The alternator charges the vehicle's battery and powers the electrical system. It's driven by the serpentine belt.
- Power Steering Pump: Provides hydraulic pressure to assist steering. Also driven by the belt.
- Air Conditioning Compressor: Compresses refrigerant to provide cooling. Another essential component powered by the serpentine belt.
- Water Pump: Circulates coolant through the engine to regulate temperature. Its failure can lead to overheating and severe engine damage. The water pump on the 2009 MDX is driven by the timing belt, not the serpentine belt, but it is still a vital part of the overall engine system.
- Tensioner Pulley (Automatic Tensioner): This spring-loaded pulley maintains proper belt tension. It automatically adjusts to compensate for belt stretch and temperature changes. A failing tensioner is a common cause of belt noise and reduced accessory performance.
- Idler Pulley: A smooth pulley that guides the belt and provides optimal wrap around other pulleys. Some diagrams might not clearly differentiate this.
- Serpentine Belt: The continuous belt itself, typically made of reinforced rubber. Specific belt size for the 2009 Acura MDX is a critical spec; refer to your owner's manual or a parts catalog for the correct part number.
The exact serpentine belt length may vary slightly depending on the specific year and sub-model, so verifying your vehicle's specifications is essential. Always double-check the part number before purchasing a replacement belt.
Symbols in the Serpentine Belt Diagram
A typical serpentine belt diagram uses standardized symbols to represent different components and belt routing. Here's a breakdown:
- Solid Lines: Represent the primary path of the serpentine belt.
- Dashed Lines: May indicate the belt path behind other components, showing how the belt wraps around various pulleys.
- Arrows: Indicate the direction of belt rotation. Pay close attention to these, as they define the driving and driven sides of each pulley.
- Component Labels: Abbreviations like "ALT" (alternator), "P/S" (power steering), "A/C" (air conditioning), and "CRANK" (crankshaft) are used to identify each component.
- Pulleys: Illustrated as circles, sometimes with shading to indicate depth or direction of rotation. The presence of grooves indicates the driving surface for the belt.
- Tensioner: Usually depicted with a symbol indicating its spring-loaded nature. This may be a spring icon or a specific label like "TENSIONER."
While the diagram itself usually doesn't employ color, some repair manuals or online resources might use color-coding for added clarity. Red could highlight the critical components, blue to indicate the accessories, etc.
How the Serpentine Belt System Works
The serpentine belt system is a closed-loop system. The crankshaft pulley, driven by the engine, provides the rotational force that drives the entire system. The serpentine belt wraps around the crankshaft pulley and then travels around each of the accessory pulleys (alternator, power steering pump, AC compressor). The tensioner pulley maintains the proper tension on the belt, ensuring that it grips the pulleys firmly and prevents slippage. As the crankshaft rotates, it drives the belt, which in turn drives the accessories. The belt follows a specific, predetermined path, as illustrated in the serpentine belt diagram.
The automatic tensioner pulley plays a key role. As the belt wears and stretches, the spring mechanism within the tensioner extends, taking up the slack and maintaining optimal tension. A failing tensioner will typically cause the belt to squeal, particularly under load, and can lead to reduced accessory performance.
Real-World Use: Basic Troubleshooting Tips
Here are a few common issues and how the serpentine belt diagram can help:
- Squealing Belt: A squealing belt is often caused by slippage. Using the diagram, inspect the belt for cracks, glazing, or excessive wear. Also, check the tensioner to ensure it's functioning correctly. Is the squeal loudest when the AC is on? Then the problem might be related to the AC compressor pulley or the belt path relative to it.
- Accessory Failure: If an accessory (e.g., alternator) stops working, use the diagram to verify the belt is properly routed around its pulley. A broken or slipped belt will prevent the accessory from functioning.
- Belt Jumping Off: This usually indicates a misaligned pulley, a damaged belt, or a faulty tensioner. Use the diagram to visually inspect the alignment of all pulleys. A pulley that's wobbling or damaged can cause the belt to jump off.
- Visual Inspection: Regularly inspect the belt for signs of wear and tear. Cracks, fraying, and missing chunks are all indicators that the belt needs to be replaced. Compare the current belt routing to the diagram to ensure it's correct.
When troubleshooting, remember that a visual inspection is your first step. Use the diagram as a guide to ensure you're checking all the relevant components and the correct belt path. A belt dressing spray may temporarily quiet a squealing belt but it is not a substitute for proper repair or replacement. Such sprays can also attract dirt and grime, accelerating belt wear. When replacing the belt, always use a high-quality replacement that meets or exceeds the original manufacturer's specifications.
Safety Considerations
Working on the serpentine belt system involves potential hazards. Here's what to keep in mind:
- Engine Off: Always turn off the engine and remove the key from the ignition before working on the serpentine belt.
- Hot Components: Be careful of hot engine components, especially the exhaust manifold and radiator. Let the engine cool down completely before starting work.
- Rotating Parts: Keep your hands, hair, and clothing away from rotating parts when the engine is running. Even a momentarily engaged starter can cause serious injury.
- Battery Disconnect: Consider disconnecting the negative battery terminal to prevent accidental starting or short circuits.
- Proper Tools: Use the correct tools for the job. A serpentine belt tool can make belt removal and installation much easier and safer.
The tensioner pulley is under spring tension. When releasing the tension to remove the belt, be prepared for the sudden movement of the tensioner arm. Always wear safety glasses to protect your eyes.
Having a reliable serpentine belt diagram is essential for proper maintenance and repair of your 2009 Acura MDX. With this information and the right diagram at your disposal, you will be better equipped to handle common belt-related issues.
We have the high resolution serpentine belt diagram file available for download. You can access it at [insert link or instructions on how to get the file here].