2009 Chevy Malibu 2.4 Serpentine Belt Diagram
For the experienced DIYer tackling maintenance or repairs on a 2009 Chevy Malibu with the 2.4L Ecotec engine, understanding the serpentine belt system is crucial. This article provides a detailed breakdown of the serpentine belt diagram for this specific model, equipping you with the knowledge to correctly route, tension, and troubleshoot issues related to this vital component. Whether you're replacing a worn belt, investigating a squealing noise, or simply expanding your automotive knowledge, this guide will prove invaluable.
Purpose of the Serpentine Belt Diagram
The serpentine belt diagram is your roadmap for proper belt routing. Its primary purpose is to illustrate the correct path the serpentine belt takes around the various engine accessories. This is essential for several reasons:
- Correct Accessory Function: The belt powers vital components like the alternator (charging the battery), the power steering pump (assisting steering), the air conditioning compressor (providing cool air), and the water pump (circulating coolant to prevent overheating). Incorrect routing can prevent one or more of these components from functioning, leading to serious problems.
- Preventing Damage: Improperly routed belts can rub against other engine components, causing premature wear and potential damage to both the belt and the engine itself. Misalignment can also put undue stress on accessory bearings, leading to premature failure.
- Simplified Maintenance: A clear diagram simplifies the belt replacement process. Instead of relying on memory or trial and error (which can be disastrous), you have a visual guide to ensure correct installation.
- Troubleshooting: The diagram helps in diagnosing issues. If an accessory isn't working, comparing the belt routing to the diagram can reveal if the belt is slipping, misrouted, or broken.
Key Specs and Main Parts of the Serpentine Belt System
Understanding the individual components of the serpentine belt system is just as important as understanding the diagram itself. Here's a breakdown of the key elements:
- Serpentine Belt: The main component, a continuous belt made of reinforced rubber that transmits power from the crankshaft pulley to the various engine accessories. The 2009 Malibu 2.4L typically uses a multi-ribbed belt (often referred to as a "poly-v" belt) with a specific length and rib count. While specific dimensions can vary slightly based on production date, a quality replacement belt will be designed to fit.
- Crankshaft Pulley (or Damper): Located at the bottom of the engine, this pulley is directly connected to the crankshaft and provides the driving force for the serpentine belt.
- Alternator Pulley: Driven by the serpentine belt, the alternator converts mechanical energy into electrical energy to charge the battery and power the vehicle's electrical system.
- Power Steering Pump Pulley: Driven by the serpentine belt, the power steering pump provides hydraulic pressure to assist in steering.
- Air Conditioning Compressor Pulley: Driven by the serpentine belt, the A/C compressor circulates refrigerant to cool the vehicle's interior.
- Water Pump Pulley: Driven by the serpentine belt, the water pump circulates coolant through the engine to prevent overheating.
- Tensioner Pulley: A spring-loaded pulley that maintains the correct tension on the serpentine belt. This is *critical* for proper accessory function and belt longevity. A worn or failing tensioner can cause belt slippage, noise, and premature wear.
- Idler Pulley(s): Smooth, unpowered pulleys used to guide the serpentine belt around the engine and prevent it from rubbing against other components. Some Malibu 2.4L engines may have one or more idler pulleys.
Symbols and Diagram Interpretation
Serpentine belt diagrams use a standardized set of symbols and conventions to represent the various components and belt routing. Here's what you need to know:
- Solid Lines: Typically represent the serpentine belt itself. The thickness of the line usually doesn't have specific meaning, but indicates the belt's path.
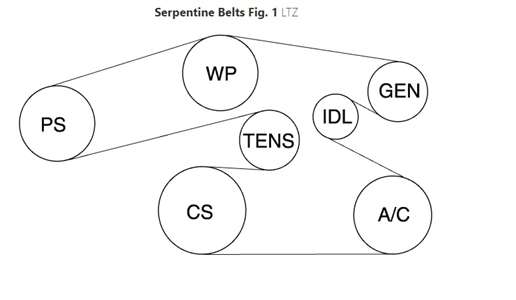
- Pulleys: Represented as circles. The diagram *may* label each pulley with an abbreviation indicating its function (e.g., ALT for alternator, P/S for power steering, A/C for air conditioning, W/P for water pump, CRK for crankshaft, TEN for tensioner, IDL for idler).
- Arrows: Indicate the direction of rotation of each pulley. This is important for understanding how the belt transfers power.
- Tensioner Markings: The tensioner often has markings indicating the acceptable tension range. The diagram *may* show where to check these markings. Correct tension is essential.
- Ribbed vs. Smooth Surfaces: The diagram *may* indicate whether the belt is contacting a ribbed (grooved) surface or a smooth surface. This is crucial for correct routing because the ribbed side of the belt engages with the grooves on most pulleys (except for idler pulleys, which are usually smooth).
How It Works: The Serpentine Belt System in Action
The serpentine belt system is relatively simple in its operation. The crankshaft, driven by the engine's combustion, rotates the crankshaft pulley. The serpentine belt, wrapped around the crankshaft pulley and the various accessory pulleys, transfers this rotational force to the accessories. The tensioner pulley maintains the correct amount of tension on the belt, preventing slippage and ensuring efficient power transfer. As the engine speed increases, the crankshaft pulley rotates faster, driving the accessories at a correspondingly faster rate. When the belt is properly routed and tensioned, each accessory receives the power it needs to function correctly.
Real-World Use: Basic Troubleshooting Tips
The serpentine belt diagram is a valuable tool for diagnosing and troubleshooting problems. Here are some common issues and how the diagram can help:
- Squealing Noise: A common symptom of a slipping serpentine belt. Use the diagram to visually inspect the belt for cracks, wear, or glazing. Check the tensioner to ensure it's applying adequate pressure. Misalignment can also cause squealing; compare the belt's path to the diagram to identify potential issues.
- Accessory Malfunction: If the alternator isn't charging, the power steering isn't working, or the A/C isn't cooling, check the serpentine belt. Is it intact? Is it routed correctly around the affected accessory's pulley? Is the pulley spinning when the engine is running? The diagram helps confirm proper routing.
- Belt Wear or Damage: Regularly inspect the serpentine belt for signs of wear, such as cracks, fraying, or missing ribs. If the belt is damaged, use the diagram to ensure the new belt is routed correctly. Also, inspect the pulleys for damage or excessive wear, which could be contributing to the belt failure.
- Tensioner Issues: A weak or failing tensioner can cause belt slippage, noise, and premature wear. Check the tensioner's range indicator. If the indicator is outside the acceptable range, the tensioner likely needs replacement. The diagram helps locate the tensioner for inspection and replacement.
- Belt Slippage in Wet Conditions: Check belt and pulleys for oil contamination that causes slippage. Diagram helps you inspect all pulleys, and also confirms that the belt is installed correctly.
Safety Precautions
Working on the serpentine belt system can be dangerous if proper precautions aren't taken. Keep the following in mind:
- Disconnect the Battery: Before working on any part of the electrical system, disconnect the negative battery cable to prevent accidental shocks or short circuits.
- Engine OFF and Cool: Never work on the serpentine belt system while the engine is running. Allow the engine to cool completely before starting any work to prevent burns.
- Moving Parts: The serpentine belt and pulleys are moving parts. Keep your hands, clothing, and tools clear of these components when the engine is running (even briefly for diagnostic purposes).
- Tensioner Safety: The tensioner is spring-loaded and can snap back with considerable force when released. Use the correct tools and techniques to release the tension safely. Consult your vehicle's repair manual for specific instructions.
- Eye Protection: Wear safety glasses to protect your eyes from debris.
- High Heat Components: Be extremely cautious around the exhaust manifold, especially when the engine is warm.
We have the detailed 2009 Chevy Malibu 2.4L Serpentine Belt Diagram file available for download. With this diagram and the information provided in this article, you'll be well-equipped to tackle any serpentine belt-related maintenance or repair on your vehicle.