2009 Chevy Malibu 3.6 Serpentine Belt Diagram
Alright, let's dive into the serpentine belt system of the 2009 Chevy Malibu equipped with the 3.6L V6 engine. This article aims to equip you with the knowledge needed to understand, diagnose, and even replace the serpentine belt and related components. Whether you're tackling a slipping belt, replacing a failing accessory, or simply expanding your automotive know-how, understanding this system is crucial.
Purpose of the Serpentine Belt Diagram
The serpentine belt diagram is your roadmap to understanding the belt's routing. Why is this so important? Because a properly routed belt ensures that all your engine accessories – the alternator, power steering pump, air conditioning compressor, and sometimes the water pump – receive the necessary power to function correctly. A misrouted belt can lead to catastrophic failures, from a dead battery and loss of power steering to engine overheating. The diagram serves multiple purposes:
- Repair and Replacement: Crucially, it shows you how to reinstall a new belt after removing the old one. The routing can be complex, and without the diagram, you're likely to get it wrong.
- Diagnostics: The diagram helps you identify the components driven by the belt. This is vital when troubleshooting issues. For example, if your power steering suddenly fails, you can quickly check if the belt is properly engaged with the power steering pump pulley.
- Preventative Maintenance: Familiarity with the diagram aids in inspecting the belt's condition and the condition of the pulleys. Early detection of wear or misalignment can prevent a roadside breakdown.
- Understanding Your Vehicle: More generally, it helps you understand how the 3.6L engine delivers power to its critical accessories.
Key Specs and Main Parts
Before we get to the diagram itself, let's identify the key components and their typical specifications (bear in mind that specs can vary slightly depending on specific vehicle options):
- Serpentine Belt: A long, continuous belt made of rubber or synthetic materials that transmits rotational force from the crankshaft pulley to the various engine accessories. For the 2009 Malibu 3.6L, you're typically looking at a belt length in the range of 90-95 inches, but always verify the correct part number for your specific vehicle.
- Crankshaft Pulley (or Harmonic Balancer): Mounted at the front of the crankshaft, this pulley is the driving force behind the entire system. It absorbs torsional vibrations from the engine.
- Alternator Pulley: Driven by the serpentine belt, the alternator generates electrical power to charge the battery and run the vehicle's electrical systems.
- Power Steering Pump Pulley: The power steering pump provides hydraulic assistance to make steering easier. Its pulley is driven by the serpentine belt.
- Air Conditioning (A/C) Compressor Pulley: When the A/C is engaged, the compressor circulates refrigerant to cool the cabin.
- Water Pump Pulley: In some 3.6L configurations, the water pump (responsible for circulating coolant through the engine to prevent overheating) is driven by the serpentine belt. In others, it's driven by the timing chain. Consult your specific diagram!
- Tensioner Pulley: This spring-loaded pulley maintains the correct tension on the serpentine belt, preventing slippage and ensuring proper accessory function. The tensioner is critical for belt longevity and system performance.
- Idler Pulley: These smooth, bearing-equipped pulleys are used to guide the belt around the various accessories and maintain the correct wrap angle on the pulleys. They have no direct function other than guiding the belt.
Symbols and Notation in the Serpentine Belt Diagram
Serpentine belt diagrams use standardized symbols to convey information efficiently. Understanding these symbols is key to interpreting the diagram correctly. While specific diagrams might have slight variations, here's a general guide:
- Solid Lines: Represent the serpentine belt itself. The thickness of the line doesn't typically indicate anything specific.
- Arrows: Indicate the direction of belt travel. Follow the arrows to visualize how the belt moves around the pulleys.
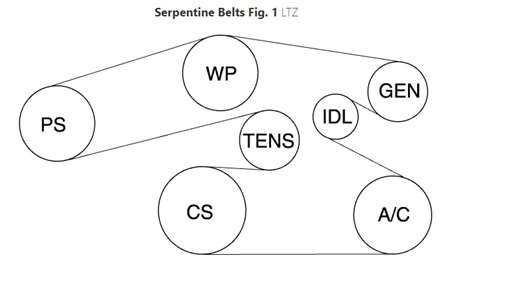
- Pulley Symbols: Circles or stylized pulley shapes represent the various pulleys. Some diagrams may label each pulley with its corresponding component (e.g., "ALT" for Alternator, "P/S" for Power Steering).
- Tensioner Symbol: The tensioner is usually depicted with a spring symbol indicating its spring-loaded mechanism. Some diagrams indicate the direction in which to rotate the tensioner to release belt tension.
- Component Labels: Clear abbreviations or full names identifying each component (e.g., "Crankshaft," "A/C Compressor").
- Routing Path: Sometimes the diagram will visually highlight the path the belt takes, especially around the tensioner and idler pulleys. This could be done with different colors or shading.
How It Works
The serpentine belt system is a fairly straightforward power transmission system. The engine's rotational energy, generated by the pistons firing, is transferred to the crankshaft. The crankshaft pulley, securely mounted to the crankshaft, rotates. The serpentine belt is then wrapped around the crankshaft pulley and all the other accessory pulleys. As the crankshaft pulley spins, it drives the serpentine belt, which in turn drives all the accessories. The tensioner pulley ensures that the belt maintains sufficient contact (wrap angle) on each pulley to prevent slippage and ensure efficient power transfer.
The tensioner is a particularly important component. As the belt stretches with age or temperature changes, the tensioner automatically adjusts to maintain the correct tension. Without a functioning tensioner, the belt would slip, leading to reduced accessory performance and premature belt wear. A failed tensioner is a common cause of serpentine belt noise (squealing or chirping).
Real-World Use: Basic Troubleshooting Tips
Here are some common issues and how the serpentine belt diagram can help you troubleshoot them:
- Squealing or Chirping Noise: This is often caused by a slipping belt. Use the diagram to inspect the belt for wear, cracks, or glazing. Check the tensioner to ensure it's functioning correctly (the arm should move smoothly and provide adequate tension). Also, check pulley alignment.
- Accessory Failure (e.g., Power Steering Loss): First, confirm the belt is still intact. Then, use the diagram to verify the belt is properly routed around the power steering pump pulley. If the belt is intact and routed correctly, the problem likely lies within the power steering pump itself.
- Overheating: If the water pump is driven by the serpentine belt (refer to your diagram!), a broken or slipping belt will prevent the water pump from circulating coolant, leading to overheating.
- Battery Not Charging: If the alternator isn't being driven due to a broken or slipping belt, the battery won't charge. Use the diagram to verify the belt is properly routed around the alternator pulley.
Remember: Always address any unusual noises or performance issues promptly to prevent further damage.
Safety Precautions
Working on the serpentine belt system can be dangerous if proper precautions aren't taken:
- Disconnect the Battery: Before working on any part of the engine, disconnect the negative battery cable to prevent accidental electrical shocks.
- Hot Engine: Never work on the serpentine belt system while the engine is hot. Allow the engine to cool completely to prevent burns.
- Moving Parts: Keep hands, hair, and clothing away from the serpentine belt and pulleys while the engine is running. The rotating components can cause serious injury.
- Tensioner Spring: The tensioner is under considerable spring pressure. Use the correct tools to relieve the tension safely. Refer to your vehicle's service manual for the specific procedure.
- Eye Protection: Always wear safety glasses to protect your eyes from debris.
Conclusion
Understanding the serpentine belt system and having access to the correct diagram is essential for maintaining the performance and reliability of your 2009 Chevy Malibu 3.6L. By familiarizing yourself with the components, symbols, and troubleshooting tips outlined above, you'll be well-equipped to handle many common issues. Remember to prioritize safety and consult your vehicle's service manual for detailed instructions and specifications. Good luck!
And remember, we have access to detailed serpentine belt diagrams specific to your 2009 Chevy Malibu 3.6L. You can download it now!