2009 Dodge Ram 1500 Blend Door Actuator Diagram
Alright, let's dive into the blend door actuator diagram for your 2009 Dodge Ram 1500. Understanding this system is crucial for diagnosing and fixing HVAC (Heating, Ventilation, and Air Conditioning) problems. Whether you're dealing with no heat, no cold air, or inconsistent temperatures, knowing your way around this diagram can save you time and money on repairs.
Purpose of the Blend Door Actuator Diagram
This diagram isn't just a pretty picture; it's a roadmap to understanding the entire blend door actuator system. Its primary purpose is threefold:
- Diagnosis: It allows you to trace the electrical and mechanical pathways, helping pinpoint the source of a problem.
- Repair: It guides you through the process of replacing a faulty actuator or related components.
- Learning: It helps you understand how the HVAC system works in your Ram, making you a more informed and capable DIYer.
Imagine trying to fix a complex electrical circuit without a schematic – that's what it's like tackling HVAC issues without a diagram. It's a vital tool for anyone looking to work on their Ram's climate control system.
Key Specs and Main Parts
Before we jump into the diagram, let's familiarize ourselves with the key components. These are the players you'll be identifying in the schematic:
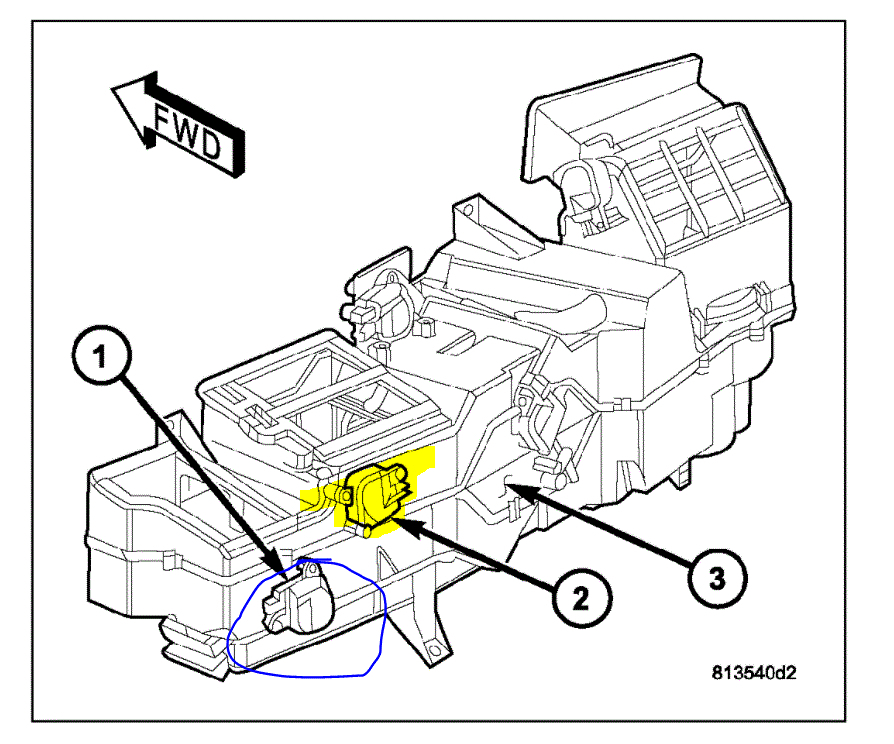
- Blend Door Actuator: The heart of the system. This electric motor controls the position of the blend door, which regulates the mix of hot and cold air flowing into the cabin. Your Ram 1500 typically has at least one, but may have multiple, depending on the options (dual-zone climate control, for example). The actuator receives signals from the HVAC control module.
- Blend Door: The physical flap inside the HVAC housing that directs airflow. A faulty blend door can cause temperature control problems even if the actuator is working perfectly.
- HVAC Control Module (Head Unit): The control panel in your dash where you set the temperature. It sends electrical signals to the blend door actuator.
- Wiring Harness: The network of wires that connects all the components.
- Fuses and Relays: These protect the electrical circuits and switch power on and off to the actuator.
- Temperature Sensors: These provide feedback to the HVAC control module about the temperature inside the cabin and in the ductwork, influencing how the system operates.
Understanding the Symbols in the Diagram
The diagram uses standardized symbols to represent electrical and mechanical components. Here’s a breakdown of common symbols you'll encounter:
- Solid Lines: Typically represent wires carrying electrical current. The thickness of the line might indicate the gauge (size) of the wire, and therefore, its current-carrying capacity.
- Dashed Lines: Can represent communication lines (like data buses for the HVAC control module) or mechanical linkages.
- Color Coding: Wires are often color-coded to help identify them. The diagram legend will specify what each color represents (e.g., red for power, black for ground). Always verify the legend!
- Component Symbols: Standard symbols are used for resistors, capacitors, transistors, diodes, relays, switches, motors (like the blend door actuator), and other electrical components. Learning these standard symbols is key to understanding any electrical diagram.
- Ground Symbols: Indicate a connection to the vehicle's chassis ground, which provides a return path for electrical current.
Keep in mind that the specific symbols and color codes can vary slightly between different diagrams, so always refer to the legend provided with your specific diagram.
How the Blend Door Actuator System Works
Here's a simplified explanation of how the system operates:
- You adjust the temperature using the HVAC control module in the dashboard.
- The control module receives your input and determines the desired blend door position.
- The control module sends an electrical signal to the blend door actuator. This signal is typically a PWM (Pulse Width Modulation) signal that controls the speed and direction of the actuator's motor.
- The actuator's motor turns, moving the blend door to the correct position.
- The blend door mixes hot and cold air to achieve the desired temperature.
- Some systems use temperature sensors to provide feedback to the control module, allowing for more precise temperature control.
The magic happens in that PWM signal, which varies the duty cycle (the amount of time the signal is "on" versus "off") to precisely control the actuator's movement. This allows for fine-tuning the air temperature. If the actuator is failing, the control module may log a DTC (Diagnostic Trouble Code) that you can read with an OBD-II scanner.
Real-World Use: Basic Troubleshooting Tips
Here are some basic troubleshooting tips you can use with the blend door actuator diagram:
- No Heat or No Cold Air: Check the blend door actuator first. Use the diagram to locate it, and then listen for clicking or grinding noises when you adjust the temperature. Use a multimeter to check if the actuator is receiving power and ground. If power and ground are present, the actuator is likely faulty.
- Inconsistent Temperature: Could be a faulty blend door actuator, a problem with the HVAC control module, or a faulty temperature sensor. Use the diagram to trace the wiring between these components.
- Diagnostic Trouble Codes (DTCs): Use an OBD-II scanner to retrieve DTCs related to the HVAC system. The diagram can help you understand which components are associated with specific DTCs. For example, a code indicating a blend door actuator circuit malfunction can point directly to a wiring problem or a faulty actuator.
- Visual Inspection: Carefully inspect the wiring harness for any signs of damage, corrosion, or loose connections. Use the diagram to identify the specific wires that connect to the blend door actuator.
Remember, always start with the simplest checks first, such as checking fuses and relays. The diagram will show you which fuses and relays are related to the HVAC system.
Safety Precautions
Working on electrical systems can be dangerous. Here are some essential safety precautions:
- Disconnect the Battery: Always disconnect the negative battery terminal before working on any electrical components. This prevents accidental shorts and potential electrocution.
- Use Proper Tools: Use insulated tools designed for automotive electrical work.
- Avoid Working in Wet Conditions: Water conducts electricity, increasing the risk of electrocution.
- Be Careful with Airbag Systems: Some HVAC components may be located near airbag modules. Avoid jarring or impacting these modules, as this could trigger accidental deployment. Consult your vehicle's service manual for specific instructions on disabling the airbag system if necessary.
- HVAC Refrigerant: If you suspect a leak in the HVAC system, be extremely careful. Refrigerant can cause frostbite and is harmful to the environment. Have the system professionally discharged before attempting any repairs that involve the refrigerant lines.
Electricity can be deadly. If you're not comfortable working with electrical systems, it's best to consult a qualified mechanic.
We have the detailed blend door actuator diagram for your 2009 Dodge Ram 1500 readily available. You can download it to aid in your diagnosis and repair process.