2009 Ford Escape 2.5 Serpentine Belt Diagram
Alright, let's dive into the serpentine belt system for the 2009 Ford Escape with the 2.5L engine. Understanding this system is crucial for a few reasons. First and foremost, it's vital for preventative maintenance and repairs. A broken or worn serpentine belt can leave you stranded. Secondly, knowing the layout allows you to diagnose issues like squealing noises or malfunctioning accessories. Finally, it's simply good mechanical knowledge that can empower you to tackle more complex automotive tasks.
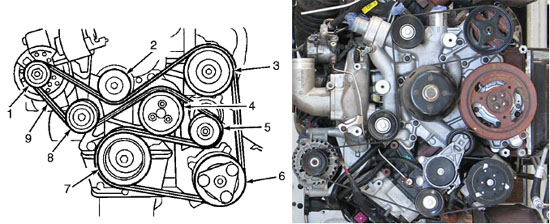
Purpose of the Serpentine Belt Diagram
The serpentine belt diagram, in essence, is a roadmap for your engine's accessory drive system. This diagram clearly illustrates the path the serpentine belt takes as it weaves around various pulleys, powering essential components. Without it, replacing or even inspecting the belt can become a frustrating trial-and-error exercise. The diagram also helps in understanding the drive ratios between different components. For instance, the crank pulley size relative to the alternator pulley size affects the alternator's rotational speed. Having the diagram allows for quick reference during troubleshooting, parts replacement, and even when planning engine modifications that might affect the accessory drive.
Key Specs and Main Parts of the 2009 Ford Escape 2.5L Serpentine Belt System
The 2009 Ford Escape 2.5L utilizes a single, long serpentine belt to drive the following accessories:
- Crankshaft Pulley: The main driving pulley, connected directly to the crankshaft. This pulley transfers the engine's rotational force to the serpentine belt.
- Alternator: The alternator generates electricity to power the vehicle's electrical system and charge the battery.
- Power Steering Pump: Provides hydraulic pressure to assist in steering the vehicle.
- Air Conditioning Compressor: Compresses refrigerant to cool the cabin.
- Idler Pulley(s): Smooth, non-driven pulleys that guide the belt and maintain proper tension.
- Tensioner Pulley: A spring-loaded pulley that automatically adjusts belt tension, compensating for belt stretch and wear. This is a critical component.
The specific belt length will vary depending on whether or not your vehicle has air conditioning. Typically, you'll find the correct belt length listed in your owner's manual or on a sticker in the engine compartment. However, always double-check by comparing the new belt to the old one before installation.
Understanding the Symbols in the Serpentine Belt Diagram
The serpentine belt diagram uses standardized symbols to represent different components and their relationships. Here's a breakdown of the most common symbols:
- Solid Lines: These lines represent the belt itself and its path around the pulleys. The thickness of the line sometimes indicates the width of the belt, though this is not always consistent.
- Circles: Circles represent pulleys. Different sizes of circles indicate different pulley diameters, which is important for understanding drive ratios.
- Arrows: Arrows indicate the direction of rotation of each pulley. Note that pulleys adjacent to each other on the belt will rotate in opposite directions.
- Labels: Each pulley is typically labeled with an abbreviation representing the component it's connected to. For example, "ALT" for alternator, "P/S" for power steering, "A/C" for air conditioning, "CRANK" for crankshaft, and "TENSIONER" for tensioner pulley.
- Dashed Lines: Sometimes, dashed lines are used to indicate the back side of the belt, when it wraps around a pulley. This clarifies the belt's path in complex layouts.
- Spring Symbol: The tensioner pulley is often indicated by a spring symbol attached to its mounting point, visually representing its spring-loaded mechanism.
Color coding is not typically used in serpentine belt diagrams, but if present, it might be used to highlight specific sections of the belt path or differentiate between different components in a more complex system. However, for the 2009 Escape 2.5L, you're unlikely to encounter color coding.
How the Serpentine Belt System Works
The serpentine belt system operates on a simple principle: transferring rotational force from the engine's crankshaft to various accessories. The crankshaft pulley, driven by the engine, rotates the serpentine belt. This belt, in turn, wraps around and drives the pulleys of the alternator, power steering pump, A/C compressor, and any idler pulleys. The tensioner pulley maintains constant tension on the belt, preventing slippage and ensuring efficient power transfer. Without proper tension, the belt will slip, leading to reduced performance of the accessories, noise, and premature wear.
The tensioner pulley is especially crucial. Its spring-loaded design automatically adjusts for belt stretch that occurs naturally over time and with temperature changes. This ensures consistent performance of all driven accessories. A failing tensioner can cause the belt to slip, leading to a squealing noise and potentially damaging the belt or other components.
Real-World Use: Basic Troubleshooting Tips
Here are some common issues you might encounter and how the serpentine belt diagram can help in troubleshooting:
- Squealing Noise: A squealing noise is often a sign of a slipping belt. Use the diagram to visually inspect the belt for cracks, wear, or glazing (a shiny appearance). Check the tensioner pulley for proper operation. If the tensioner is bouncing excessively, it may need replacement.
- Accessory Malfunction: If an accessory like the alternator or A/C compressor isn't working, first check the serpentine belt for proper tension and condition. If the belt is intact and properly tensioned, the problem likely lies with the accessory itself. The diagram helps verify that the belt is routed correctly around the faulty accessory's pulley.
- Belt Breaks: A broken belt is usually caused by wear and tear or a seized pulley. Before replacing the belt, rotate each accessory pulley by hand. If any pulley is difficult to turn or makes noise, it may be seizing and should be inspected and potentially replaced. The diagram will help you locate all the pulleys to check.
- Misalignment: The diagram can help visualize if a pulley is severely misaligned. A misaligned pulley will cause premature belt wear and noise. Use a straightedge or laser alignment tool to check pulley alignment.
Remember, a thorough visual inspection, guided by the serpentine belt diagram, is the first step in diagnosing any accessory drive system problem.
Safety Considerations
Working on the serpentine belt system involves inherent risks. The engine should always be OFF and the ignition key removed before starting any work. The main safety concern revolves around moving parts when the engine is running. Never put your hands, tools, or clothing near the serpentine belt or pulleys while the engine is running.
The tensioner pulley stores a significant amount of spring energy. When releasing the tensioner to remove the belt, use the correct tool and follow the manufacturer's instructions carefully. Improper release of the tensioner can cause injury. Be especially cautious when working near the radiator fan; it can start unexpectedly even with the engine off if the ignition is on. Disconnect the negative battery cable for an extra layer of safety.
Download the Diagram
We have a detailed, high-resolution diagram of the 2009 Ford Escape 2.5L serpentine belt routing that you can download. This will be a valuable resource for any repair or maintenance work you undertake on your vehicle. With the diagram in hand, you'll be well-equipped to understand and troubleshoot your serpentine belt system.