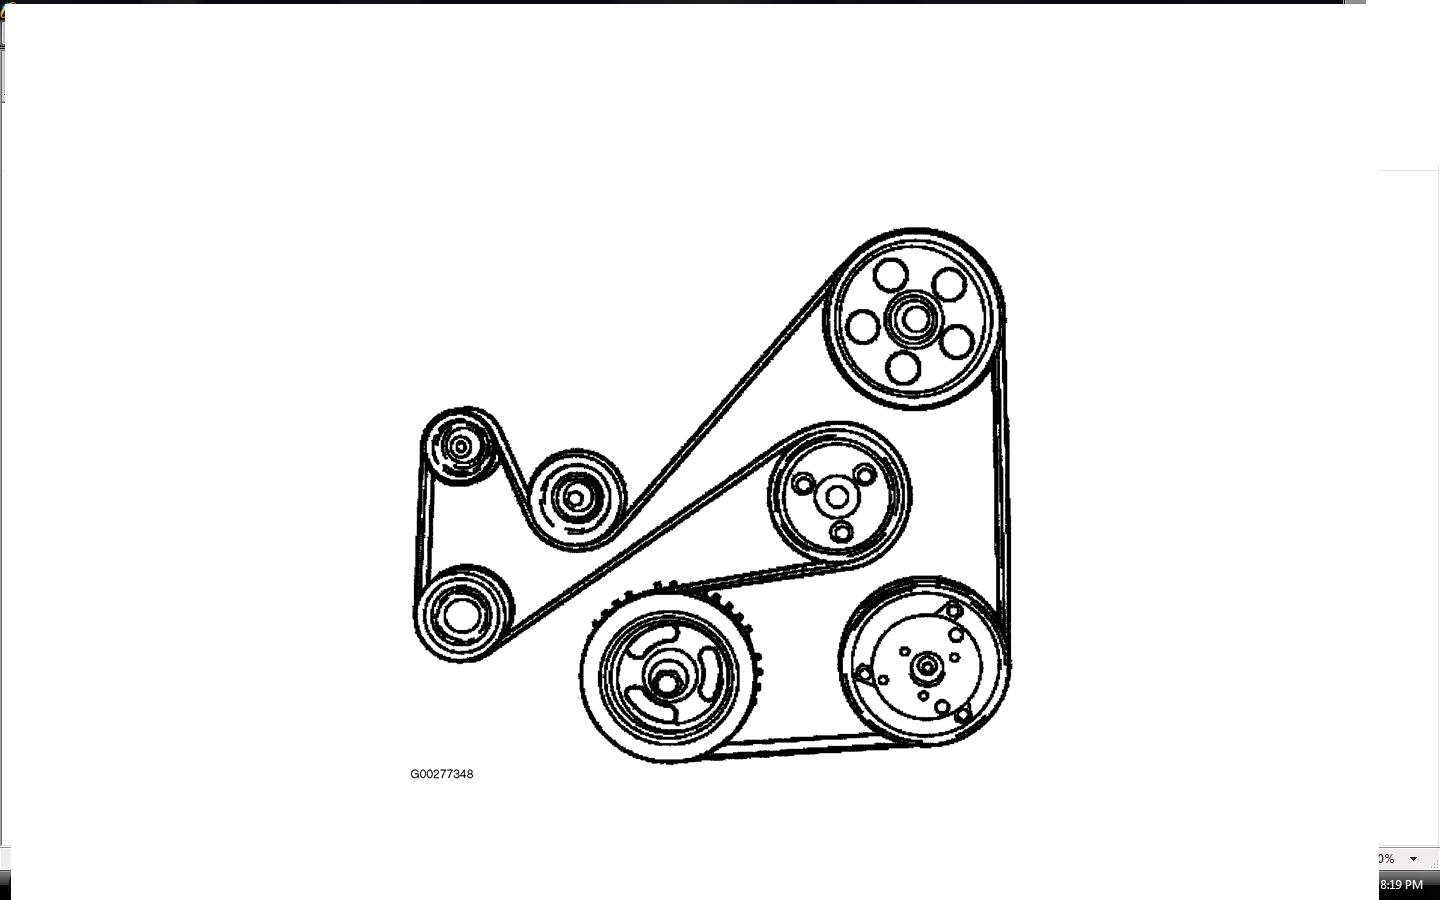
2009 Ford Fusion 2.3 Serpentine Belt Diagram
Let's dive into the serpentine belt system of the 2009 Ford Fusion with the 2.3L engine. This guide is designed for the intermediate DIYer, the weekend mechanic, or anyone looking to understand this critical part of their Fusion. We'll break down the serpentine belt diagram, its components, and how it all works together. Understanding this system can save you money on repairs and give you a deeper appreciation for how your car functions.
Purpose of the Serpentine Belt Diagram
The serpentine belt diagram is essentially a roadmap for your engine's accessory drive system. Its primary purpose is to illustrate the routing of the serpentine belt around various engine components. This diagram becomes invaluable for several reasons:
- Belt Replacement: When your serpentine belt cracks, frays, or snaps, the diagram is essential for ensuring you route the new belt correctly. An incorrectly routed belt can lead to component failure and engine damage.
- Troubleshooting: Identifying the belt's path helps you diagnose issues like squealing noises, which can often be traced to a worn belt or a failing component driven by the belt.
- Component Replacement: If you're replacing an alternator, power steering pump, or other driven accessory, knowing the belt's routing allows you to properly reinstall everything.
- General Understanding: Studying the diagram gives you a better understanding of how the engine's accessory drive system functions, contributing to your overall automotive knowledge.
Key Specs and Main Parts
The 2009 Ford Fusion 2.3L typically uses a multi-ribbed serpentine belt. While the exact length can vary slightly depending on options (e.g., with or without AC), it's usually in the range of 90 to 93 inches. It's always best to consult your vehicle's specific information or the parts catalog for the exact belt length needed.
The main components driven by the serpentine belt in this engine configuration are:
- Crankshaft Pulley: The heart of the system, powered directly by the engine. It's the source of rotational force for the entire serpentine belt system.
- Alternator: Provides electrical power to charge the battery and run electrical accessories.
- Power Steering Pump: Provides hydraulic assist to the steering system, making it easier to turn the wheel.
- Air Conditioning Compressor: Compresses refrigerant to cool the vehicle's interior.
- Tensioner Pulley: Maintains proper tension on the serpentine belt, preventing slippage and ensuring optimal performance of the driven accessories. The tensioner is spring-loaded and crucial for belt longevity.
- Idler Pulley: A smooth pulley that guides the belt around components and maintains proper wrap angle. It has no mechanical connection to any accessory.
Symbols and Diagram Interpretation
Understanding the symbols on the serpentine belt diagram is crucial for accurate interpretation. Here's a breakdown of common symbols:
- Solid Line: Represents the path of the serpentine belt. The thickness of the line doesn't usually convey any specific information.
- Arrows: Indicate the direction of belt rotation. Follow these arrows to understand how each component drives the next.
- Circles: Represent pulleys. These circles often have labels or abbreviations indicating which component they are connected to (e.g., ALT for alternator, P/S for power steering).
- Squares/Rectangles: May represent accessory components themselves, especially if the diagram is simplified.
- Abbreviations: Common abbreviations include:
- ALT: Alternator
- P/S: Power Steering
- A/C: Air Conditioning
- CRANK: Crankshaft
- TENS: Tensioner
- IDLR: Idler
A properly drawn diagram will clearly show the path the belt takes *around* each pulley, which is critical for correctly routing the belt.
How It Works
The serpentine belt system is a relatively simple, but vital, power transfer mechanism. The crankshaft pulley, driven directly by the engine's rotation, provides the driving force. This rotational energy is then transferred to the other components via the serpentine belt. The belt wraps around each pulley in a specific sequence, dictated by the engine design and accessory placement. The tensioner pulley is essential because it maintains constant pressure on the belt, preventing slippage. Without proper tension, the belt can slip, causing reduced performance of the accessories (e.g., dim headlights from a poorly charging alternator, weak power steering, or ineffective air conditioning). The idler pulley simply guides the belt, maintaining the correct wrap angle around the driven components.
Real-World Use and Basic Troubleshooting
Here's how you might use the serpentine belt diagram in a real-world scenario:
- Belt Squeal: A common issue is a squealing noise, especially when the engine is cold or under load. This can indicate a worn belt, a glazed belt surface, or a failing tensioner. The diagram helps you visually inspect the belt's condition along its entire length, checking for cracks, fraying, or missing ribs. You can also check the tensioner for proper movement. If the tensioner arm is bouncing excessively, it may be failing and not providing enough tension.
- Accessory Failure: If your alternator stops charging, power steering fails, or A/C stops cooling, the serpentine belt is one of the first things to check. Use the diagram to verify that the belt is properly routed and has sufficient tension. A snapped or severely damaged belt will immediately disable all driven accessories.
- Post-Repair Check: After replacing any of the driven components (alternator, power steering pump, etc.), use the diagram to double-check that the belt is routed correctly. A single misrouted section can cause the belt to rub against other components, leading to premature wear and failure.
- Belt Installation: When installing a new belt, having the diagram on hand is invaluable. It serves as a visual guide to ensure you route the belt correctly, especially in tight engine compartments where it's difficult to see the entire belt path.
Safety Precautions
Working on the serpentine belt system involves several safety risks. Here are some important precautions:
- Disconnect the Battery: Before working on any part of the engine, disconnect the negative battery terminal to prevent accidental electrical shocks or short circuits.
- Hot Engine: Never work on the serpentine belt system while the engine is hot. Wait for it to cool down completely to avoid burns.
- Moving Parts: Keep your hands and clothing away from moving parts. The serpentine belt system operates at high speeds, and contact can cause serious injury.
- Tensioner Spring: The tensioner pulley is spring-loaded and can snap back forcefully. Use the correct tools to relieve tension on the belt before removing it. Improper handling can cause injury.
- Eye Protection: Wear safety glasses to protect your eyes from debris or flying objects.
The alternator and air conditioning compressor are electrically connected and contain potentially hazardous voltages and refrigerants, respectively. Only qualified technicians should perform repairs involving these components.
We have a high-resolution, printable version of the 2009 Ford Fusion 2.3L Serpentine Belt Diagram available for download. This file will provide you with a clear and detailed visual aid for your repair and maintenance tasks. Use this resource in conjunction with this article and always prioritize safety when working on your vehicle.