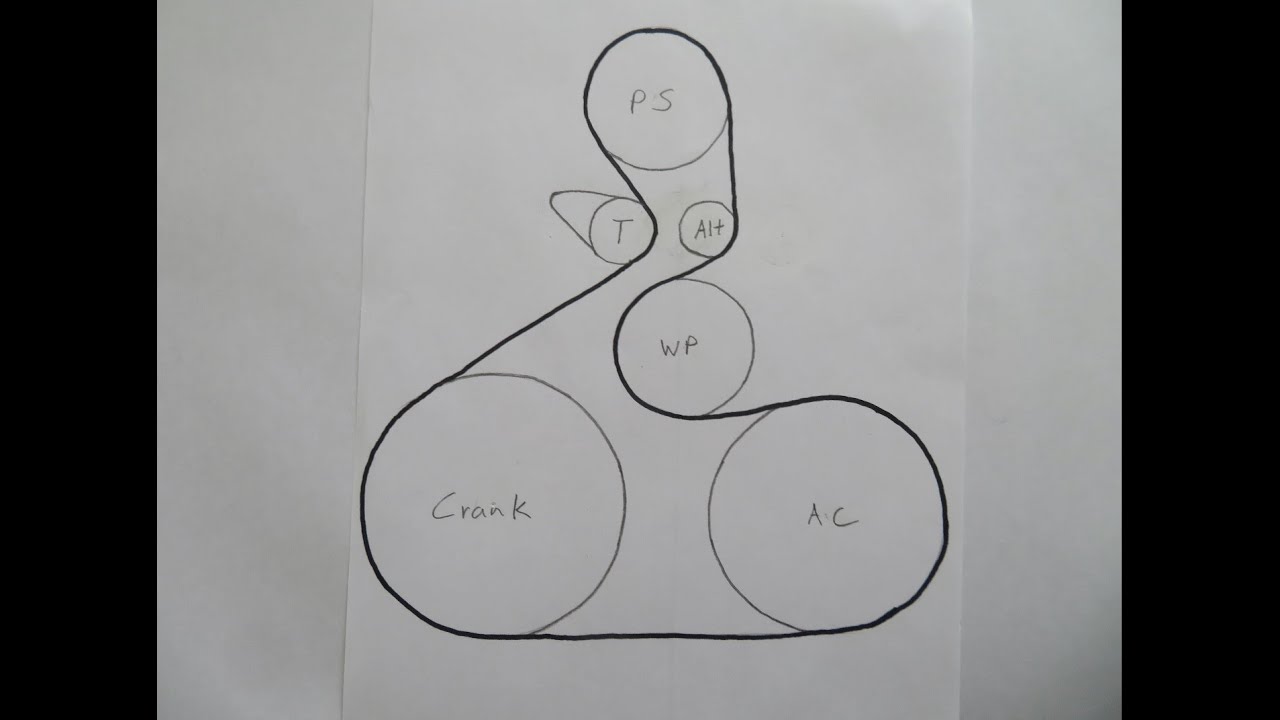
2009 Honda Accord 2.4 Serpentine Belt Diagram
The serpentine belt in your 2009 Honda Accord with the 2.4L engine is a critical component, responsible for powering numerous engine accessories. Understanding its routing and condition is crucial for preventative maintenance and troubleshooting. This article will break down the serpentine belt diagram, equipping you with the knowledge to diagnose issues, replace the belt, and ensure optimal engine performance.
Purpose of the Serpentine Belt Diagram
The serpentine belt diagram serves several important purposes:
- Replacement Guidance: The diagram provides the exact routing path for the belt. Incorrect installation can lead to component failure or even engine damage.
- Troubleshooting: Observing the belt's position and path allows you to identify potential issues like misalignment or improper tension.
- Preventative Maintenance: Knowing the belt's route helps you visually inspect it for wear, cracks, or fraying, allowing for timely replacement before a breakdown.
- Learning: Understanding the system provides invaluable insight into how the engine accessories function and interact.
Key Specs and Main Parts
The 2009 Honda Accord 2.4L engine's serpentine belt system consists of the following key components:
- Serpentine Belt: The main belt, typically made of reinforced rubber, that transmits rotational force from the crankshaft pulley to other pulleys.
- Crankshaft Pulley: The driving pulley, connected directly to the engine's crankshaft. Its rotation drives the serpentine belt.
- Alternator Pulley: Powers the alternator, which charges the battery and provides electricity to the vehicle's electrical system.
- Power Steering Pump Pulley: Powers the power steering pump, which provides hydraulic assistance for steering.
- Air Conditioning (A/C) Compressor Pulley: Powers the A/C compressor, responsible for cooling the cabin air.
- Idler Pulley(s): Smooth, bearing-mounted pulleys used to guide the belt around the engine, maintaining proper alignment and tension. These are not driven.
- Tensioner Pulley: Spring-loaded pulley that maintains consistent tension on the serpentine belt. This is a critical component for belt life.
Belt Specs: While exact dimensions can vary slightly based on the manufacturer, the approximate length of the serpentine belt for a 2009 Honda Accord 2.4L is around 83-85 inches. It's crucial to consult your vehicle's service manual or parts catalog for the precise specification for your particular model and options.
Symbols and Diagram Interpretation
Serpentine belt diagrams use specific conventions to represent the system components and belt routing. Understanding these symbols is key to interpreting the diagram correctly:
- Solid Lines: Typically represent the serpentine belt itself. The line traces the path of the belt around each pulley.
- Circles: Represent pulleys. The size of the circle may sometimes be proportional to the actual pulley size.
- Arrows: Indicate the direction of belt travel. This is essential for ensuring the belt is installed correctly.
- Component Labels: Abbreviations or full names identify each pulley (e.g., ALT for alternator, P/S for power steering, A/C for air conditioning, CRANK for crankshaft, TENSIONER).
- Tensioner Indication: The tensioner pulley is often marked with a specific symbol or labeled clearly as "Tensioner." Its location and the direction of its spring-loaded movement are often depicted.
- Ribbed vs. Smooth Pulleys: Sometimes diagrams differentiate between ribbed (grooved) pulleys and smooth pulleys, indicating which side of the belt makes contact. The serpentine belt is ribbed and the flat side will ride on the smooth pulleys.
Pay close attention to the direction of rotation indicated by the arrows, and carefully trace the belt path to ensure you understand the proper routing.
How It Works
The serpentine belt system is a relatively simple, yet crucial, power transmission system. The crankshaft, driven by the engine's combustion process, rotates. This rotation is transferred to the serpentine belt, which wraps around the various pulleys. The friction between the belt and pulleys causes the pulleys to rotate, driving the accessories they are connected to.
The tensioner pulley plays a vital role in maintaining the correct belt tension. Too little tension will cause the belt to slip, resulting in reduced performance from the accessories (e.g., weak A/C, poor power steering). Too much tension can prematurely wear the belt and the bearings in the driven accessories.
The order and arrangement of the pulleys are critical. Each component is strategically placed to maximize efficiency and minimize belt length. This arrangement also influences the direction of rotation for each component. For instance, the alternator might rotate clockwise, while the power steering pump rotates counter-clockwise.
Real-World Use: Basic Troubleshooting
Here are some common serpentine belt issues and how the diagram can help:
- Squealing Noise: This can indicate a loose belt, worn belt, or misaligned pulley. Use the diagram to check the belt's routing and tension. A visual inspection can reveal cracks, glazing (a shiny, hardened surface), or fraying.
- Accessory Failure: If your A/C, power steering, or alternator stops working, check the serpentine belt. A broken belt will immediately stop all driven accessories from functioning. Use the diagram to verify the belt is intact and properly routed around the affected component's pulley.
- Visible Cracks or Wear: Regularly inspect the belt for signs of wear. Deep cracks, missing chunks, or excessive fraying indicate the need for replacement. The diagram helps you locate the entire belt path for a thorough inspection.
- Belt Slippage: Excessive belt dust or debris around the pulleys can indicate slippage. This often occurs when the belt is worn or the tensioner is failing. The diagram helps you confirm the correct belt routing and tensioner location.
Troubleshooting Example: You hear a squealing noise when you turn on the A/C. Consult the diagram to verify the belt routing around the A/C compressor pulley. Inspect the belt for wear or damage near the A/C compressor pulley. Check the tensioner to ensure it's functioning properly and maintaining adequate belt tension.
Safety Considerations
Working on the serpentine belt system involves potential hazards. Exercise extreme caution:
- Engine Off: Always ensure the engine is completely off and the key is removed from the ignition before working on the serpentine belt.
- Hot Engine: Avoid working on the system immediately after the engine has been running, as components can be extremely hot.
- Moving Parts: Never attempt to adjust or inspect the belt while the engine is running. Serious injury can occur.
- Tensioner Spring: The tensioner pulley is spring-loaded and can snap back forcefully when released. Use appropriate tools to relieve tension and secure the tensioner before removing the belt.
- Sharp Edges: Be mindful of sharp edges on pulleys and other engine components. Wear gloves to protect your hands.
High-Risk Component: The tensioner pulley spring is particularly dangerous. Always use the correct tool (usually a wrench or socket) to carefully relieve the tension before removing or installing the belt. Never attempt to manually force the tensioner without the proper tool.
Disclaimer: While this article provides guidance, it is not a substitute for professional advice. If you are uncomfortable performing these tasks, consult a qualified mechanic.
We have a downloadable PDF file of the 2009 Honda Accord 2.4L Serpentine Belt Diagram available for your convenience. Use it as a reference when performing maintenance or repairs on your vehicle. This diagram will clearly show you the correct routing for your specific engine configuration.