2009 Honda Accord V6 Serpentine Belt Diagram
Alright, let's dive into the serpentine belt diagram for the 2009 Honda Accord V6. Whether you're tackling a squealing belt, replacing a component, or just want to understand your engine better, having a good understanding of this system is crucial. This article will walk you through the diagram's details, helping you confidently work on your Accord.
Purpose of the Serpentine Belt Diagram
The serpentine belt diagram is your roadmap for the auxiliary drive system. It shows the routing of the serpentine belt and the components it powers. It's not just a pretty picture; it’s essential for several reasons:
- Accurate Belt Installation: Incorrect routing can lead to belt slippage, component failure, or even engine damage. The diagram ensures the belt follows the proper path around all pulleys.
- Troubleshooting: When you hear a squealing noise or notice a component isn't working, the diagram helps you identify the possible causes.
- Component Replacement: If you're replacing the alternator, power steering pump, or AC compressor, knowing the belt path is critical for removal and reinstallation.
- Preventive Maintenance: Checking the belt's condition and tension is part of regular maintenance. The diagram helps you locate the belt tensioner and inspect the belt along its entire length.
- Learning and Understanding: Gaining a deeper understanding of your engine's operation empowers you to perform more complex repairs and modifications.
Key Specs and Main Parts
The 2009 Honda Accord V6 typically uses a single serpentine belt to drive several accessories. Here are the key components and specifications (although slight variations might exist depending on trim level, this covers the general configuration):
- Engine: 3.5L V6 (J35 engine family)
- Serpentine Belt Length: Approximately 85-87 inches (verify with your specific vehicle VIN)
- Belt Type: Multi-ribbed V-belt (typically 6 or 7 ribs)
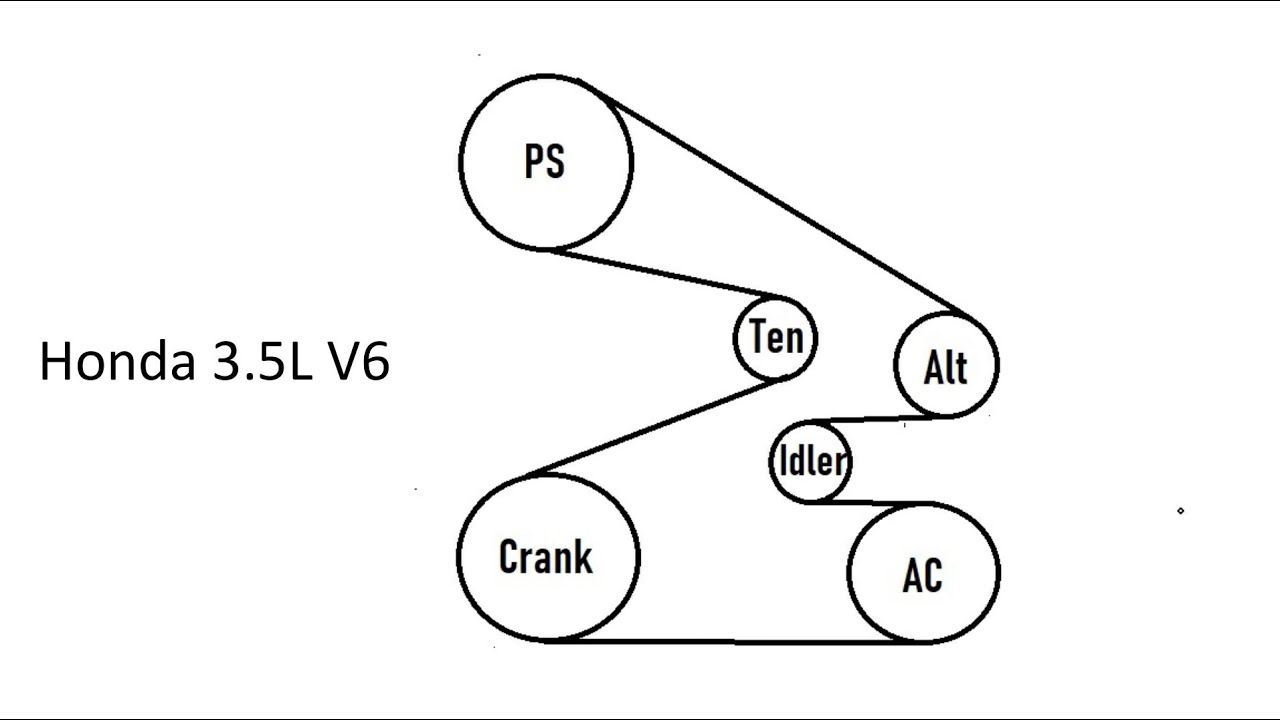
The main parts driven by the serpentine belt are:
- Crankshaft Pulley (or Damper): The driving force of the entire system, connected directly to the engine's crankshaft.
- Alternator: Generates electrical power to charge the battery and run the car's electrical systems.
- Power Steering Pump: Provides hydraulic pressure to assist steering.
- Air Conditioning (AC) Compressor: Compresses refrigerant for the air conditioning system.
- Idler Pulley(s): Smooth, non-driven pulleys that guide the belt and maintain proper tension and wrap angle around the driven components.
- Belt Tensioner: A spring-loaded or hydraulic device that maintains constant tension on the serpentine belt. It's crucial for proper belt performance and lifespan.
Decoding the Serpentine Belt Diagram: Symbols and Conventions
Understanding the symbols on the diagram is key to its effective use. Here's a breakdown:
- Solid Lines: Represent the path of the serpentine belt. The thicker the line, generally, the easier it is to visualize.
- Arrows: Indicate the direction of belt rotation. Follow these arrows to ensure you're routing the belt correctly.
- Circles/Pulleys: Represent the various pulleys driven by the belt. The diagram will label each pulley (e.g., ALT for Alternator, P/S for Power Steering, A/C for Air Conditioning).
- Tensioner Symbol: Often represented by a pulley with an arrow indicating the direction of movement when releasing or applying tension.
- Dotted Lines: May be used to indicate the belt's path behind other components for clarity.
- Text Labels: Crucial for identifying each component and its function. Pay close attention to abbreviations.
How the Serpentine Belt System Works
The crankshaft pulley is the heart of the system. As the engine runs, the crankshaft pulley rotates, driving the serpentine belt. The belt, in turn, transmits this rotational force to the other pulleys connected to the alternator, power steering pump, and AC compressor. The belt tensioner is absolutely vital. It applies consistent pressure to the belt, ensuring it maintains proper contact with all the pulleys. Without adequate tension, the belt will slip, leading to reduced performance of the accessories and potential damage to the belt itself. The idler pulleys help guide the belt along its path, preventing it from rubbing against other components and maintaining optimal wrap around the driven pulleys. The correct belt routing ensures the correct direction of rotation for each component. Incorrect routing can cause components to run in reverse or not at all, leading to serious problems.
Real-World Use: Basic Troubleshooting
Here are some common issues and how the serpentine belt diagram can help:
- Squealing Noise: Often indicates a loose or worn belt. Check the belt tensioner and belt condition. Use the diagram to inspect the belt's entire length for cracks, glazing, or missing ribs.
- Accessory Failure: If the alternator isn't charging, the power steering is difficult, or the AC isn't cooling, the belt could be slipping. Verify the belt's tension and condition. The diagram helps you pinpoint the specific component that's not functioning.
- Belt Slippage: Can be caused by a worn belt, a faulty tensioner, or a contaminated pulley (e.g., oil or coolant). The diagram helps you visually inspect the entire belt path for potential issues.
- Belt Breakage: Usually caused by a worn belt, misaligned pulleys, or a seized component (e.g., a failing alternator). The diagram helps you identify all components that need inspection after a belt failure.
Troubleshooting Tip: Always start by visually inspecting the belt for wear and tear. Look for cracks, fraying, or missing ribs. Also, check the belt tensioner for proper operation. If the tensioner is weak or seized, it needs to be replaced. If you suspect a misaligned pulley, use a straight edge to check alignment across the pulleys.
Safety Considerations
Working with the serpentine belt system involves several safety hazards:
- Moving Parts: Never work on the serpentine belt system while the engine is running. The belt and pulleys can cause serious injury.
- Hot Components: The engine and exhaust components can be extremely hot. Allow the engine to cool down completely before working on the system.
- High Tension: The serpentine belt is under significant tension. Use the proper tools to release the tension before removing the belt. Improperly releasing the tension can cause the belt to snap back, causing injury.
- Electrical Hazards: The alternator is part of the electrical system. Disconnect the negative battery cable before working on the serpentine belt system to prevent electrical shocks.
- Eye Protection: Always wear safety glasses when working on the engine to protect your eyes from debris.
Safety Warning: The alternator pulley and crankshaft pulley spin at high speeds. Never put your hands or tools near these components while the engine is running. The power steering pump contains pressurized fluid. Be careful when disconnecting the lines to avoid spraying fluid. The AC compressor contains refrigerant, which can be harmful if inhaled. Consult a qualified technician if you suspect a refrigerant leak.
Diagram Availability
We have a detailed, high-resolution PDF file containing the 2009 Honda Accord V6 serpentine belt diagram ready for you. This diagram includes specific markings, torque specs (where applicable), and further clarifying information. Click the link below to download your copy. Having this diagram readily available will significantly simplify your maintenance and repair procedures.
[Link to Download Diagram Here - Replace with actual link]