2009 Honda Civic 1.8 Serpentine Belt Diagram
So, you're tackling a serpentine belt replacement on your 2009 Honda Civic with the 1.8L engine (R18A1). Smart move! Knowing how the serpentine belt system is laid out is absolutely crucial, not just for repairs, but also for preventative maintenance and understanding the overall health of your engine's accessory drive. This article will serve as your comprehensive guide to the 2009 Civic 1.8 serpentine belt diagram, ensuring you can confidently diagnose issues, replace components, and keep your Civic running smoothly.
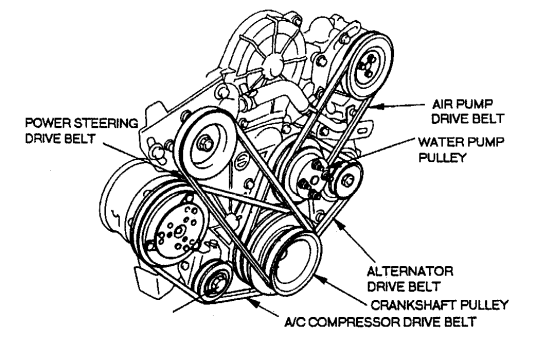
Purpose of Understanding the Serpentine Belt Diagram
Why bother with the diagram? Well, several reasons:
- Accurate Belt Routing: The most obvious. Incorrect routing can lead to component damage, belt slippage, and even complete failure. This diagram guarantees you route the new belt correctly.
- Component Identification: The diagram clearly labels all the accessories driven by the belt (alternator, power steering pump, AC compressor, etc.). This is vital for diagnosing issues. If your AC isn't blowing cold, is it the compressor, or a slipping belt? The diagram helps you narrow it down.
- Tensioner Identification and Function: Understanding the tensioner's location and how it works is critical for proper belt installation and adjustment. Too loose, and you'll experience slippage. Too tight, and you risk premature bearing wear in the accessories.
- Troubleshooting: When diagnosing a squealing belt or accessory malfunction, the diagram helps visualize the system and identify potential problem areas.
- Learning Engine Mechanics: Even if you're not doing the repair yourself, understanding the serpentine belt system provides valuable insight into how your engine operates.
Key Specs and Main Parts of the 2009 Civic 1.8 Serpentine Belt System
The serpentine belt system on the 2009 Honda Civic 1.8 is a relatively straightforward design. Key components include:
- Serpentine Belt: The continuous belt (typically made of EPDM rubber) that transmits power from the crankshaft pulley to the various accessories.
- Crankshaft Pulley (Harmonic Balancer): The pulley attached to the crankshaft that initiates the belt's rotation. Its primary function is to dampen torsional vibrations from the engine, preventing damage.
- Alternator Pulley: Driven by the belt, the alternator generates electrical power to charge the battery and run the vehicle's electrical systems.
- Air Conditioning (AC) Compressor Pulley: The AC compressor pressurizes refrigerant, enabling the cooling system.
- Power Steering Pump Pulley: The power steering pump provides hydraulic pressure to assist in steering.
- Tensioner Pulley (Automatic Tensioner): This is a spring-loaded mechanism that automatically maintains the correct tension on the serpentine belt. It's essential for preventing slippage and premature wear. It uses a spring and a dampener to apply constant tension to the belt.
- Idler Pulley: Sometimes, an idler pulley is used to guide the belt and maintain proper wrap around the other pulleys. The 2009 Civic 1.8 does *not* typically have a separate idler pulley in the typical sense.
Key Specs: While we can’t give an exact belt length without consulting the diagram (which we have for you to download!), the critical specification is the belt length and belt type (e.g., number of ribs). Always refer to the manufacturer's recommendation (printed on the old belt or available at your local auto parts store). Also, use a quality belt. Gates and Goodyear are reputable brands.
Understanding Serpentine Belt Diagram Symbols
Serpentine belt diagrams use a variety of symbols to represent different components and characteristics. Here's a breakdown:
- Solid Lines: Generally represent the belt itself. The thickness of the line may indicate the width of the belt.
- Circles: Represent pulleys. The size of the circle is *not* necessarily proportional to the actual pulley size.
- Labels: Each pulley will be labeled with an abbreviation indicating the component it drives (e.g., ALT for alternator, AC for air conditioning compressor, PS for power steering pump, CRANK for crankshaft).
- Arrows: Indicate the direction of belt rotation. Pay close attention to these!
- Dashed Lines or Shaded Areas: May indicate the back (smooth) side of the belt contacting a pulley. This is important for understanding the belt's routing path.
- Tensioner Symbol: The tensioner is usually represented by a pulley symbol connected to a spring or a diagrammatic representation of the tensioner mechanism.
Sometimes, diagrams use color-coding, but this is less common. If present, a key will explain the color assignments.
How the Serpentine Belt System Works
The principle is straightforward: the engine's rotational force, generated during the combustion cycle, is transferred to the crankshaft pulley. The serpentine belt, wrapped around the crankshaft pulley and the pulleys of the various accessories, then transmits this rotational force to those accessories, causing them to operate.
The automatic tensioner plays a vital role. As the belt stretches over time (which is normal), the tensioner automatically compensates, maintaining the correct tension. This prevents belt slippage, which can reduce the efficiency of the accessories and cause a characteristic squealing noise. Think of it like a spring constantly pushing against the belt, keeping it taut.
Real-World Use: Basic Troubleshooting Tips
Here are a few common issues you might encounter and how the diagram can help:
- Squealing Belt: This usually indicates belt slippage. Check the tensioner to ensure it's functioning correctly. Is the tensioner pulley bouncing excessively? It might be worn or damaged. Ensure the belt is routed correctly. Use the diagram to verify.
- Accessory Malfunction: If, for example, your AC isn't working, check that the AC compressor pulley is rotating when the engine is running. If it's not, the belt may be broken or slipping. The diagram will immediately show you the belt path to the AC compressor.
- Broken Belt: Inspect all pulleys for damage. A misaligned or damaged pulley can cause premature belt wear and breakage. Use the diagram to inspect the alignment of the pulleys.
- Battery Not Charging (Alternator Issue): Similarly, if your battery isn't charging, check the alternator pulley's rotation. A slipping or broken belt is a common cause. The diagram will clearly show you the belt path to the alternator.
Important Note: Before replacing the serpentine belt, inspect all pulleys for free rotation. A seized or difficult-to-turn pulley can overload the belt and cause it to fail prematurely.
Safety Considerations
Working on the serpentine belt system involves several safety risks. Here are some key points to remember:
- Disconnect the Negative Battery Terminal: This prevents accidental starting of the engine while you're working. This is crucial because you'll be working near the starter motor and other electrical components.
- Hot Engine: Allow the engine to cool completely before working on the serpentine belt system. Exhaust manifolds and other engine components can reach extremely high temperatures.
- Moving Parts: Never put your hands or tools near the serpentine belt while the engine is running. The belt can grab clothing or tools and cause serious injury.
- Tensioner Spring: The automatic tensioner is under significant spring pressure. Use the correct tools and techniques to relieve the tension safely. Incorrectly releasing the tensioner can cause it to snap back forcefully, potentially causing injury.
- Eye Protection: Wear safety glasses to protect your eyes from debris.
Specifically regarding the 2009 Civic 1.8:
- The crankshaft pulley is connected directly to the engine's crankshaft. Any impact or damage to it can directly affect the engine's performance and integrity.
- The tensioner is spring-loaded and can recoil forcefully if not handled correctly during belt removal or installation.
By taking the proper precautions, you can safely and effectively diagnose and repair your 2009 Honda Civic's serpentine belt system.
We have the detailed serpentine belt diagram for the 2009 Honda Civic 1.8L (R18A1 engine) available for download. You can access it [Link to Download - Placeholder]. This diagram will provide the exact routing and component identification you need for a successful repair.