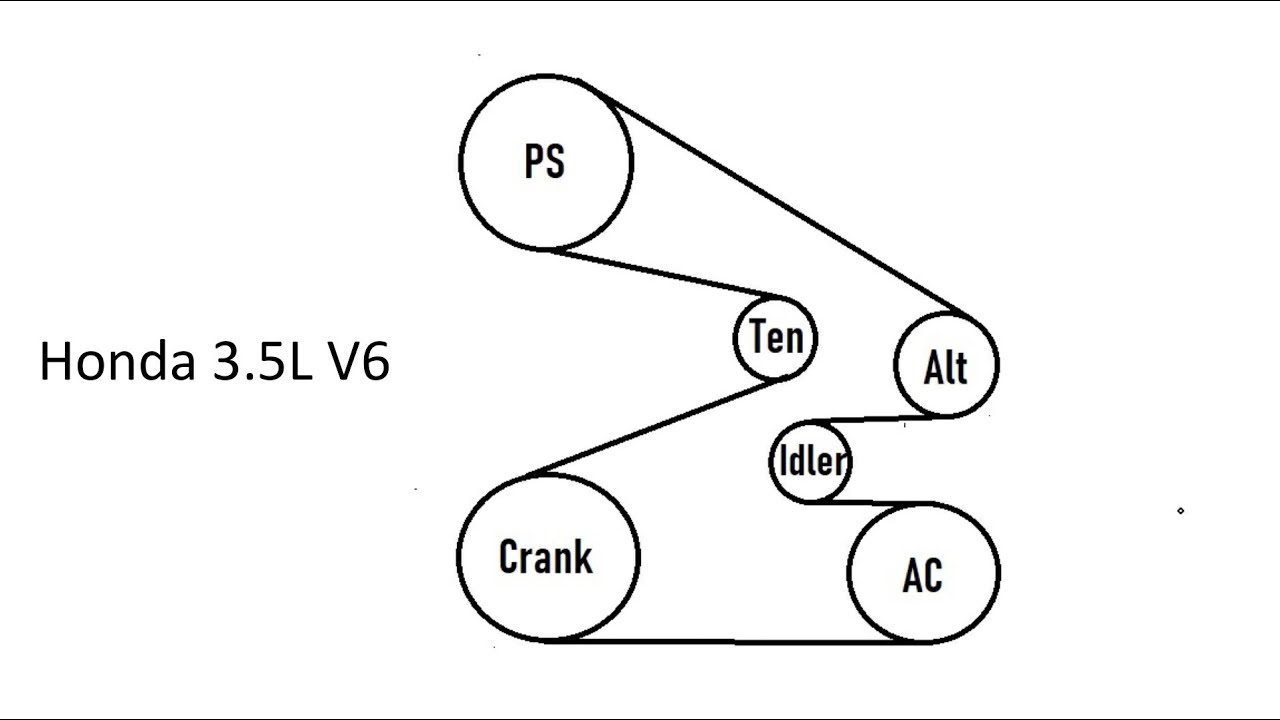
2009 Honda Pilot 3.5 Serpentine Belt Diagram
Alright, let's dive into the serpentine belt system on the 2009 Honda Pilot with the 3.5L engine. This guide is designed for the experienced DIYer who wants to understand, troubleshoot, or replace the serpentine belt and related components. Having a clear understanding of the belt's routing and function is crucial for proper maintenance and avoiding potential damage to your engine.
Purpose of Understanding the Serpentine Belt Diagram
Why bother with the diagram? Several reasons: First, if your belt breaks, you need to know how to install a new one correctly. Second, understanding the belt's path allows you to inspect all the components it drives, such as the alternator, power steering pump, AC compressor, and tensioner pulley. Identifying problems early can save you from major repairs down the road. Third, knowing the correct routing prevents improper installation, which can lead to belt slippage, component damage, and even engine overheating. Finally, it's just good general knowledge for anyone who likes to tinker with their vehicle.
Key Specs and Main Parts
The 2009 Honda Pilot's 3.5L engine typically uses a single, multi-ribbed serpentine belt. The exact length of the belt can vary slightly depending on the specific trim and options of your Pilot, but it's generally in the range of 85-87 inches. Always double-check the part number against your vehicle's VIN to ensure you get the correct replacement. The belt is usually a standard "K" section belt. Consult a parts catalog or your Honda dealer for the exact specification.
Here's a breakdown of the components typically driven by the serpentine belt:
- Crankshaft Pulley (or Harmonic Balancer): This is the driving pulley, connected directly to the engine's crankshaft. It provides the power for the entire system.
- Alternator: Charges the battery and powers the electrical system. A failing alternator can sometimes manifest as a squealing belt due to increased resistance.
- Power Steering Pump: Provides hydraulic pressure for power-assisted steering. A whining sound, especially at low speeds, can indicate a failing power steering pump.
- Air Conditioning (AC) Compressor: Compresses refrigerant for the AC system. A seized or failing compressor can put excessive strain on the belt.
- Tensioner Pulley: This is a spring-loaded pulley that maintains constant tension on the serpentine belt. A worn tensioner can cause belt slippage, noise, and premature wear. There are two types of tensioners, manual and automatic. The Pilot has an automatic tensioner.
- Idler Pulley: A smooth pulley that guides the belt around the system. It does not drive any components but ensures proper belt alignment.
Symbols and Diagram Interpretation
Serpentine belt diagrams are usually straightforward, but understanding the conventions is key.
- Solid Lines: These represent the actual path of the serpentine belt. Follow the line carefully to trace the belt's routing around each pulley.
- Arrows: Arrows on the belt line indicate the direction of belt travel. This is crucial for understanding which side of the belt contacts each pulley (grooved or smooth).
- Pulley Symbols: Each pulley is represented by a circle. Often, the diagram will include a small identifier next to the pulley (e.g., "ALT" for alternator, "P/S" for power steering, "CRANK" for crankshaft).
- Tensioner Symbol: The tensioner is usually depicted with a spring or an arrow indicating the direction of the spring's force. This helps you visualize how the tensioner maintains belt tension.
- Component Labels: Key components are usually labeled with abbreviations or full names. Familiarize yourself with these abbreviations.
Colors are sometimes used in diagrams, but generally for illustrative purposes. Don't rely on color as a primary indicator. Focus on the lines, arrows, and labels.
How It Works
The serpentine belt system is a clever design that allows a single belt to drive multiple engine accessories. The crankshaft pulley transfers rotational energy from the engine to the belt. The belt, under tension maintained by the tensioner pulley, then transfers this energy to the various accessory pulleys (alternator, power steering pump, AC compressor). Each accessory pulley requires a specific amount of torque to operate its respective component. If the belt is loose or damaged, it can slip on the pulleys, reducing the efficiency of these accessories. For instance, a slipping alternator belt can lead to a discharged battery. Proper belt tension is critical for the system to function correctly.
Real-World Use: Basic Troubleshooting Tips
Here's how understanding the serpentine belt system can help you troubleshoot common issues:
- Squealing Belt: A common symptom is a squealing or chirping noise, especially upon startup or when the engine is under load. This can be caused by a loose belt, a worn belt, a glazed pulley, or a failing component (e.g., a seizing alternator). Check the belt tension and condition. Look for cracks, fraying, or glazing.
- Battery Not Charging: If your battery isn't charging, the alternator might not be spinning at the correct speed due to a slipping belt. Check the belt tension and condition. Use a voltmeter to test the alternator's output.
- Power Steering Problems: If the power steering is intermittent or requires excessive effort, the power steering pump might not be receiving enough power due to a slipping belt. Check the belt tension and condition.
- AC Not Cooling: If the AC isn't cooling properly, the AC compressor might not be engaging. Check the belt tension and condition. Have the AC system professionally tested.
- Visual Inspection: Regularly inspect the belt for signs of wear, cracking, fraying, or glazing. Check the pulleys for damage or misalignment. Look for oil or coolant leaks that could contaminate the belt.
- Tensioner Check: Inspect the tensioner pulley for smooth operation. It should move freely but not be excessively loose. A wobbly or noisy tensioner needs replacement.
If you suspect a problem with any of the driven components, start by inspecting the belt and tensioner. A faulty belt or tensioner can often mimic the symptoms of a failing component.
Safety Considerations
Working on the serpentine belt system can be hazardous. Always disconnect the negative battery cable before starting any work. The engine should be cool to avoid burns.
- Moving Parts: Never put your hands near the serpentine belt while the engine is running. The belt and pulleys can cause serious injury.
- Tensioner Spring: The tensioner has a strong spring that can snap back unexpectedly if not handled correctly. Use the correct tools to relieve the tension before removing the belt. Usually, this involves inserting a wrench into the tensioner pulley and rotating it to compress the spring.
- Sharp Edges: Be careful of sharp edges on the pulleys and surrounding components. Wear gloves to protect your hands.
- Eye Protection: Wear safety glasses to protect your eyes from debris.
Remember, if you're not comfortable performing this work yourself, it's always best to consult a qualified mechanic.
Diagram Access
To further assist you, we have a detailed diagram of the 2009 Honda Pilot 3.5L serpentine belt routing. You can download it in PDF format. This diagram provides a visual aid that complements this article, making it easier to understand the belt's path and the location of each component.
By combining this guide with the visual aid of the diagram, you'll be well-equipped to tackle serpentine belt-related maintenance and repairs on your 2009 Honda Pilot.