2009 Hyundai Santa Fe 3.3 Serpentine Belt Diagram
Alright, let's dive into the serpentine belt diagram for a 2009 Hyundai Santa Fe with the 3.3L engine. This is crucial information whether you're tackling a repair, performing routine maintenance, or just want a better understanding of how your engine's accessories are driven. We'll break down the diagram, explain what each component does, and offer some real-world troubleshooting tips.
Purpose of the Serpentine Belt Diagram
The serpentine belt diagram is your roadmap to correctly routing the serpentine belt. Why is this important? Simple: a misrouted belt can lead to serious problems. It could cause premature wear on the belt itself, prevent accessories like the alternator and power steering pump from functioning properly, or even result in the belt completely slipping off, leaving you stranded. Using the diagram ensures that the belt follows the correct path, maintaining proper tension and allowing each accessory to operate as intended. Think of it as the key to keeping your engine's supporting systems running smoothly.
Key Specs and Main Parts in the 2009 Santa Fe 3.3L System
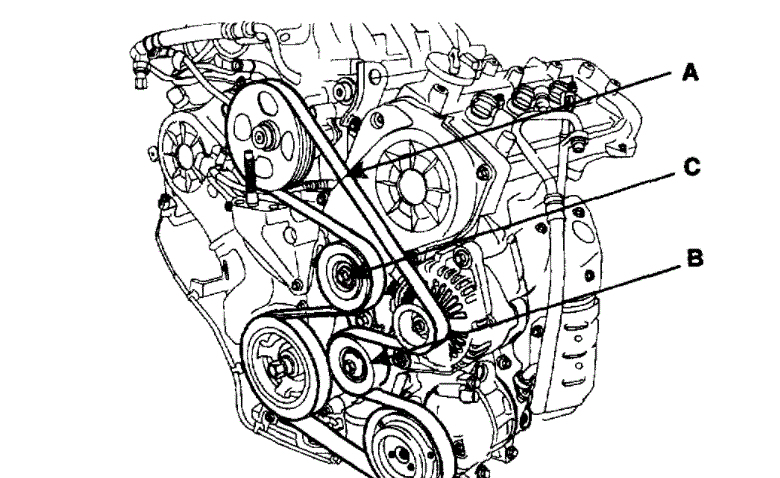
Before we dissect the diagram, let's define the key components involved in the serpentine belt system:
- Crankshaft Pulley (or Crank Pulley): This is the driving force behind the entire system. It's directly connected to the engine's crankshaft and transfers rotational energy to the serpentine belt.
- Alternator Pulley: The alternator charges the battery and provides power to the vehicle's electrical system. The serpentine belt spins this pulley, driving the alternator.
- Power Steering Pump Pulley: This pulley drives the power steering pump, which provides hydraulic assistance to make steering easier.
- Air Conditioning (A/C) Compressor Pulley: Powers the A/C compressor, which is responsible for cooling the cabin.
- Water Pump Pulley: Crucial for circulating coolant throughout the engine, preventing overheating.
- Idler Pulley(s): These are smooth pulleys that guide the belt and help maintain the correct tension. They don't drive any accessories. They purely exist to redirect the belt's path and optimize contact with other pulleys.
- Tensioner Pulley (with Automatic Tensioner): This is spring-loaded and maintains the correct amount of tension on the serpentine belt. The automatic tensioner is a critical component that automatically adjusts for belt stretch and wear, ensuring consistent performance.
- Serpentine Belt: The rubber belt itself, responsible for transmitting power between all the pulleys.
Specific Specs (General): While exact belt length varies depending on the manufacturer, knowing you're working with a multi-ribbed serpentine belt for a 3.3L V6 engine is a start. Always refer to the part number specified for your vehicle when purchasing a replacement belt. Torque specs for the tensioner pulley bolt, idler pulley bolts, and accessory bracket bolts are critical for safe and effective repairs. These values are usually found in the repair manual.
Understanding Serpentine Belt Diagram Symbols
The diagram uses a standardized set of symbols to represent the components and belt path. Here’s a breakdown:
- Solid Lines: Represent the path of the serpentine belt itself. The thickness of the line doesn't typically indicate anything specific, but it is there to make it easier to visualize.
- Circles/Rounded Shapes: Indicate pulleys. They're usually labeled with abbreviations for the corresponding accessory (e.g., ALT for Alternator, P/S for Power Steering, A/C for Air Conditioning, W/P for Water Pump, CRANK for Crankshaft).
- Arrows: Show the direction of rotation for each pulley. This is essential for understanding how the belt is meant to drive each component.
- Smooth Pulleys: Typically represent idler pulleys.
- Grooved Pulleys: Indicate the pulleys that are driven by the ribbed side of the serpentine belt.
- Tensioner Symbol: Usually represented by a spring or a drawing that shows the tensioner's mechanism. The direction of the arrow on the tensioner indicates the direction in which the tensioner arm moves to tighten or loosen the belt.
- Colors (Less Common): Some diagrams use different colors to highlight specific sections of the belt path or different types of pulleys. However, this is less common; most diagrams rely on line type and labels.
How the Serpentine Belt System Works
The crankshaft pulley is the heart of the system. As the engine runs, the crankshaft rotates, driving the crankshaft pulley. The serpentine belt, wrapped around this pulley, then transfers this rotational force to all the other pulleys in the system. The belt is strategically routed to ensure that each accessory – the alternator, power steering pump, A/C compressor, and water pump – receives the necessary power to operate. The tensioner keeps the belt taut, preventing slippage and ensuring efficient power transfer. Without proper tension, the belt will slip, and the accessories won't function correctly. The idler pulleys simply act as guides, optimizing the belt's wrap angle around the driving and driven pulleys to maximize contact and prevent premature wear.
Real-World Use: Basic Troubleshooting Tips
Here are some common issues you might encounter and how the serpentine belt diagram can help:
- Squealing Noise: Often indicates a loose or worn serpentine belt. Check the tensioner. If the tensioner is maxed out or the belt shows signs of wear (cracks, glazing), it's time for a replacement. Refer to the diagram to ensure correct routing after replacement.
- Accessory Malfunction: If your alternator isn't charging or your power steering isn't working, the serpentine belt could be the culprit. Check the diagram to make sure the belt is correctly routed around the affected accessory's pulley. A slipped or broken belt will obviously cause these issues.
- Belt Slippage: Can be caused by a loose belt, worn pulleys, or contamination (oil, coolant). Inspect the pulleys for damage or excessive wear. Clean any contaminants from the pulleys and replace the belt if necessary, carefully following the diagram for correct installation.
- Visual Inspection: Regularly inspect the belt for cracks, fraying, missing ribs, or glazing (a shiny, hardened surface). Any of these signs indicate the need for replacement. The diagram helps you visualize the entire belt path for a thorough inspection.
Safety Considerations
Working with the serpentine belt system involves inherent risks, particularly when the engine is running or can unexpectedly turn over. Here are some crucial safety precautions:
- Disconnect the Negative Battery Terminal: This prevents accidental engine starting while you're working on the system.
- Keep Hands and Fingers Clear: Never reach into the engine bay while the engine is running. The rotating belt and pulleys can cause serious injury.
- Wear Safety Glasses: Protect your eyes from debris that could be dislodged while working.
- Hot Engine: Ensure the engine is cool before working near it to avoid burns. Specifically, working near the exhaust manifold is risky if the engine is still hot.
- Tensioner Spring: The automatic tensioner contains a strong spring. Use the correct tools and techniques to release the tension and avoid injury. Consult the repair manual for detailed instructions. Improper handling can lead to the tensioner snapping back with considerable force.
Remember, if you're unsure about any aspect of the serpentine belt replacement or troubleshooting process, consult a qualified mechanic. It's always better to be safe than sorry.
We have a high-resolution, printable version of the 2009 Hyundai Santa Fe 3.3L serpentine belt diagram available for download. This detailed diagram will provide you with an even clearer view of the belt routing and component locations.