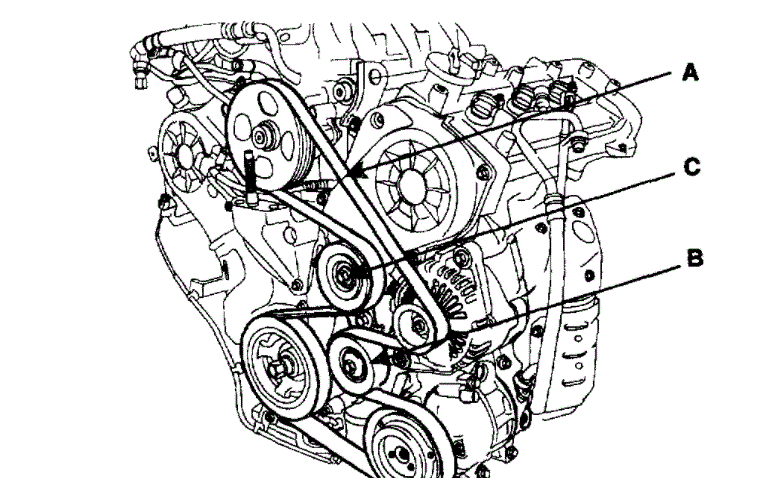
2009 Hyundai Santa Fe Serpentine Belt Diagram
The serpentine belt in your 2009 Hyundai Santa Fe is a crucial component, responsible for powering several essential systems. Understanding its layout, often referred to as the serpentine belt diagram, is invaluable for maintenance, troubleshooting, and repairs. This article will serve as your comprehensive guide to interpreting the 2009 Santa Fe serpentine belt diagram, empowering you to tackle common issues with confidence.
Purpose of the Serpentine Belt Diagram
The serpentine belt diagram isn't just a pretty picture; it's a lifeline. Its primary purpose is to illustrate the correct routing of the serpentine belt around various engine accessories. Why is this important? A properly routed belt ensures each accessory receives the necessary power. Using the diagram, you can:
- Replace a worn or broken belt: Knowing the exact path ensures the new belt is installed correctly.
- Diagnose squealing or slipping: A misaligned or worn belt can cause these issues. The diagram helps you verify proper alignment.
- Troubleshoot accessory malfunctions: If a specific accessory isn't working, the diagram can help you determine if the belt is the culprit.
- Gain a deeper understanding of your engine: By tracing the belt's path, you learn which components are belt-driven.
Key Specs and Main Parts
The 2009 Hyundai Santa Fe came with several engine options, each with a potentially different serpentine belt configuration. It’s crucial to consult the diagram specific to your engine. The most common engine options and the systems they power are:
- 2.7L V6 (G6EA): This engine typically powers the alternator, power steering pump, air conditioning compressor, and water pump.
- 3.3L V6 (G6DB): Similar to the 2.7L, this engine also powers the alternator, power steering pump, air conditioning compressor, and water pump.
Key components you'll find in the serpentine belt diagram include:
- Crankshaft Pulley (or Harmonic Balancer): The main pulley driven directly by the engine, acting as the origin of the belt's power.
- Alternator Pulley: Powers the alternator, which charges the battery and provides electrical power to the vehicle.
- Power Steering Pump Pulley: Drives the power steering pump, assisting with steering effort.
- Air Conditioning (A/C) Compressor Pulley: Engages and drives the A/C compressor to provide cooling.
- Water Pump Pulley: Circulates coolant throughout the engine, preventing overheating.
- Tensioner Pulley: An adjustable pulley that maintains the correct tension on the serpentine belt. This is crucial for proper operation and belt longevity. It often includes an automatic or manual adjustment mechanism.
- Idler Pulley: A smooth pulley that guides the belt around the engine accessories. It has no mechanical purpose other than to provide the correct belt path.
Symbols Explained
The serpentine belt diagram employs a few key symbols to represent different aspects of the belt routing. Understanding these symbols is crucial for accurate interpretation.
- Solid Lines: These represent the main path of the serpentine belt. Follow these lines carefully to understand the belt's trajectory.
- Dotted Lines (sometimes): Occasionally, dotted lines might indicate the *back* of the belt. This helps visualize how the belt wraps around certain pulleys.
- Arrows: Indicate the direction of rotation of each pulley. This is particularly important when considering how the belt interacts with each component.
- Pulley Icons: Each pulley is represented by a circle. The diagram may include abbreviations (e.g., ALT for alternator, P/S for power steering) to identify each component.
- Tensioner Indicator: The tensioner pulley is often depicted with an arrow indicating the direction of its movement during belt installation or adjustment.
How It Works
The serpentine belt's operation is relatively straightforward, but understanding the underlying principles is key. The engine's crankshaft rotates, which in turn drives the crankshaft pulley. This pulley transmits rotational force to the serpentine belt. The belt, under tension maintained by the tensioner pulley, then wraps around and drives the other accessory pulleys.
The tension in the belt is critical. Too little tension, and the belt will slip, resulting in reduced performance of the accessories. Too much tension, and the belt and pulley bearings will wear out prematurely. The tensioner pulley's job is to maintain the optimal tension, compensating for belt stretch and engine vibrations.
When the engine is running, the crankshaft pulley is in constant motion, driving the belt and the attached accessories. When an accessory is engaged (e.g., the A/C compressor), it places an additional load on the engine, which can be felt as a slight decrease in engine RPMs. A healthy serpentine belt and properly functioning accessories ensure smooth and efficient operation.
Real-World Use: Basic Troubleshooting Tips
Here are some common issues you might encounter and how the serpentine belt diagram can help:
- Squealing Noise: This is often caused by a slipping belt. Check the belt tension using the tensioner pulley. Also, inspect the belt for cracks, glazing, or wear. The diagram will help you identify the location of the tensioner and the proper belt path for inspection.
- Accessory Malfunction: If your power steering is weak or your A/C isn't blowing cold, the serpentine belt might be the culprit. Use the diagram to verify that the belt is properly routed around the affected accessory's pulley. If the belt is slipping or broken, the accessory won't function correctly.
- Belt Wear: Inspect the belt regularly for signs of wear, such as cracks, fraying, or missing chunks. The diagram will help you identify the correct belt path so you can thoroughly inspect the entire length of the belt.
- Belt Jumping Off: If the belt repeatedly jumps off the pulleys, suspect a misaligned pulley or a faulty tensioner. Use a straight edge to check the alignment of the pulleys. The diagram will help you identify the location of each pulley and the correct belt path.
Safety Precautions
Working on the serpentine belt system can be dangerous. Observe the following safety precautions:
- Disconnect the Negative Battery Terminal: This prevents accidental starting of the engine while you're working.
- Wear Safety Glasses: Protect your eyes from debris and flying objects.
- Keep Hands and Clothing Clear: The engine compartment contains moving parts. Keep your hands and clothing clear of the belt, pulleys, and fans.
- Hot Surfaces: Be aware that the engine and exhaust components can be extremely hot, even after the engine has been turned off. Allow sufficient cooling time before working in the engine compartment.
- Tensioner Spring: The tensioner pulley is spring-loaded and can snap back with considerable force. Use the correct tools and techniques when releasing or adjusting the tension. Failure to do so could result in injury.
The serpentine belt system, particularly the tensioner, stores a lot of energy. Releasing the tensioner improperly can cause serious injury. Always use the correct tools and follow the manufacturer's instructions carefully.
Understanding the 2009 Hyundai Santa Fe serpentine belt diagram empowers you to perform routine maintenance and diagnose common problems. Remember to always prioritize safety and consult a qualified mechanic if you're unsure about any aspect of the repair.
We have a high-resolution, downloadable PDF of the 2009 Hyundai Santa Fe serpentine belt diagram available. It covers both the 2.7L and 3.3L engines. This detailed diagram will be a valuable resource for your DIY projects.