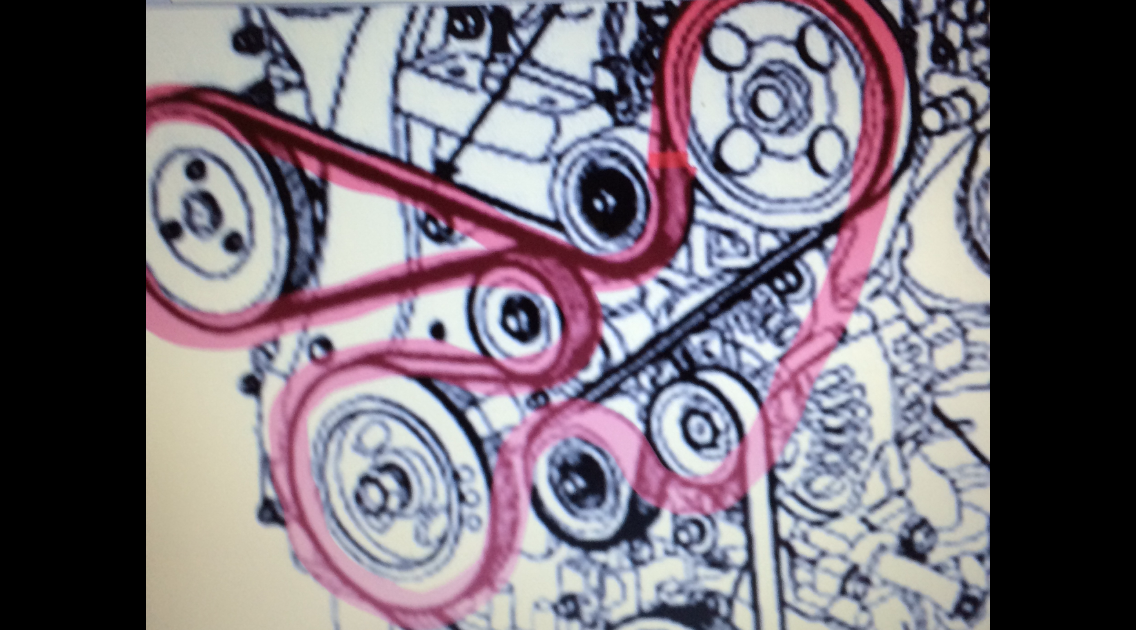
2009 Hyundai Sonata Serpentine Belt Diagram
For the intermediate car owner tackling maintenance or repairs on a 2009 Hyundai Sonata, understanding the serpentine belt diagram is absolutely crucial. This guide aims to demystify that diagram, providing a comprehensive breakdown of its purpose, components, functionality, and safety considerations. Whether you're replacing a worn belt, diagnosing a squealing noise, or simply want to understand your engine better, this information will empower you to approach the task with confidence.
Purpose of the Serpentine Belt Diagram
The serpentine belt diagram isn't just a pretty picture; it's a roadmap for replacing and troubleshooting the serpentine belt system. Its primary purpose is to show the correct routing of the serpentine belt around the various engine accessories. It's essential for:
- Belt Replacement: Ensuring the new belt is installed correctly, preventing damage to the belt and the accessories it drives. An incorrectly routed belt can lead to premature wear, slippage, and complete failure.
- Troubleshooting: Diagnosing issues like squealing belts, power steering failures, or alternator charging problems. By referencing the diagram, you can systematically check each component driven by the belt.
- Preventive Maintenance: Understanding the system allows you to visually inspect the belt and pulleys for wear and tear, allowing for timely replacement and preventing more significant engine problems.
- Learning Engine Layout: It offers a general understanding of how the accessories are laid out within the engine bay.
Key Specs and Main Parts of the 2009 Hyundai Sonata Serpentine Belt System
The 2009 Hyundai Sonata, depending on the engine (2.4L inline-4 or 3.3L V6), uses a specific serpentine belt. While the fundamental principles remain the same, the routing differs significantly between the two engines. Knowing your engine type is the first step.
Main Components:
- Serpentine Belt: A long, continuous belt made of reinforced rubber, responsible for transferring power from the crankshaft to the engine accessories.
- Crankshaft Pulley (Crank Pulley): Connected directly to the crankshaft, this pulley is the driving force behind the entire system.
- Alternator Pulley: Driven by the serpentine belt, the alternator generates electrical power to recharge the battery and run the car's electrical system.
- Power Steering Pump Pulley: Operates the power steering pump, providing hydraulic assistance for easier steering.
- Air Conditioning (A/C) Compressor Pulley: Engages and disengages to drive the A/C compressor, which cools the vehicle's cabin.
- Tensioner Pulley: A spring-loaded pulley that maintains constant tension on the serpentine belt, preventing slippage and ensuring proper operation of the accessories. It's a *critical* component.
- Idler Pulley(s): Smooth, non-driven pulleys that guide the belt and provide additional wrap around other pulleys. Not all engines will have an idler pulley.
Key Specs (General - Consult your vehicle's service manual for exact specifications):
- Belt Length: Expressed in inches or millimeters. The correct length is *crucial* for proper tension and operation.
- Belt Width: Also expressed in inches or millimeters.
- Number of Ribs: The number of grooves on the belt that mate with the grooves on the pulleys.
Symbols and Diagram Conventions
Understanding the symbols on the diagram is vital for accurate interpretation. While specific diagram formats can vary slightly, here are some common conventions:
- Solid Lines: Represent the path of the serpentine belt. Follow these lines carefully to ensure correct routing.
- Arrows: Indicate the direction of belt rotation. Always check the arrows to confirm you're routing the belt correctly.
- Pulleys: Typically represented as circles. Labels or abbreviations will identify each pulley (e.g., ALT for Alternator, P/S for Power Steering).
- Tensioner Pulley: May be represented with a spring symbol to indicate its spring-loaded mechanism.
- Routing Overlays (Sometimes): Some diagrams use different line thicknesses or colors to highlight specific sections of the belt path, especially where the belt passes behind other components.
It's important to note that diagrams may have slight variations depending on the source (e.g., Haynes manual vs. factory service manual). Always cross-reference with multiple sources if you're unsure.
How It Works: Power Transmission
The serpentine belt system works by transferring rotational energy from the engine's crankshaft to various accessories. Here's the process:
- The crankshaft rotates, turning the crankshaft pulley.
- The serpentine belt, wrapped around the crankshaft pulley, is driven by its rotation.
- The belt, in turn, drives the other pulleys connected to the engine accessories (alternator, power steering pump, A/C compressor).
- The tensioner pulley maintains the correct tension on the belt, preventing slippage and ensuring efficient power transfer. Proper tension is *critical* for the system to function correctly.
- The idler pulley(s), if present, guide the belt along its path, providing optimal wrap around the driven pulleys.
Without a properly functioning serpentine belt system, the alternator wouldn't charge the battery, the power steering wouldn't assist steering, and the A/C compressor wouldn't cool the cabin. This can rapidly lead to a non-functional vehicle.
Real-World Use: Basic Troubleshooting Tips
Here are some common issues you might encounter and how the serpentine belt diagram can help:
- Squealing Belt: This is often caused by a loose belt, a worn belt, or a glazed pulley. Check the belt tensioner for proper operation. Use the diagram to ensure the belt is routed correctly and not rubbing against anything.
- Accessory Failure (e.g., Power Steering): If the power steering suddenly stops working, inspect the belt for breaks or excessive wear. The diagram will confirm that the power steering pump is indeed driven by the serpentine belt.
- Battery Not Charging: A failing alternator, or a serpentine belt that's slipping on the alternator pulley, can cause this. Use the diagram to locate the alternator pulley and inspect the belt condition and tension.
- Visual Inspection: Regularly inspect the belt for cracks, fraying, or missing chunks. The diagram helps you to locate the belt and see its path clearly for inspection.
Using the Diagram for Replacement: When replacing the belt, carefully note the existing routing before removing the old belt. Take pictures if necessary. Then, use the diagram to precisely route the new belt, ensuring it sits correctly in the grooves of each pulley. Double-check the routing against the diagram before starting the engine.
Safety Considerations
Working on the serpentine belt system involves potential hazards. Here are some key safety precautions:
- Disconnect the Battery: Always disconnect the negative battery cable before working on any part of the electrical system, including components driven by the serpentine belt. This prevents accidental shocks.
- Engine Off and Cool: Never work on the serpentine belt system with the engine running or hot. Burns and serious injury are possible.
- Moving Parts: Be extremely cautious around moving parts. Keep hands, clothing, and tools clear of the belt and pulleys when the engine is running.
- Tensioner Pulley: The tensioner pulley is under spring pressure. Use the correct tools to relieve the tension when removing or installing the belt. Incorrectly releasing the tensioner can cause injury.
- Eye Protection: Wear safety glasses to protect your eyes from debris.
The crankshaft pulley is connected directly to the engine's rotating assembly. Accidental contact when the engine is running can result in severe injury. Similarly, the alternator produces electricity even at idle, so always disconnect the battery before working around it.
By understanding the function and proper routing of the serpentine belt using the diagram, and by following basic safety precautions, you can confidently tackle this common maintenance task.
We have a detailed 2009 Hyundai Sonata Serpentine Belt Diagram available for download. This high-resolution file provides a clear and comprehensive view of the belt routing for both engine options. It is an invaluable resource to ensure your replacement and troubleshooting goes smoothly.