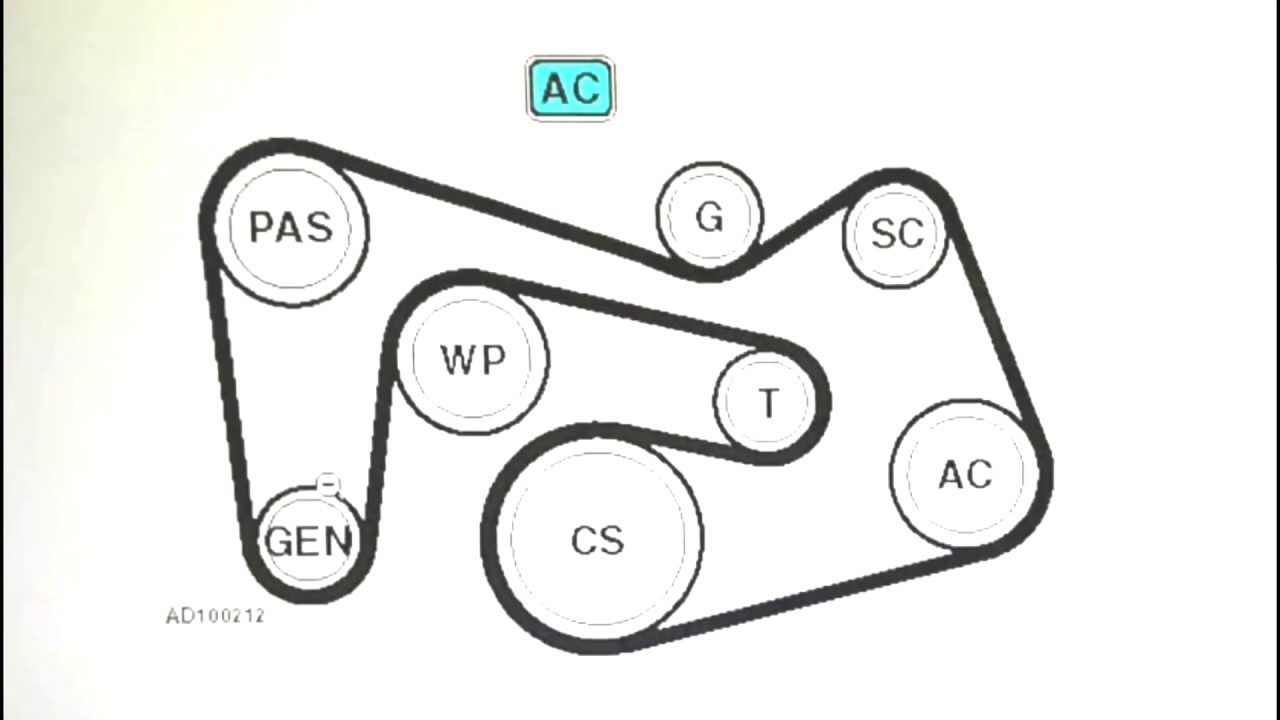
2009 Mercedes C300 Serpentine Belt Diagram
Alright folks, let's dive into the serpentine belt system on the 2009 Mercedes-Benz C300. This is a crucial component for keeping your engine running smoothly, and understanding its layout is essential for preventative maintenance, troubleshooting, and even some more advanced DIY repairs. We're going to break down the serpentine belt diagram, explaining everything from its purpose to how to use it effectively in the real world. And, just so you know, we have the complete, printable diagram available for download at the end of this article.
Why Understanding the Serpentine Belt Diagram Matters
The serpentine belt, also known as the accessory drive belt, is responsible for powering several vital components of your C300's engine. Knowing its path, tension, and the components it drives is key for several reasons:
- Routine Maintenance: You'll be able to visually inspect the belt for wear and tear, cracks, or fraying more effectively. Knowing the belt's routing allows you to check its entire length easily.
- Troubleshooting: Squealing noises, loss of power steering, or a non-charging battery can often be traced back to the serpentine belt or its components. The diagram helps you pinpoint the issue.
- Replacement: Replacing the serpentine belt is a common DIY task. The diagram ensures you route the new belt correctly, avoiding damage to the belt or engine components. Incorrect routing can lead to serious problems.
- Component Diagnosis: If an accessory, such as the AC compressor or power steering pump, fails, understanding the serpentine belt system can help you isolate the faulty component and assess its impact on the rest of the system.
Key Specs and Main Parts
Let's cover some of the essential components and specifications you'll need to be familiar with when working with the serpentine belt on your 2009 C300.
- Serpentine Belt Length: While the exact length can vary slightly based on options, the belt length is generally around 2220 mm (approximately 87 inches). Always verify the correct part number for your specific C300 model using your VIN.
- Belt Material: Serpentine belts are typically made of a reinforced EPDM rubber compound, designed for durability and resistance to heat and wear.
- Crankshaft Pulley (Harmonic Balancer): This pulley, connected directly to the crankshaft, drives the serpentine belt. It also functions as a harmonic balancer, dampening engine vibrations.
- Alternator Pulley: The alternator converts mechanical energy from the engine into electrical energy to power the car's electrical system and charge the battery.
- Power Steering Pump Pulley: This pulley drives the power steering pump, which provides hydraulic assistance for steering.
- Air Conditioning Compressor Pulley: This pulley drives the AC compressor, which circulates refrigerant in the air conditioning system.
- Idler Pulleys: Smooth, usually plastic pulleys that guide the belt along its path. They provide necessary clearance and wrap angle around other pulleys.
- Tensioner Pulley: This spring-loaded pulley maintains the correct tension on the serpentine belt. It's crucial for proper belt operation and prevents slippage. The tensioner is *usually* automatic, using spring pressure.
Understanding the Serpentine Belt Diagram: Symbols and Conventions
Serpentine belt diagrams aren't complex, but understanding the conventions used can save you time and frustration.
- Solid Lines: These represent the path of the serpentine belt itself. Following the line shows how the belt is routed around each pulley.
- Arrows: Arrows indicate the direction of belt rotation. Pay attention to these arrows, especially when reinstalling a new belt.
- Pulley Symbols: Pulleys are usually represented as circles. Sometimes, they will have labels indicating what component they belong to (e.g., ALT for alternator, AC for air conditioning compressor, PS for power steering).
- Tensioner Representation: The tensioner is typically depicted with an arrow indicating the direction in which it applies tension to the belt. It may also be labeled as "Tensioner" or "Belt Tensioner."
- Component Labels: The diagram will label each component that the belt drives, making it easy to identify each pulley's function.
How the Serpentine Belt System Works
The serpentine belt system is elegantly simple. The crankshaft pulley, driven directly by the engine, provides the rotational force that drives the entire system. The serpentine belt wraps around the crankshaft pulley and then weaves its way around all the other accessory pulleys – alternator, power steering pump, AC compressor, and idler pulleys. The tensioner pulley maintains the proper tension on the belt, ensuring sufficient grip on each pulley to prevent slippage. Think of it as a single continuous loop transferring power from the engine to various accessories. If the belt is too loose, it will slip, and the accessories won't function correctly. If it's too tight, it can damage bearings in the accessories or even break the belt.
Real-World Use: Troubleshooting Tips
Here's how you can use the serpentine belt diagram to troubleshoot common issues:
- Squealing Noise: A squealing noise, especially when the engine is first started or when accessories are heavily loaded (e.g., turning the steering wheel at low speed), often indicates a slipping serpentine belt. Use the diagram to visually inspect the belt for wear, cracks, or glazing (a shiny, smooth surface). Check the tensioner to see if it's moving freely and applying sufficient tension. A worn or failing tensioner can cause belt slippage.
- Loss of Power Steering/AC: If you suddenly lose power steering or your AC stops working, the serpentine belt may have broken or slipped off a pulley. Use the diagram to verify the belt's routing. If the belt is broken, carefully inspect all pulleys for damage and ensure they are rotating freely before installing a new belt. If the belt has just slipped off, determine *why* it came off before reinstalling it.
- Battery Not Charging: If your battery isn't charging, the alternator may not be spinning properly. Use the diagram to check the serpentine belt and its connection to the alternator pulley. A loose or worn belt can prevent the alternator from charging the battery effectively.
- Visual Inspection: Regularly inspect your serpentine belt for signs of wear and tear. Look for cracks, fraying, missing chunks, or excessive wear on the edges of the belt. A worn belt is a ticking time bomb and should be replaced promptly. Use the diagram to ensure you are checking the entire length of the belt, including the underside, which is often hidden from view.
Safety Considerations
Working on the serpentine belt system can be dangerous if you don't take proper precautions:
- Disconnect the Battery: Always disconnect the negative battery cable before working on the serpentine belt system to prevent accidental starting of the engine.
- Hot Engine: Never work on the serpentine belt system when the engine is hot. Allow the engine to cool completely before starting any repairs.
- Moving Parts: Be extremely cautious around moving parts. Keep your hands, tools, and clothing clear of the serpentine belt and pulleys when the engine is running.
- Tensioner Spring: The tensioner pulley is spring-loaded and can snap back forcefully when released. Use the appropriate tools to relieve the tension and prevent injury. Use a wrench of the correct size on the tensioner arm.
- Proper Tools: Use the correct tools for the job. Avoid using makeshift tools, which can damage components or cause injury. A serpentine belt tool kit makes belt removal and installation much easier.
The serpentine belt is a crucial part of your 2009 Mercedes C300, and understanding its system and its diagram is very important for the maintenance and repair of your vehicle. Remember, preventative maintenance is key to keeping your car running smoothly. Regularly inspect your serpentine belt and replace it as needed to avoid costly repairs down the road.
Okay, now that you've got a good handle on the 2009 C300's serpentine belt system, you're ready to tackle your next repair or maintenance task. And as promised, we've got that diagram ready for you. You can download the high-resolution version below.
Download your 2009 Mercedes C300 Serpentine Belt Diagram [link to download file here].