
2009 Nissan Altima 2.5 S Belt Diagram
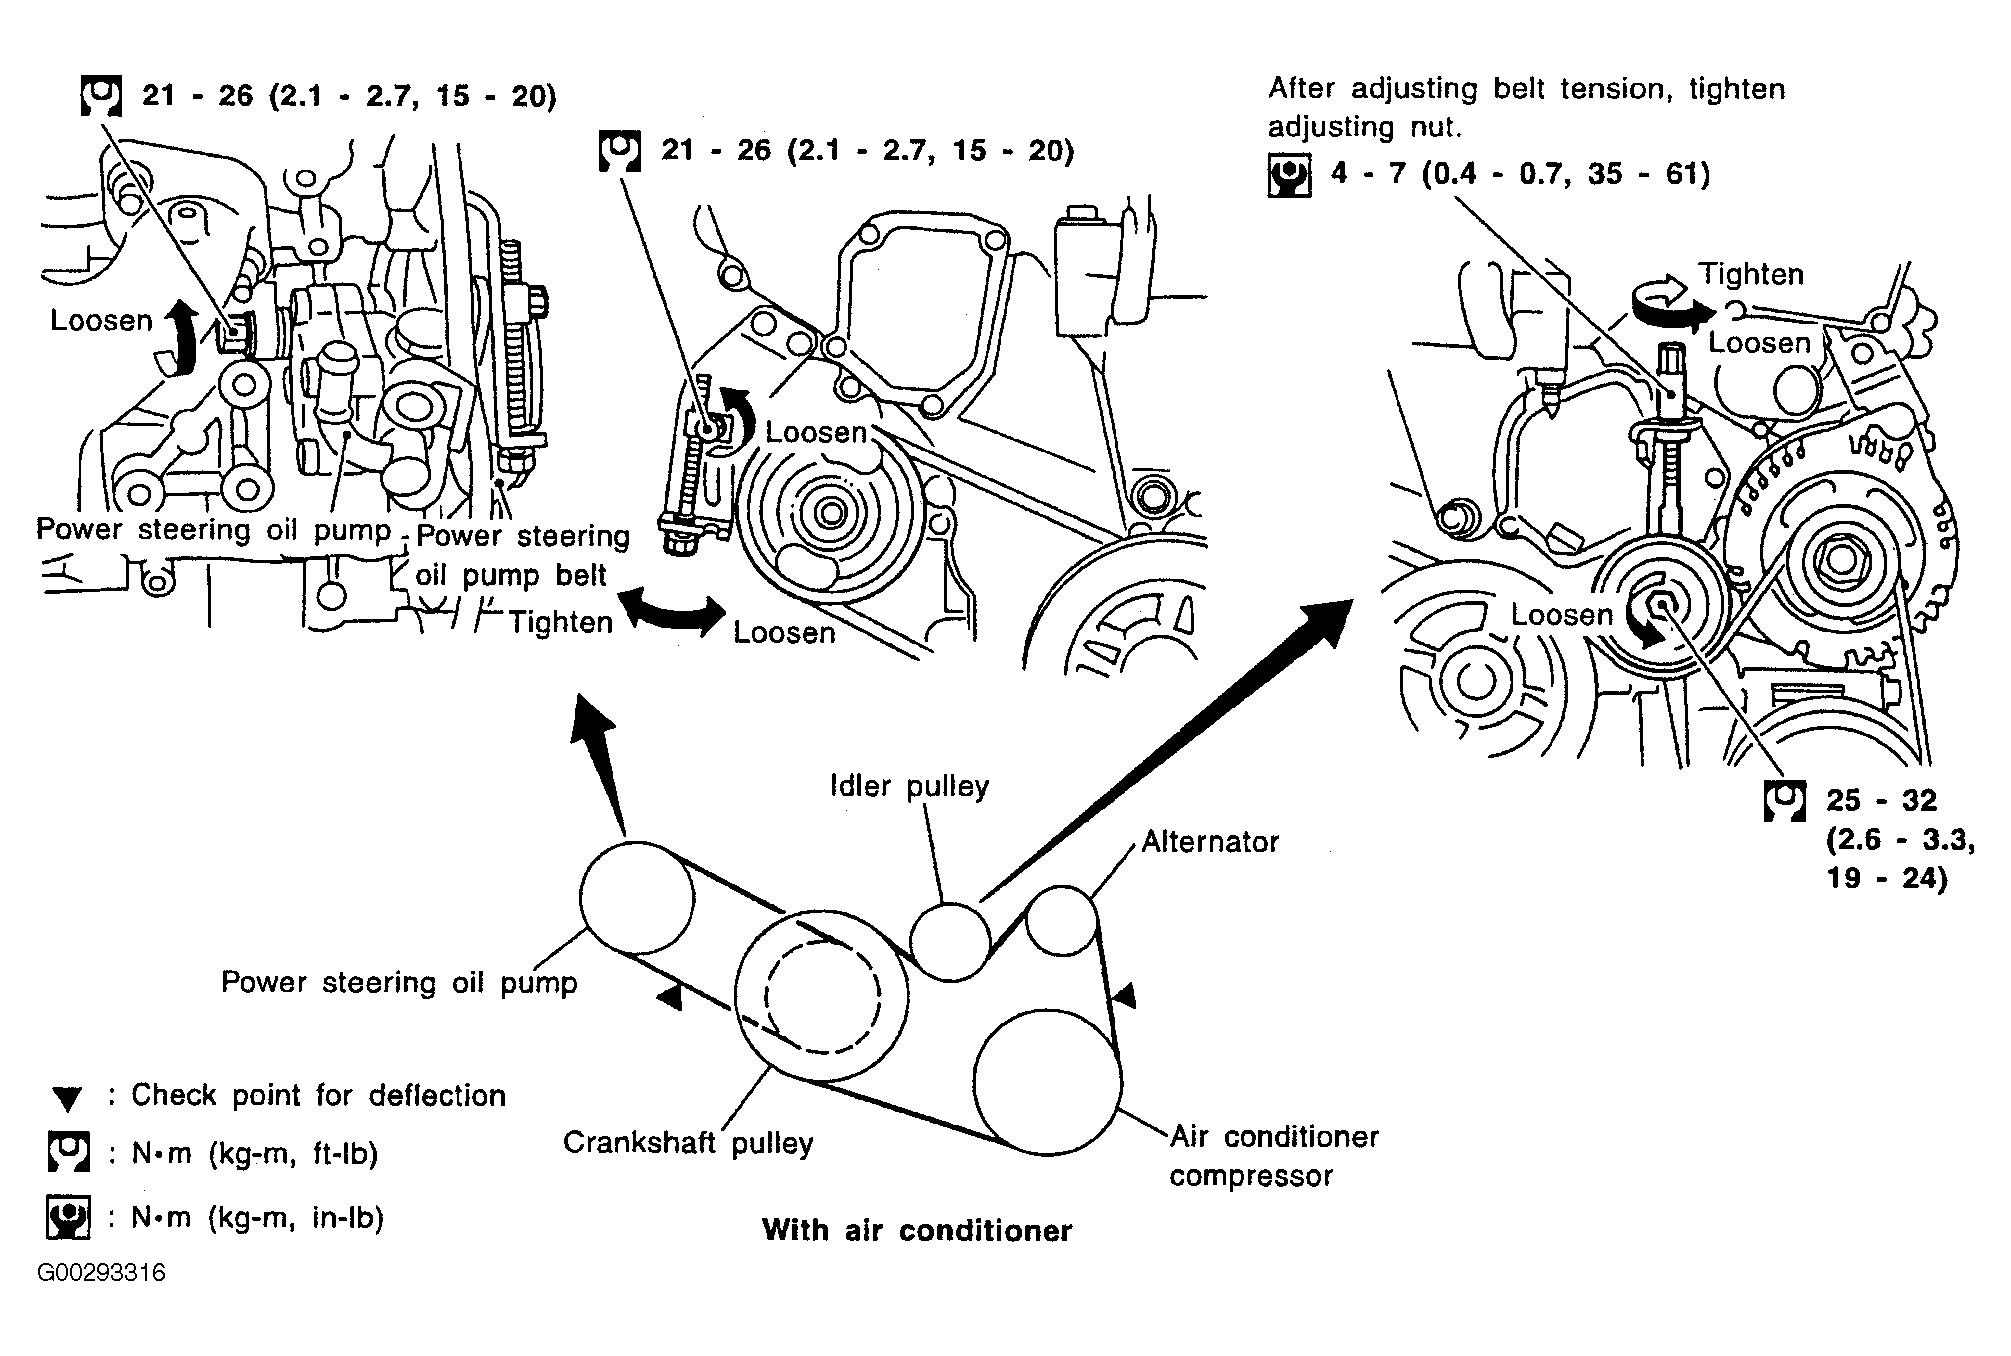
Hey there, fellow gearheads! Today, we're diving deep into the serpentine belt system of the 2009 Nissan Altima 2.5 S. Specifically, we're going to dissect the belt diagram. Knowing this diagram isn't just about showing off your mechanical prowess; it's crucial for various tasks, from routine maintenance to diagnosing and fixing issues that can leave you stranded.
Purpose of the 2009 Nissan Altima 2.5 S Belt Diagram
Why bother with a belt diagram? Several reasons stand out:
- Repair and Replacement: The most obvious reason. If your belt snaps or shows excessive wear, you'll need to replace it. The diagram shows you the correct routing to ensure all components function properly. Routing the belt incorrectly can cause serious damage to your engine and accessories.
- Troubleshooting: A squealing or slipping belt can indicate problems with the belt itself or other components like the pulleys or tensioner. The diagram helps you visually inspect the system and identify potential issues.
- Preventive Maintenance: Understanding the belt system allows you to proactively inspect for wear and tear, preventing costly breakdowns down the road.
- Learning: Even if you're not planning a repair right now, studying the diagram improves your understanding of how your Altima's engine accessories are driven.
Key Specs and Main Parts of the Serpentine Belt System
Before we get into the diagram itself, let's familiarize ourselves with the key components and some general specs. Keep in mind that the exact belt length may vary slightly depending on aftermarket options and specific accessory configurations, but the routing remains consistent.
Main Components:
- Serpentine Belt: The heart of the system, this continuous belt drives multiple accessories.
- Crankshaft Pulley (Harmonic Balancer): Attached to the crankshaft, this pulley provides the rotational force that drives the belt.
- Alternator Pulley: The alternator generates electricity to power your car's electrical system and charge the battery.
- Power Steering Pump Pulley: The power steering pump provides hydraulic assistance for steering.
- Air Conditioning Compressor Pulley: The AC compressor is responsible for cooling the cabin.
- Tensioner Pulley: This spring-loaded pulley maintains the correct tension on the serpentine belt. It's critical for proper belt operation and preventing slippage.
- Idler Pulley: An idler pulley (sometimes present) simply guides the belt around the system, helping to maintain proper wrap angle on the other pulleys.
General Specs (Typical):
Belt Length: Approximately 82-84 inches (This is a rough estimate; always verify with the correct part number for your specific vehicle).
Belt Type: Multi-ribbed serpentine belt.
Understanding the Diagram: Symbols and Conventions
The belt diagram is a simplified representation of the physical belt routing. Here’s how to interpret the common symbols:
- Solid Lines: Represent the serpentine belt itself. The thickness of the line doesn't usually matter, but it signifies the path of the belt.
- Circles/Ovals: These represent the pulleys. The size and labeling (ALT, P/S, A/C, etc.) identify which accessory each pulley is connected to.
- Arrows: Arrows on the belt line indicate the direction of belt rotation. Pay close attention to these!
- Tensioner Symbol: The tensioner is usually depicted with a spring-like symbol or an arrow indicating the direction of tension. It's typically shown with a mechanism for releasing the tension during belt removal and installation.
- Idler Pulley Symbol: Often a simple circle labeled "IDLER" or simply not labeled at all.
- Grooved Pulleys: Represent the pulleys driving the accessories. The belt grips inside the grooves.
- Smooth Pulleys: Usually the idler or tensioner pulleys. The *back* of the belt runs against these.
How the Serpentine Belt System Works
The crankshaft pulley, driven by the engine's rotation, spins the serpentine belt. The belt then transfers this rotational force to the various accessory pulleys. The tensioner pulley keeps the belt taut, preventing slippage and ensuring efficient power transfer. If the belt is too loose, it will squeal and the accessories won't operate properly (e.g., weak power steering, poor AC performance, battery not charging correctly). If it’s too tight, it will put excessive stress on the bearings of the accessories, leading to premature failure.
The order in which the belt wraps around the pulleys is crucial. The diagram shows exactly how the belt must be routed to engage each accessory correctly and with the appropriate direction of rotation. Some accessories require the grooved side of the belt, while others utilize the smooth backside. Improper routing will likely prevent the engine from running or damage engine components.
Real-World Use: Basic Troubleshooting
Here are a few common scenarios where understanding the belt diagram comes in handy:
- Squealing Belt: Often caused by a loose belt, a worn belt, or a misaligned pulley. Use the diagram to inspect the belt for cracks, fraying, or glazing. Check the tensioner for proper function. A worn tensioner may not be applying enough force.
- Belt Slippage: Can cause the alternator to undercharge the battery, the power steering to be weak, or the AC to blow warm air. Inspect the belt tension and condition. Look for signs of oil or coolant contamination on the belt or pulleys, which can reduce grip.
- Broken Belt: Obviously, the belt needs to be replaced immediately. Use the diagram to ensure correct routing of the new belt. Before installing a new belt, inspect all pulleys for damage or unusual wear that may have caused the original belt to fail.
Example: You hear a squealing noise, especially when you turn the steering wheel. This could indicate a loose or worn belt, particularly affecting the power steering pump. Refer to the diagram to check the belt's condition and the tensioner's function. If the tensioner is weak, replacing it along with the belt is often a good idea.
Safety Considerations
Working on the serpentine belt system can be dangerous if you're not careful. Here are some key safety points:
- Disconnect the Battery: Always disconnect the negative battery terminal before working on any electrical components, including the alternator.
- Engine Off and Cool: Never work on the belt system while the engine is running or hot. Burns and injuries from moving parts are very real risks.
- Keep Hands and Fingers Clear: Be extremely cautious when working around the belt and pulleys, especially when the engine is running (for diagnostic purposes only, and with extreme care!).
- Tensioner Spring: The tensioner spring is under considerable force. Use the correct tool to safely relieve the tension before removing the belt. Improper handling can lead to serious injury.
- Protective Gear: Wear safety glasses to protect your eyes from debris.
Important Note: The alternator is a high-amperage electrical component. Short circuits can cause severe burns and damage to your vehicle. Always disconnect the battery and take precautions when working near the alternator.
Remember, proper torque specifications are critical when reassembling any components. Consult your service manual for the correct torque values for the tensioner, pulleys, and any other related hardware.
We've covered a lot of ground here. Understanding your 2009 Nissan Altima 2.5 S's belt diagram is key to maintaining its health. By understanding the purpose of each component, and reading the diagram effectively, you're well-equipped to tackle potential problems or just improve your understanding of how your vehicle works. It’s a valuable tool that every DIY mechanic should have in their arsenal.
We have the high-resolution belt diagram file available for you to download. Please reach out, and we will provide you with the download link.