2009 Nissan Altima 2.5 Serpentine Belt Diagram
The serpentine belt in your 2009 Nissan Altima 2.5 is a critical component, responsible for powering several essential engine accessories. Understanding its routing and condition is vital for preventative maintenance, diagnosing problems, and performing necessary repairs. This article provides a comprehensive guide to the serpentine belt diagram for your specific vehicle, enabling you to confidently tackle related tasks.
Purpose of the Serpentine Belt Diagram
Why bother with a diagram? The serpentine belt snakes around numerous pulleys, and its path isn't always obvious. A diagram serves several key purposes:
- Proper Installation: Incorrect belt routing can lead to accessory failure, belt damage, and even engine damage. A diagram ensures the belt is installed correctly.
- Troubleshooting: A squealing or slipping belt often indicates a problem. The diagram helps identify the components driven by the belt, narrowing down potential issues.
- Replacement: When replacing the belt, the diagram is essential for guiding the installation process.
- Learning: Familiarizing yourself with the belt's layout helps you understand the engine's accessory drive system.
Key Specs and Main Parts
Before diving into the diagram, let's review the key components and specifications:
Belt Specifications:
While exact belt lengths vary slightly by manufacturer, the typical serpentine belt for a 2009 Nissan Altima 2.5L engine is approximately 82.5 inches (2096 mm) in length. Always verify the exact length with your parts supplier based on your vehicle's VIN.
Main Components:
- Crankshaft Pulley: Driven directly by the engine's crankshaft, this pulley initiates the belt's movement.
- Alternator Pulley: The alternator generates electricity for the vehicle's electrical system.
- Power Steering Pump Pulley: The power steering pump provides hydraulic assistance for steering.
- Air Conditioning Compressor Pulley: The A/C compressor circulates refrigerant to cool the cabin.
- Tensioner Pulley: This spring-loaded pulley maintains proper belt tension, preventing slippage. It is a critical component.
- Idler Pulley: An idler pulley provides a smooth surface for the belt to run on, guiding its path.
Symbols and Diagram Conventions
Serpentine belt diagrams use specific symbols and conventions to represent the belt's path and the components it interacts with. Understanding these symbols is crucial for interpreting the diagram correctly.
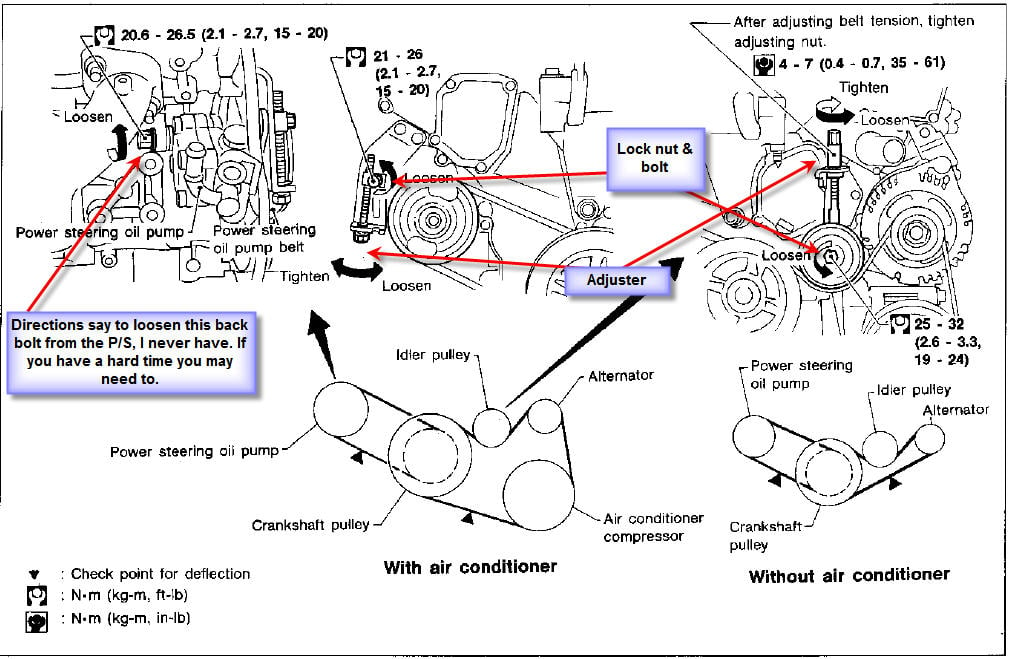
- Solid Lines: Represent the portion of the belt that is in direct contact with the pulleys. This is where the driving force is transmitted.
- Dashed Lines: Indicate the back of the belt (the smooth side) contacting a pulley. This is typically seen on the idler pulley or the tensioner pulley when it's contacting the back of the belt for tensioning.
- Arrows: Show the direction of belt rotation around each pulley. Pay close attention to these, as incorrect routing can reverse the rotation of certain accessories.
- Pulleys: Represented as circles, often with a label indicating the component they belong to (e.g., ALT for alternator, P/S for power steering).
- Tensioner: Often depicted as a pulley with an attached spring or arm, indicating its tensioning function.
How It Works: Power Transmission
The serpentine belt system operates on a simple principle: transferring rotational energy from the crankshaft to various engine accessories. The crankshaft pulley, driven by the engine, rotates the serpentine belt. The belt, in turn, wraps around the pulleys of the alternator, power steering pump, A/C compressor, and other components. The friction between the belt and the pulleys causes these accessories to rotate, enabling them to perform their respective functions.
The tensioner pulley plays a vital role in maintaining optimal belt tension. Insufficient tension causes the belt to slip, reducing the efficiency of the accessories and generating noise. Excessive tension, on the other hand, can overload the bearings in the accessories and shorten the belt's lifespan.
Real-World Use: Troubleshooting Tips
A failing serpentine belt or related component can manifest in several ways. Here are some common symptoms and troubleshooting tips:
- Squealing Noise: Often indicates a loose or worn belt. Check the belt tension and look for signs of cracking or glazing.
- Slipping Belt: May cause the alternator to undercharge the battery, the power steering to feel heavy, or the A/C to blow warm air. Inspect the belt for wear and ensure proper tension.
- Cracked or Frayed Belt: Indicates that the belt is nearing the end of its lifespan and should be replaced. Never delay replacing a visibly damaged belt.
- Accessory Failure: If a specific accessory (e.g., alternator, power steering pump) is not functioning, check the serpentine belt to ensure it's properly driving that component.
- Visually Inspect the Pulleys: Make sure the pulleys spin freely and are not damaged or wobbly. A seized pulley can cause the belt to shred.
Important: Before attempting any troubleshooting or repairs, always consult the serpentine belt diagram for your specific vehicle to ensure you're working on the correct components and routing the belt correctly.
Safety Considerations
Working around a running engine and rotating components can be dangerous. Observe the following safety precautions:
- Disconnect the Battery: Disconnect the negative battery terminal before working on the serpentine belt system to prevent accidental starting.
- Avoid Loose Clothing and Jewelry: These items can get caught in the moving parts.
- Keep Hands and Fingers Clear: Be extremely careful when the engine is running. The serpentine belt and pulleys can cause serious injury.
- Be Aware of the Tensioner: The tensioner pulley is under significant spring pressure. Use the correct tool to relieve the tension when removing or installing the belt. Releasing it improperly can cause injury.
- Hot Exhaust Manifold: Be mindful of the proximity of the exhaust manifold, which can be extremely hot even after the engine has been off for a while.
Diagram Availability
A detailed serpentine belt diagram specifically for the 2009 Nissan Altima 2.5L is an invaluable resource. We have a high-resolution version of this diagram available for you to download. Refer to it frequently during your diagnosis, maintenance, and repair tasks. Having this visual aid readily available can significantly improve the accuracy and efficiency of your work.
By understanding the serpentine belt system and having access to the correct diagram, you can confidently maintain and repair this vital component of your 2009 Nissan Altima 2.5.