2009 Nissan Altima Serpentine Belt Diagram
Alright, let's dive into the serpentine belt diagram for a 2009 Nissan Altima. Whether you're planning a preemptive belt replacement, diagnosing a squealing noise, or just expanding your automotive knowledge, understanding this diagram is crucial. It's not just a picture; it's a roadmap to your Altima's accessory drive system.
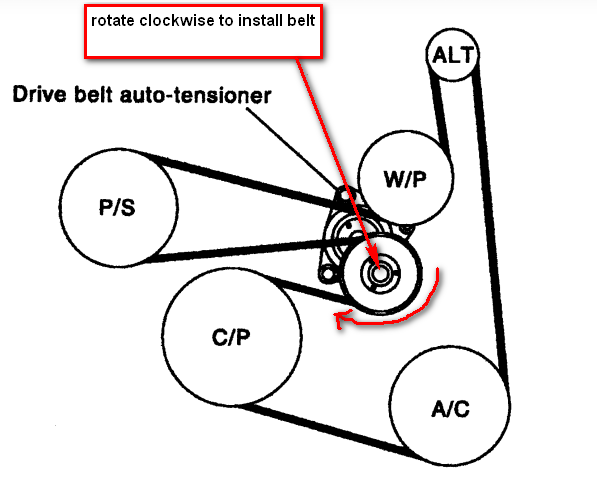
Purpose of the Serpentine Belt Diagram
Why bother with a diagram? Simple. The serpentine belt is responsible for powering several essential engine components. We're talking about the alternator (keeping your battery charged), the power steering pump (making turning easier), the air conditioning compressor (keeping you cool), and sometimes the water pump (critical for engine cooling). A broken or improperly routed belt means these systems fail, potentially leading to a breakdown. The diagram allows you to:
- Correctly route a new belt: Ensuring the belt follows the precise path is vital for proper function and prevents damage.
- Diagnose issues: The diagram helps you understand the belt's relationship to different components, aiding in troubleshooting.
- Perform maintenance: Proper tension is critical. The diagram shows the location of the tensioner, essential for belt adjustments.
- Learn your engine: Understanding the belt system provides a deeper insight into how your engine functions.
Key Specs and Main Parts of the 2009 Altima Serpentine Belt System
Before we get to the visual breakdown, let's cover the critical components and some relevant specifications. Keep in mind that Altima models might have slight variations depending on the engine (2.5L inline-4 or 3.5L V6), but the core principles remain the same.
- Serpentine Belt: The heart of the system. Made of reinforced rubber, it transmits power from the crankshaft to the accessories. For the 2.5L engine, a common belt size is around 84-85 inches in length. For the 3.5L, expect something in the 88-90 inch range. Always verify the correct part number with your VIN!
- Crankshaft Pulley (Damper): Located at the bottom of the engine, connected to the crankshaft. This pulley drives the serpentine belt.
- Alternator Pulley: The alternator pulley spins to generate electricity.
- Power Steering Pump Pulley: Powers the hydraulic assistance for your steering.
- Air Conditioning Compressor Pulley: Engages and disengages to compress refrigerant and cool the cabin.
- Water Pump Pulley (potentially): On some engines, the serpentine belt drives the water pump; on others, it's driven by the timing chain. Check your specific engine.
- Idler Pulleys: Smooth, unpowered pulleys used to guide the belt and increase its wrap around other pulleys. "Wrap" refers to the amount of surface contact the belt has with a pulley. More wrap often means better power transmission and reduced slippage.
- Tensioner Pulley: This is a spring-loaded pulley that maintains the correct tension on the serpentine belt. It’s crucial for proper operation.
Understanding Diagram Symbols
Serpentine belt diagrams might seem complex at first, but they use a fairly standardized set of symbols. Here's what you need to know:
- Solid Lines: Typically represent the belt itself. The path of the solid line is the *most important* information the diagram is conveying.
- Dashed Lines (sometimes): May indicate the backside of the belt (the smooth side) making contact with a pulley. This is important for understanding which pulleys are driven by friction, not grooves.
- Circles: Represent pulleys. They are usually labeled with abbreviations indicating what component they belong to (ALT for alternator, P/S for power steering, A/C for air conditioning, etc.).
- Arrows: Indicate the direction of rotation of the pulleys and the belt. Understanding the direction of rotation is helpful for diagnosing slippage issues.
- Text Labels: These provide additional information, such as pulley size, belt length, or torque specifications for tensioner adjustments.
- Icons: The tensioner is often represented by a specific icon showing its spring-loaded mechanism. It might look like a spring or a lever arm.
Color-coding is rare on basic diagrams, but some advanced versions might use different colors to highlight specific sections of the belt path or to differentiate between components.
How It Works: The Serpentine Belt System in Action
The engine's crankshaft spins the crankshaft pulley. This rotation is then transferred via the serpentine belt to all the other pulleys. The tensioner pulley keeps the belt tight, preventing slippage. When you turn on the air conditioning, the A/C compressor clutch engages, adding load to the system. The alternator generates electricity based on engine speed, and the power steering pump provides assistance when you turn the steering wheel.
The key is that everything is interconnected. A failure in one component can affect the performance of others. For example, a seized alternator will put immense stress on the belt, potentially causing it to break.
Real-World Use: Basic Troubleshooting Tips
Here's how you can use the serpentine belt diagram for basic troubleshooting:
- Squealing Noise: A squealing belt often indicates slippage. Check the belt tension. Is the tensioner working correctly? Is the belt glazed or cracked? Use the diagram to verify the belt is routed correctly. A misrouted belt will often squeal.
- Battery Light On: If the alternator isn't charging, the belt might be slipping or broken. Use the diagram to check the belt's condition and routing. Is the alternator pulley spinning freely? A stuck alternator can snap a belt.
- Power Steering Issues: If your steering is suddenly difficult, the power steering pump might not be receiving power. Check the belt and its routing to the power steering pulley.
- Overheating: If the water pump is driven by the serpentine belt (verify this using your diagram!), a broken belt will stop the water pump, leading to rapid overheating.
- Visual Inspection: Regularly inspect the belt for cracks, fraying, missing chunks, or glazing. Use the diagram to verify the correct routing and tension.
Important Note: Before replacing a serpentine belt, take a picture or make a detailed drawing of its current routing. This will be invaluable when installing the new belt. It's easy to misroute a belt, especially with multiple pulleys.
Safety First!
Working on the serpentine belt system involves potential hazards. Here's what you need to keep in mind:
- Engine Off: Always work on the engine with it turned off and the key removed from the ignition.
- Hot Engine: Never touch the belt or pulleys when the engine is hot. Allow it to cool down completely.
- Moving Parts: Keep your hands, clothing, and tools clear of the belt and pulleys when the engine is running. The rotating components can cause serious injury.
- Battery Disconnect: Disconnect the negative battery terminal before working on the electrical components (like the alternator).
- Tensioner Safety: Serpentine belt tensioners are under significant spring pressure. Use the correct tools to relieve the tension and avoid injury. The spring can release unexpectedly and cause damage or injury.
Download Your Diagram
We have a detailed serpentine belt diagram specifically for the 2009 Nissan Altima. It will be very helpful when performing maintenance or repairs. The diagram is available for download below. Using this resource in conjunction with the above information will make your maintenance project a success!
Good luck with your project!