2009 Nissan Murano Fuse Box Diagram
The 2009 Nissan Murano, like any modern vehicle, relies on a complex network of electrical circuits. Understanding the fuse box diagram for your Murano is crucial for diagnosing and resolving electrical issues, performing modifications, and even just gaining a better understanding of your vehicle's systems. This article will serve as your guide to navigating the 2009 Murano fuse box, offering insights and practical tips for using this essential resource.
Purpose: Why You Need This Diagram
The fuse box diagram isn't just a piece of paper; it's your roadmap to electrical troubleshooting. Here's why it's so vital:
- Electrical Repair: When an electrical component fails (e.g., a taillight, radio, or power window), the first step is often to check the corresponding fuse. The diagram tells you exactly which fuse to inspect.
- Preventing Further Damage: Replacing a blown fuse with one of a higher amperage (amp) rating can overload the circuit and cause significant damage, potentially leading to a fire. The diagram provides the correct amp rating for each fuse.
- Modification and Upgrades: Planning to install aftermarket accessories like a sound system or auxiliary lighting? You'll need to identify appropriate power sources, and the fuse box diagram will help you tap into the correct circuits safely.
- Learning Your Vehicle: Even if you don't plan on performing repairs yourself, understanding the fuse box layout gives you a better grasp of your Murano's electrical systems and how they function.
Key Specs and Main Parts
The 2009 Nissan Murano typically has two main fuse box locations:
- Interior Fuse Box: Located inside the cabin, often under the dashboard on the driver's side or behind the glove compartment. This box generally houses fuses for interior components like lights, entertainment system, and power accessories.
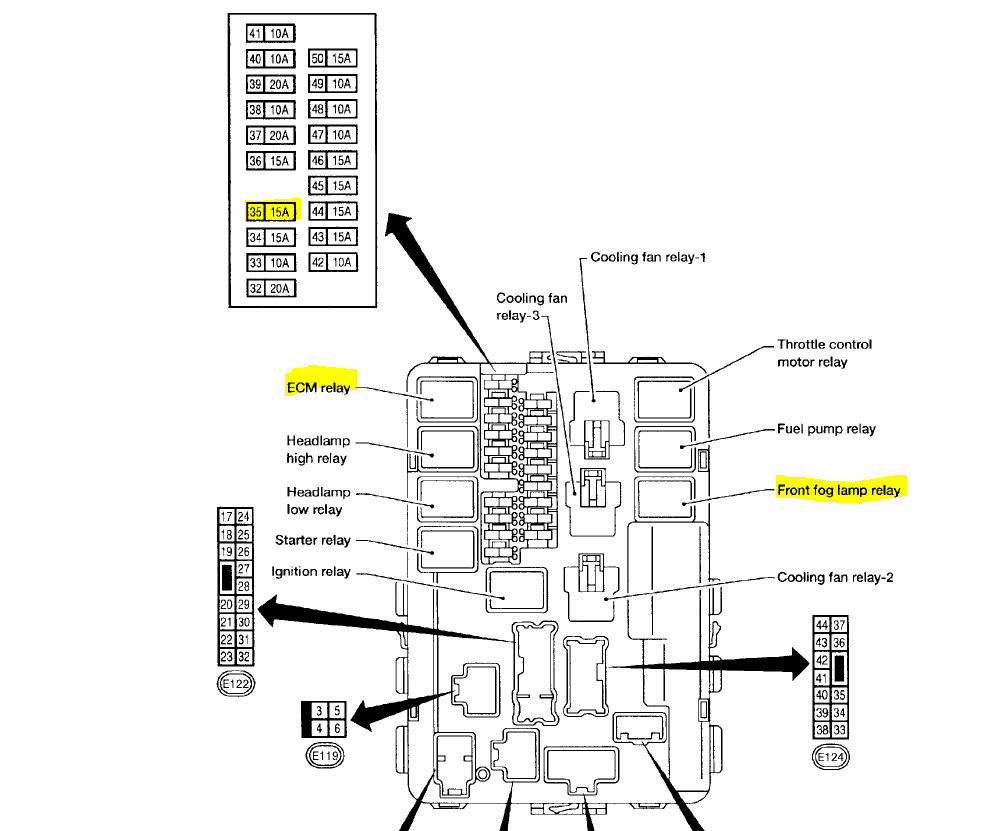
- Engine Compartment Fuse Box: Situated in the engine bay, this box contains fuses for engine management systems, headlights, and other critical vehicle functions. It may also contain relays.
Main Parts:
- Fuses: These are the sacrificial elements designed to protect circuits from overcurrent. They contain a thin metal filament that melts and breaks the circuit if the current exceeds the fuse's rating. Common fuse types include blade fuses (ATO/ATC) and mini blade fuses.
- Relays: Electrically operated switches used to control high-current circuits with a low-current signal. They are commonly used for headlights, starter motors, and other power-hungry components.
- Fuse Puller: A small plastic tool designed to safely remove fuses without damaging them or the fuse box terminals.
- Fuse Box Cover: The cover that protects the fuses and relays. It usually has a diagram printed on it or inside it, which is often a simplified version of the detailed diagram.
Symbols: Decoding the Diagram
Fuse box diagrams use symbols and abbreviations to represent different components and circuits. Here's a breakdown of common elements:
- Fuse Numbers: Each fuse is assigned a unique number, which corresponds to its position in the fuse box.
- Amp Ratings (A): The number followed by "A" indicates the fuse's amperage rating. For example, "10A" means the fuse is rated for 10 amps.
- Circuit Descriptions: A brief description of the component or system that the fuse protects (e.g., "Headlight (RH)," "Power Window").
- Line Styles:
- Solid Lines: Indicate a direct connection.
- Dashed Lines: May indicate a connection through a switch or relay.
- Color Coding (On Some Diagrams): Some diagrams use color to distinguish between different types of circuits or systems. For example, red might indicate power circuits, while blue might indicate lighting circuits.
- Iconography: Small icons may represent specific components, such as a headlight bulb for the headlight circuit or a speaker for the audio system. Consult the diagram's legend (if provided) for a key to these icons.
How It Works: The Electrical Protection System
The fuse box is the central hub of your Murano's electrical protection system. Each fuse is strategically placed in a circuit to safeguard against overcurrent situations. When a fault occurs (e.g., a short circuit), the current in the affected circuit increases dramatically. This excessive current heats the fuse filament, causing it to melt and break the circuit, preventing damage to the wiring and components connected to that circuit. Relays act as remote switches, allowing low-current circuits to control high-current devices. They prevent overloading the low current switches in the vehicle.
Real-World Use: Basic Troubleshooting Tips
Here's a simple troubleshooting scenario:
Problem: Your driver's side power window stops working.
Steps:
- Consult the Fuse Box Diagram: Locate the interior fuse box diagram (either on the cover or in your owner's manual).
- Identify the Power Window Fuse: Find the fuse labeled "Power Window (Driver Side)" or something similar. Note its fuse number and amp rating.
- Inspect the Fuse: Use a fuse puller to remove the fuse. Visually inspect it. If the filament is broken, the fuse is blown.
- Replace the Fuse: Replace the blown fuse with a new fuse of the exact same amp rating.
- Test the Window: Try operating the power window. If it now works, the problem was likely a blown fuse. If the fuse blows again immediately, there's likely a more serious problem in the power window circuit (e.g., a short circuit in the wiring or a faulty window motor).
Additional Tips:
- Always use the correct fuse rating.
- If a fuse blows repeatedly, don't just keep replacing it. Investigate the underlying cause of the overcurrent.
- Use a multimeter to test for voltage and continuity to further diagnose electrical problems.
Safety: Handle with Care
Working with electrical systems can be dangerous. Here are some safety precautions:
- Disconnect the Battery: Before working on any electrical components, disconnect the negative (-) terminal of the battery to prevent accidental shocks.
- Never Bypass Fuses: Never use a wire or other conductive material to bypass a fuse. This eliminates the circuit protection and can cause severe damage or fire.
- High-Voltage Components: Be extremely cautious around components like the ignition system and fuel injectors, which can carry high voltage even with the battery disconnected.
- Consult a Professional: If you're uncomfortable working with electrical systems, consult a qualified mechanic.
We have the 2009 Nissan Murano fuse box diagram file available for download. This detailed diagram will provide you with a clear and comprehensive guide to your vehicle's electrical system. Remember to always prioritize safety and consult a professional if you're unsure about any procedure.