2009 Nissan Murano Serpentine Belt Diagram
Alright, let's dive into the serpentine belt diagram for a 2009 Nissan Murano. Understanding this diagram is crucial whether you're tackling a routine belt replacement, diagnosing a squealing noise, or simply want to get a better grasp of your engine's accessory drive system. This isn't just a piece of paper; it's your roadmap to keeping your Murano running smoothly. We have the diagram file available for download, so you can follow along as we explain it.
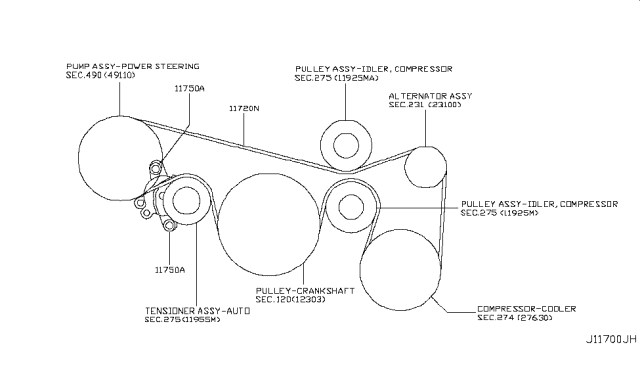
Purpose of the Serpentine Belt Diagram
Why bother with a diagram? Simple. The serpentine belt is responsible for powering several critical engine components, including:
- Alternator: Charges the battery and provides power to the electrical system.
- Power Steering Pump: Assists in turning the steering wheel.
- Air Conditioning Compressor: Cools the cabin air.
- Water Pump: Circulates coolant to prevent overheating.
If the serpentine belt fails, you could lose any or all of these functions. A diagram helps you correctly route the new belt during replacement, ensuring proper tension and preventing damage to components. It’s also invaluable for troubleshooting – identifying which component is driven by the belt can narrow down the source of a problem, like a squealing noise pinpointed to the alternator pulley.
Key Specs and Main Parts
The 2009 Nissan Murano typically uses a single serpentine belt to drive all the accessories. The specific belt length and number of ribs can vary slightly depending on the engine configuration (though most are the 3.5L V6). However, it will be identified as something along the lines of a "multi-rib belt". Here are the primary components involved:
- Serpentine Belt: The continuous belt that transmits power.
- Crankshaft Pulley (Crank Pulley): Driven directly by the engine, it's the starting point of the accessory drive system.
- Alternator Pulley: Rotates the alternator, generating electricity.
- Power Steering Pump Pulley: Rotates the power steering pump, providing hydraulic assist.
- Air Conditioning Compressor Pulley: Rotates the A/C compressor, circulating refrigerant.
- Water Pump Pulley: Rotates the water pump, circulating coolant.
- Tensioner Pulley: Maintains the correct tension on the serpentine belt. It often has a spring-loaded mechanism.
- Idler Pulley: A smooth pulley that guides the belt around other components, optimizing the belt's path and preventing it from rubbing.
The tensioner pulley is especially important. It automatically adjusts to account for belt stretch and wear, ensuring consistent performance. Understanding its location and function is key to proper belt installation and maintenance.
Symbols: Lines, Colors, and Icons
Serpentine belt diagrams usually use a simplified representation of the engine and its accessories. Here’s what to look for:
- Solid Lines: Represent the path of the serpentine belt. Pay close attention to the direction of the lines; they indicate how the belt wraps around each pulley.
- Dashed Lines (Rare): Sometimes used to indicate the back side of the belt (the side without the ribs) making contact with a pulley. It's less common, but good to be aware of.
- Pulleys: Shown as circles, often with labels indicating which component they belong to (ALT for alternator, P/S for power steering, A/C for air conditioning, WP for water pump, CRANK for crankshaft). The size of the circle doesn't necessarily reflect the actual pulley size.
- Tensioner: Often depicted with an arrow indicating the direction of its spring-loaded tensioning arm. The diagram might also show the location where you can insert a wrench or socket to relieve the tension during belt removal and installation.
- Idler Pulleys: Simple circles, usually labeled "IDLER."
The direction of rotation of the crankshaft pulley is usually implied (clockwise when viewed from the front), and the diagram shows how the belt's path translates this rotation to the other accessories. Understanding how the belt loops around each component allows you to visualise the motion of the accessories.
How It Works
The serpentine belt system is a relatively simple but ingenious design. The crankshaft pulley, directly connected to the engine's crankshaft, drives the entire system. As the crankshaft rotates, it turns the serpentine belt. The belt, in turn, wraps around and drives the other pulleys connected to the alternator, power steering pump, air conditioning compressor, and water pump.
The tensioner pulley plays a crucial role in maintaining the correct belt tension. Proper tension is critical for optimal performance and longevity. Too loose, and the belt will slip, causing reduced performance and squealing noises. Too tight, and it can overload the bearings in the accessories, leading to premature failure.
The idler pulley simply guides the belt, optimizing its path to maximize contact with the driving pulleys. Without the idler pulley, the belt might rub against other engine components or have insufficient wrap angle on the pulleys, leading to slippage.
Real-World Use: Basic Troubleshooting
Here are a few common problems and how the diagram can help you diagnose them:
- Squealing Noise: A common symptom of a slipping serpentine belt. Use the diagram to visually inspect the belt's condition and check the tensioner pulley. Is the belt glazed or cracked? Is the tensioner arm moving excessively? A worn belt or a faulty tensioner can cause slippage and noise. Listen closely to each pulley to pinpoint the location. If the squeal seems to be coming from the alternator pulley, this may point toward the alternator being bad.
- Loss of Power Steering: If the power steering suddenly stops working, check the diagram to see if the serpentine belt drives the power steering pump. If the belt is broken or missing, that's your problem. If the belt is intact, the power steering pump itself might be faulty.
- Overheating: If the engine is overheating, check the water pump. If the serpentine belt is broken, the water pump won't be circulating coolant, leading to overheating.
- Battery Not Charging: This indicates a possible issue with the alternator. Referring to the diagram, see if the belt runs the alternator. A broken or slipping belt can prevent the alternator from charging the battery.
Always remember to visually inspect the entire belt for cracks, fraying, glazing, and missing chunks. A visual inspection combined with understanding of the accessories driven by the belt will assist in troubleshooting the system.
Safety
Working on the serpentine belt system involves several safety considerations:
- Hot Engine: Never work on the engine while it's hot. Allow it to cool completely before attempting any repairs.
- Moving Parts: The serpentine belt and pulleys are moving parts. Ensure the engine is off and the key is removed before putting your hands near them. Even with the engine off, the cooling fan can sometimes cycle on unexpectedly. Disconnect the negative battery cable for added safety.
- Tensioner Spring: The tensioner pulley has a strong spring. Use the correct tool and technique to relieve the tension. Incorrectly releasing the tension can cause injury.
- Eye Protection: Wear safety glasses to protect your eyes from debris that may be dislodged during the process.
Specifically, the tensioner spring can be quite strong. Always be aware of its position and potential movement. We have the diagram file available, which often specifies the correct tool and procedure for releasing the tensioner.
Armed with this information and the downloadable diagram, you should be well-equipped to tackle serpentine belt-related issues on your 2009 Nissan Murano. Remember to always prioritize safety and consult a professional mechanic if you're unsure about any step in the process.