2009 Nissan Rogue Fuse Box Diagram
The 2009 Nissan Rogue fuse box diagram is an invaluable resource for anyone working on their vehicle's electrical system. Whether you're troubleshooting a blown fuse, installing aftermarket electronics, or simply trying to understand how your Rogue's various systems are powered, this diagram is essential. We're assuming you have a solid understanding of basic automotive electrical principles. This guide provides a deep dive into the fuse box, empowering you to diagnose and repair electrical issues efficiently and safely. This guide also assumes you have access to basic automotive tools like a multimeter, fuse puller, and a set of screwdrivers.
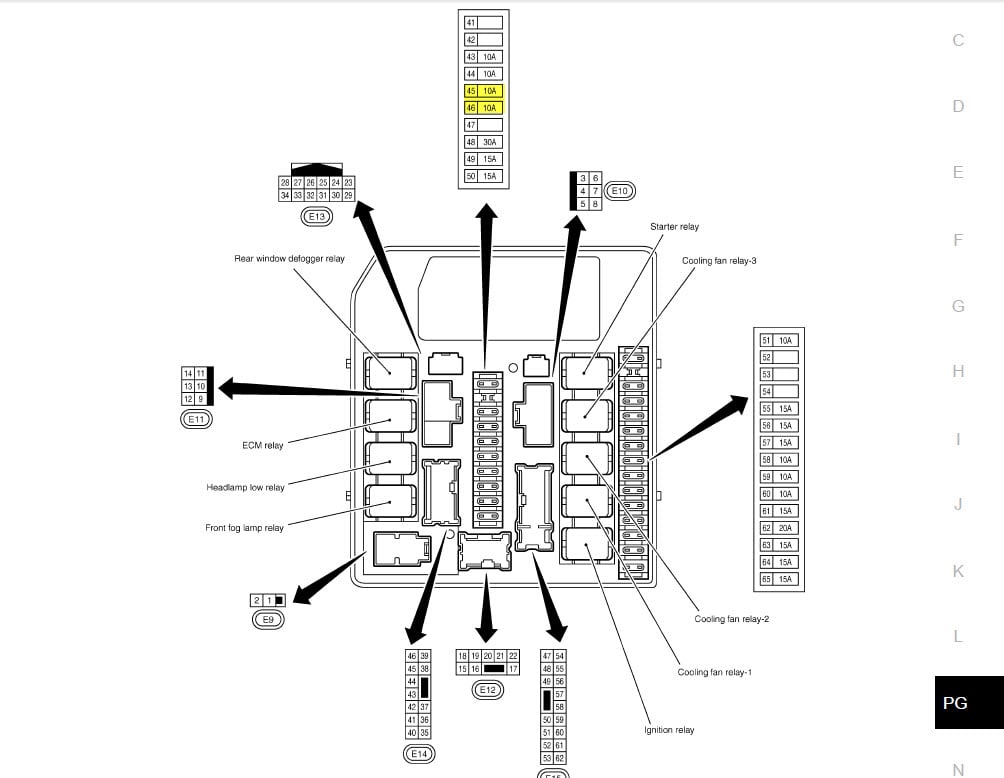
Purpose of the Fuse Box Diagram
The primary purpose of the fuse box diagram is to identify the specific fuse that protects a particular circuit within the vehicle. Without it, you'd be guessing which fuse corresponds to, say, the power windows, the headlights, or the radio. Using the wrong fuse could lead to misdiagnosis, wasted time, or even further damage to the electrical system. This diagram empowers you to:
- Quickly identify blown fuses.
- Understand the function of each circuit.
- Locate the correct fuse for replacement.
- Plan and execute aftermarket installations (e.g., installing a new amplifier).
- Gain a deeper understanding of your Rogue's electrical architecture.
Key Specs and Main Parts
The 2009 Nissan Rogue typically has two fuse box locations:
- Interior Fuse Box: Located inside the cabin, usually under the dashboard on the driver's side. This fuse box generally houses fuses for interior components like the radio, lights, power windows, and various control modules.
- Engine Compartment Fuse Box: Found in the engine bay, often near the battery. This fuse box contains fuses for engine management systems, headlights, windshield wipers, and other critical engine-related components.
The fuse box itself is a plastic enclosure containing an array of fuses, relays, and potentially other components. The cover of the fuse box usually has a simplified diagram printed on it, but for detailed troubleshooting, you'll want a more comprehensive diagram. Key specifications include:
- Fuse Ampere Ratings: Fuses are rated in Amperes (A), indicating the maximum current they can handle before blowing. Common ratings include 5A, 7.5A, 10A, 15A, 20A, 25A, and 30A. Always replace a blown fuse with one of the same ampere rating. Using a higher amperage fuse can overload the circuit and cause significant damage, including fires.
- Fuse Types: The 2009 Rogue primarily uses blade-type fuses (ATO/ATC). These are color-coded according to their amperage rating for easy identification. Micro fuses may also be used in some locations.
- Relays: Relays are electromechanical switches that control high-current circuits using a low-current signal. They are often used for headlights, fuel pumps, and other power-intensive systems.
Understanding the Symbols on the Diagram
The fuse box diagram uses a variety of symbols to represent different components and circuits. Here's a breakdown of common symbols you'll encounter:
- Fuse Symbol: Typically a rectangle or a squiggly line. The diagram will identify the fuse number and its amperage rating (e.g., Fuse #12 - 15A).
- Relay Symbol: A small square or rectangle, often with a coil symbol inside. The relay symbol indicates a switch that controls a higher-current circuit.
- Lines: Solid lines represent wiring, while dashed lines may indicate ground connections or signal paths.
- Colors: Some diagrams may use color-coding to differentiate between different circuits or functions. For instance, a red line might represent a power supply, while a blue line might represent a signal wire. Be sure to check the diagram's legend for color-coding explanations.
- Icons: Icons are often used to represent the component protected by a specific fuse (e.g., a headlight icon for the headlight fuse, a radio icon for the radio fuse). These make the diagram much easier to interpret.
Important Term: A circuit is a closed loop through which electrical current flows. It consists of a power source (battery), a load (e.g., a light bulb), and wiring connecting them. A fuse is a safety device designed to protect the circuit from overcurrent conditions.
How It Works
The fuse box is the central distribution point for electrical power in the vehicle. The battery provides the primary power source, and the fuse box distributes this power to various circuits throughout the car. Each fuse protects a specific circuit by interrupting the flow of current if it exceeds a safe level. This prevents damage to components and wiring caused by short circuits or overloads.
When a component malfunctions or there's a short circuit, the current flow in the affected circuit increases dramatically. This excessive current heats up the fuse's internal element, causing it to melt and break the circuit. This "blowing" of the fuse prevents further damage to the system.
Relays act as electrically controlled switches. A low-current signal from a control module (e.g., the headlight switch) activates the relay, which then closes a high-current circuit to power a component (e.g., the headlights). Relays are used because the switches inside the car may not be able to handle the large amount of current that a larger device uses.
Real-World Use: Basic Troubleshooting Tips
Using the fuse box diagram, you can effectively troubleshoot many electrical problems. Here are some basic tips:
- Identify the Problem: Determine which component or system is not working.
- Consult the Diagram: Locate the fuse associated with the malfunctioning component in the fuse box diagram.
- Inspect the Fuse: Visually inspect the fuse. A blown fuse will have a broken filament inside. You can also use a multimeter to test the fuse for continuity. Set the multimeter to continuity mode (often indicated by a diode symbol) and touch the probes to each side of the fuse. If the meter beeps or shows a low resistance reading, the fuse is good. If it shows no continuity (an open circuit), the fuse is blown.
- Replace the Fuse: Replace the blown fuse with a new fuse of the same amperage rating.
- Test the System: After replacing the fuse, test the system to see if it's working correctly. If the fuse blows again immediately, there's likely a short circuit or overload in the circuit, and further diagnosis is needed. Do not repeatedly replace blown fuses without addressing the underlying problem.
If a new fuse immediately blows, it's crucial to investigate further. Possible causes include:
- Short Circuit: A direct connection between a power wire and ground. This is the most common cause of blown fuses. Look for damaged or frayed wiring.
- Overload: Too many devices drawing power from the same circuit. This can happen if you've added aftermarket accessories or if a component is drawing excessive current due to a fault.
- Faulty Component: The component itself may be malfunctioning and drawing too much current.
Safety Precautions
Working with automotive electrical systems can be dangerous. Always follow these safety precautions:
- Disconnect the Battery: Before working on any electrical components, disconnect the negative (-) terminal of the battery to prevent accidental shorts.
- Use Proper Tools: Use insulated tools designed for automotive electrical work.
- Never Bypass a Fuse: Bypassing a fuse with a wire or other conductive material can cause severe damage and potentially start a fire. Fuses are there to protect the system!
- Be Careful Around High-Voltage Components: The ignition system and some other components operate at high voltages. Avoid touching these components with the engine running.
Warning: The engine compartment fuse box may contain relays and fuses that control critical engine functions. Tampering with these components without proper knowledge can lead to engine damage or even vehicle failure. Exercise extreme caution!
Understanding the 2009 Nissan Rogue fuse box diagram is a valuable skill for any car owner. By following these guidelines and exercising caution, you can diagnose and repair many common electrical problems yourself, saving time and money. Remember to always prioritize safety and consult a professional mechanic if you're unsure about any aspect of the repair.
We have the complete 2009 Nissan Rogue fuse box diagram available for download. With this detailed resource, you'll have all the information you need to tackle your Rogue's electrical issues with confidence.