2009 Toyota Corolla Fuse Box Diagram
The 2009 Toyota Corolla, while a paragon of reliability, isn't immune to electrical gremlins. When circuits go awry, the fuse box is your first port of call. This article dissects the 2009 Corolla's fuse box diagram, providing the knowledge necessary for effective troubleshooting, repairs, and even basic modifications. Consider this your comprehensive guide to understanding and utilizing this crucial component.
Why Understanding the Fuse Box Matters
The fuse box diagram is more than just a collection of lines and symbols; it's a roadmap to your car's electrical system. Armed with this diagram, you can:
- Diagnose Electrical Problems: Identify blown fuses associated with specific components, saving time and money on unnecessary shop visits.
- Perform Repairs: Locate and replace faulty fuses, restoring functionality to affected systems.
- Add Accessories: Safely tap into existing circuits when adding aftermarket accessories like lights or sound systems, knowing amperage limits and potential risks.
- Gain a Deeper Understanding: Appreciate the intricacies of your car's electrical architecture, enabling you to perform more advanced maintenance and modifications.
- Prevent Further Damage: Identifying a continually blown fuse can point to a bigger short that can be addressed before it causes more serious damage to vehicle wiring.
Key Specs and Main Parts of the 2009 Corolla Fuse Box
The 2009 Corolla typically features two fuse boxes: one located in the engine compartment (under the hood) and another inside the cabin, usually under the dashboard on the driver's side.
- Engine Compartment Fuse Box: Houses fuses and relays protecting critical engine components like the fuel pump, ignition system, cooling fan, and headlights. It also typically includes higher amperage fuses.
- Interior Fuse Box: Protects circuits for interior accessories like the radio, power windows, power locks, cigarette lighter (auxiliary power outlet), and interior lights.
Key Components:
- Fuses: Overcurrent protection devices. They contain a thin metal strip that melts and breaks the circuit when the current exceeds the fuse's rated amperage. Different fuse types exist (blade, cartridge), with blade fuses being most common in the 2009 Corolla.
- Relays: Electrically operated switches. They use a small control current to switch a larger current, allowing low-current circuits to control high-current devices (e.g., headlights, starter motor).
- Fuse Puller: A small plastic tool (often integrated into the fuse box itself) used to safely remove fuses without damaging them or your fingers.
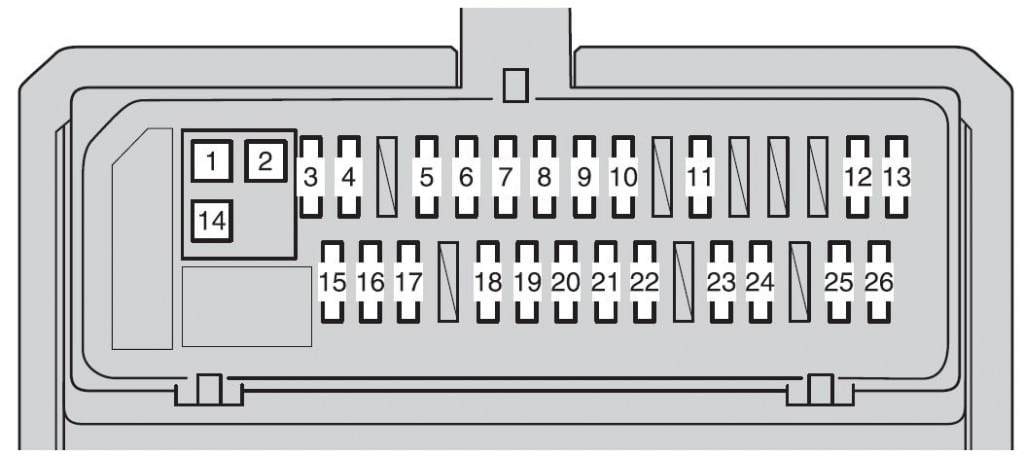
- Diagram Label: Typically located on the inside of the fuse box cover, providing a visual representation of each fuse and relay's function. The label is crucial for identifying the correct fuse.
Understanding Fuse Box Symbols and Markings
The fuse box diagram uses standardized symbols and markings to convey information concisely. Deciphering these is essential for proper use.
- Lines: Represent electrical circuits or connections.
- Colors: Often used to distinguish between different circuit types or amperage ratings. Consult your owner's manual or the specific diagram for color-coding conventions as they may vary slightly.
- Icons: Pictorial representations of the components or systems protected by each fuse. Common icons include:
- Headlight icon: Headlights
- Horn icon: Horn
- Radio icon: Radio
- Fan icon: Cooling fan or blower motor
- Cigarette lighter icon: Accessory power outlet
- Window icon: Power windows
- Amperage Rating: A number printed on the fuse itself, indicating the maximum current the fuse can handle before blowing. Expressed in Amperes (A). Using a fuse with a higher amperage rating than specified can damage the circuit and potentially cause a fire.
- Fuse Type: While the 2009 Corolla primarily uses blade fuses, different sizes exist (e.g., Mini, ATO/ATC). The diagram typically doesn't explicitly state the fuse type but understanding the physical size required is important when replacing a fuse.
How the Fuse Box Works
The fuse box serves as the central distribution point for electrical power in the vehicle. Power from the battery is routed through the fuse box, where it's distributed to various circuits, each protected by a fuse. When an overcurrent occurs (due to a short circuit, excessive load, or component failure), the fuse blows, interrupting the circuit and preventing damage to wiring and components.
Relays act as intermediaries, allowing low-current circuits (e.g., a switch on the dashboard) to control high-current circuits (e.g., the headlights). When the control circuit is energized, the relay closes, completing the high-current circuit and activating the corresponding component.
Real-World Use: Basic Troubleshooting Tips
Here's a step-by-step guide to troubleshooting electrical problems using the fuse box:
- Identify the Problem: Determine which component or system is malfunctioning.
- Consult the Diagram: Locate the fuse associated with the problematic component in the fuse box diagram. Both under-hood and interior diagrams should be consulted depending on the component.
- Inspect the Fuse: Visually inspect the fuse. A blown fuse will typically have a broken filament or a darkened appearance.
- Test the Fuse: Use a multimeter to test the fuse for continuity. Set the multimeter to the continuity setting (often indicated by a beep symbol). Touch the probes to the two terminals of the fuse. A beep indicates continuity (the fuse is good); no beep indicates a blown fuse. This is more accurate than visual inspection alone.
- Replace the Fuse: Replace the blown fuse with a new fuse of the same amperage rating.
- Test the System: Turn on the component or system to verify that the problem is resolved.
- If the Fuse Blows Again: If the new fuse blows immediately or shortly after replacement, there is likely a short circuit or other underlying problem in the circuit. Further diagnosis by a qualified mechanic is recommended. Do not repeatedly replace fuses without addressing the root cause.
Safety Considerations
Working with electrical systems can be dangerous. Always observe the following safety precautions:
- Disconnect the Battery: Before working on any electrical components, disconnect the negative battery cable to prevent accidental short circuits.
- Use Insulated Tools: Use tools with insulated handles to protect against electric shock.
- Never Exceed Amperage Ratings: Never replace a fuse with one of a higher amperage rating. This can overload the circuit and cause a fire.
- Identify High-Risk Components: Be particularly cautious when working with circuits involving the airbag system, fuel pump, or ignition system. Mishandling these components can result in serious injury or damage.
- Consult a Professional: If you are uncomfortable working with electrical systems, consult a qualified mechanic.
Airbag systems in particular are very dangerous. They contain capacitors that can hold charge even when the battery is disconnected, and accidental deployment can cause serious injury.
We understand the importance of having a readily available reference. We have the 2009 Toyota Corolla fuse box diagram available for download. This downloadable diagram can be a valuable asset for your vehicle maintenance and repair needs.