2009 Toyota Corolla Serpentine Belt Diagram
Alright, let's dive into the serpentine belt diagram for the 2009 Toyota Corolla. Whether you're tackling a squealing belt, replacing a worn component, or just want a better understanding of your engine's accessory drive system, knowing how to read this diagram is crucial. We're going to cover everything you need to know, from basic principles to real-world troubleshooting.
Why You Need the Serpentine Belt Diagram
The serpentine belt diagram is essentially a roadmap for your engine's accessory drive. It shows the path the belt takes around various components, ensuring they all spin in the correct direction and at the proper speed. Here's why it's invaluable:
- Repair and Replacement: If you're replacing the serpentine belt, tensioner, idler pulley, or any other driven component, the diagram is essential to ensure proper routing. Incorrect routing can lead to belt slippage, component damage, and ultimately, a breakdown.
- Troubleshooting: A squealing belt can indicate misalignment or a failing component. The diagram helps you visually inspect the belt path and identify potential problem areas.
- Understanding Engine Mechanics: Even if you're not actively working on your car, understanding the serpentine belt system gives you a deeper knowledge of how your engine functions.
Key Specs and Main Parts of the 2009 Corolla Serpentine Belt System
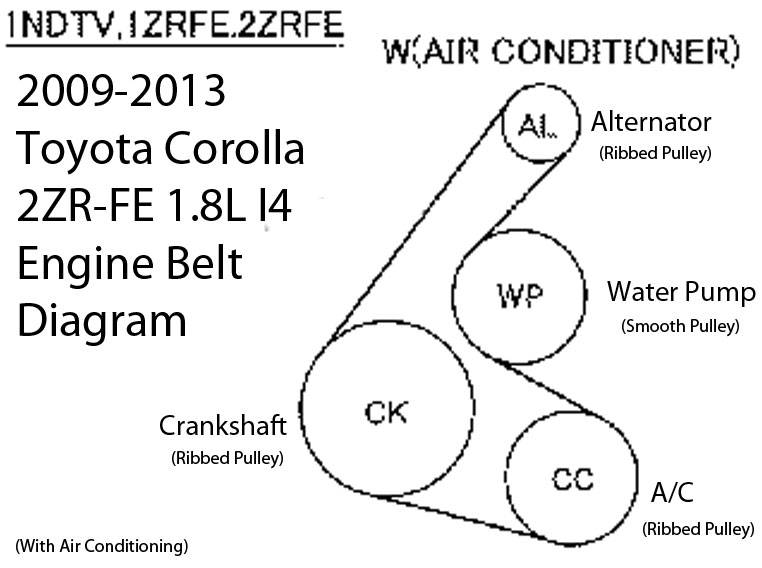
The 2009 Toyota Corolla typically uses a single serpentine belt to drive multiple engine accessories. Let's identify the key players:
- Crankshaft Pulley (or Damper): This is the main driving force. Connected directly to the engine's crankshaft, it transfers rotational energy to the serpentine belt.
- Alternator: The alternator charges the battery and powers the electrical system.
- Air Conditioning (A/C) Compressor: Circulates refrigerant to cool the car's interior.
- Power Steering Pump: Provides hydraulic assistance for steering.
- Water Pump: Circulates coolant to regulate engine temperature. In many Corollas, the water pump is driven by the timing chain, not the serpentine belt, but it's important to verify this for your specific engine. Double check your specific engine configuration.
- Tensioner Pulley: This spring-loaded or hydraulically-damped pulley maintains the proper tension on the serpentine belt. Without the tensioner, the belt would slip. Understanding the *automatic tensioner* is critical for belt replacement.
- Idler Pulley: These smooth, non-driven pulleys guide the belt around the engine and ensure proper wrap angle on the driven components. They don't drive anything, they just redirect the belt path.
- Serpentine Belt: The rubber belt itself, typically made of EPDM (ethylene propylene diene monomer) rubber for durability and resistance to heat and cracking.
Decoding the Diagram: Symbols and Markings
Serpentine belt diagrams are generally straightforward, but understanding the symbols is essential:
- Solid Lines: These represent the path of the outer surface of the serpentine belt.
- Dashed Lines: These typically indicate the inner surface of the belt and how it wraps around a pulley. In some diagrams, they might represent the belt's path behind other components, showing the 3D routing.
- Arrows: Arrows indicate the direction of rotation for each pulley. Pay close attention to these, as incorrect belt routing will cause components to rotate in the wrong direction, leading to damage.
- Component Symbols: Each component (alternator, A/C compressor, etc.) is usually represented by a simplified icon or labeled with an abbreviation (ALT, AC, PS).
- Tensioner Symbol: The tensioner is often depicted with a spring or a small lever to indicate its tensioning action.
- Ribbed vs. Smooth: The diagram might visually indicate whether the belt is engaging a ribbed (grooved) or smooth portion of the pulley. Ribbed pulleys are driven by the ribbed side of the belt.
How It Works: The Serpentine Belt System in Action
The serpentine belt system is a closed-loop system powered by the engine's crankshaft. Here's the sequence of operation:
- The engine turns the crankshaft, rotating the crankshaft pulley.
- The rotating crankshaft pulley drives the serpentine belt.
- The serpentine belt, under tension from the tensioner pulley, transfers rotational energy to the other components: alternator, A/C compressor, power steering pump (if applicable), and sometimes the water pump.
- Each component is driven at a specific speed ratio relative to the crankshaft speed, determined by the pulley diameter.
- The tensioner pulley automatically adjusts to maintain the correct belt tension, compensating for belt stretch and variations in engine speed.
Real-World Use: Troubleshooting a Serpentine Belt Issue
Here's how you can use the serpentine belt diagram to troubleshoot common problems:
- Squealing Belt: A squealing belt is often caused by slippage. Visually inspect the belt path using the diagram. Look for signs of misalignment, such as a pulley that's not perfectly parallel to the others. Check the tensioner to ensure it's providing adequate tension. Also, inspect the belt itself for cracks, glazing, or wear. If the belt is excessively worn, replace it.
- Belt Wear or Damage: The diagram helps you understand if the belt is rubbing against any other components or brackets. Any unusual wear patterns should be investigated. Replace the belt if it is cracked, frayed, or missing chunks.
- Component Failure: If a component, like the alternator, is seizing up, it can put excessive strain on the belt, causing it to slip or break. The diagram helps you isolate the affected component. For example, if the A/C compressor seizes, the belt will struggle to turn it, potentially leading to a squeal or even belt failure.
- Incorrect Belt Routing: If you've recently replaced the belt and are experiencing problems, double-check the routing against the diagram. Incorrect routing is a common mistake.
Safety Considerations: Working with the Serpentine Belt System
Working on the serpentine belt system can be dangerous if you're not careful. Here are some key safety precautions:
- Disconnect the Battery: Before working on any electrical components, disconnect the negative battery cable to prevent accidental shorts or shocks.
- Hot Engine: Never work on the serpentine belt system when the engine is hot. Allow the engine to cool completely before starting any repairs.
- Moving Parts: Be extremely cautious around moving parts. Keep your hands, tools, and clothing clear of the belt and pulleys when the engine is running (only run the engine briefly for troubleshooting purposes).
- Tensioner Spring: The tensioner pulley is spring-loaded and can snap back forcefully when released. Use the correct tools and techniques to relieve the tension safely. The *belt routing tool* and socket wrench is important.
The serpentine belt system is a critical part of your 2009 Toyota Corolla's engine. Understanding the diagram, its components, and how they interact will help you maintain your vehicle and troubleshoot any potential problems. Don't be afraid to get your hands dirty and learn about your car!
We have a high-resolution, downloadable PDF version of the 2009 Toyota Corolla serpentine belt diagram available. Contact us if you need it.