2009 Toyota Sienna Serpentine Belt Diagram
Alright folks, let's dive into the serpentine belt diagram for the 2009 Toyota Sienna. Understanding this diagram is crucial for a variety of reasons, whether you're tackling preventative maintenance, diagnosing a squealing belt, or replacing a failing component. This isn't just some pretty picture; it's a roadmap to keeping your Sienna's accessories running smoothly. We'll break down the diagram's components, explain its function, and arm you with the knowledge to use it effectively.
Purpose of the 2009 Toyota Sienna Serpentine Belt Diagram
Why bother with this diagram in the first place? The serpentine belt is responsible for driving several critical components in your Sienna, including:
- Alternator: Charges the battery and powers electrical systems.
- Power Steering Pump: Provides hydraulic assistance for steering.
- Air Conditioning Compressor: Cools the cabin.
- Water Pump: Circulates coolant to regulate engine temperature (on some Sienna models, the water pump is driven by the timing belt; verify your specific engine configuration).
A broken or worn serpentine belt can lead to a complete system failure in any of these areas. Imagine losing power steering or air conditioning suddenly! The diagram allows you to:
- Properly route the new belt: Ensuring correct installation is paramount. An incorrectly routed belt can slip, wear prematurely, or even damage components.
- Identify components: Learn the location of each pulley and accessory.
- Diagnose problems: Understand how the system should operate to pinpoint the source of issues.
- Plan repairs: Determine the tools and steps required for belt replacement or accessory repair.
Having the diagram on hand before starting any work saves time, reduces errors, and improves safety. We have a downloadable file available for you to reference as you work.
Key Specs and Main Parts
Before we jump into the diagram's intricacies, let's highlight some key specifications and the main parts involved in the serpentine belt system of a 2009 Toyota Sienna.
Key Specs:
- Belt Length: The specific belt length varies depending on the engine (3.5L V6 primarily). Consult your owner's manual or a parts catalog for the correct length for your specific VIN. Using the wrong length belt will result in improper tension.
- Belt Material: Serpentine belts are typically made from a reinforced elastomer compound. Look for belts made from EPDM (ethylene propylene diene monomer) rubber, which offers superior heat and wear resistance.
- Tension: Proper belt tension is critical. Too loose, and the belt will slip, causing noise and reduced accessory performance. Too tight, and you risk premature bearing failure in the driven components. The diagram will show the location of the tensioner.
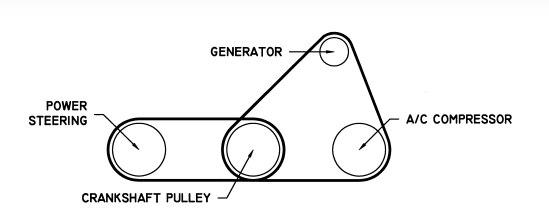
Main Parts:
- Crankshaft Pulley (Damper): Driven by the engine, this pulley is the starting point of the serpentine belt's journey.
- Alternator Pulley: Powers the alternator.
- Power Steering Pump Pulley: Drives the power steering pump.
- Air Conditioning Compressor Pulley: Powers the AC compressor.
- Water Pump Pulley: (If applicable). Drives the water pump.
- Tensioner Pulley: Maintains proper belt tension. This pulley is spring-loaded and automatically adjusts to compensate for belt stretch.
- Idler Pulley: A smooth pulley that helps guide the belt and maintain its correct path.
Understanding Diagram Symbols
The serpentine belt diagram employs various symbols to convey information efficiently. Here's a breakdown of common elements:
- Solid Lines: Typically represent the belt itself, showing its routing path around the pulleys.
- Dashed Lines: May indicate the orientation of the belt (e.g., front or back side) or hidden components.
- Arrows: Indicate the direction of belt travel. Crucial for understanding how the belt loops around each pulley.
- Circles: Represent pulleys. Some diagrams may label each circle with the component it's connected to (e.g., ALT for alternator).
- Squares/Rectangles: Can represent sensors, brackets, or other supporting components.
- Labels: Abbreviated labels identify each pulley and accessory (e.g., P/S for power steering, A/C for air conditioning, ALT for alternator, CRANK for crankshaft).
- Tensioner Symbol: Often represented by a spring or a symbol indicating a spring-loaded mechanism. The tensioner is a critical part, and the diagram will highlight its location.
While most diagrams are black and white, some may use colors to differentiate belt sections or highlight specific components. Consult the legend or accompanying notes for color-coding conventions, if any.
How It Works
The serpentine belt system operates on a simple principle: transferring rotational power from the engine's crankshaft to various accessories. The crankshaft pulley, directly connected to the engine, drives the serpentine belt. The belt, in turn, wraps around the pulleys of the alternator, power steering pump, air conditioning compressor, and (if applicable) the water pump. As the crankshaft rotates, it spins the belt, which then spins these accessories, enabling them to function.
The tensioner pulley plays a vital role in maintaining proper belt tension. The spring-loaded mechanism in the tensioner automatically adjusts to compensate for belt stretch and variations in engine load. This ensures consistent belt contact with the pulleys, preventing slippage and ensuring optimal accessory performance.
Understanding the routing is paramount. The diagram shows the specific path the belt must follow. It's crucial to route the belt correctly, ensuring it wraps around each pulley in the proper direction and maintains sufficient contact area. An incorrectly routed belt can slip, causing noise, reduced accessory performance, and premature wear.
Real-World Use: Basic Troubleshooting
Here's how you can use the serpentine belt diagram to troubleshoot common problems:
- Squealing Belt: A squealing belt is often caused by slippage. Use the diagram to check the belt's routing. Make sure it's properly seated on all pulleys. Inspect the belt for cracks, glazing, or fraying. Also, check the tensioner to ensure it's functioning correctly and maintaining adequate tension. If the tensioner seems weak, it may need replacement.
- Accessory Failure: If an accessory isn't working (e.g., no power steering, no AC), check the serpentine belt first. Is it intact? Is it properly routed? If the belt is broken, replace it and inspect the pulleys of the failed accessory for damage. If the belt is intact, but the accessory still isn't working, the accessory itself may be faulty.
- Belt Wear: Regular inspection of the serpentine belt is crucial. Use the diagram to locate the belt and visually inspect it for signs of wear, such as cracks, fraying, or missing chunks. Replace the belt if any of these signs are present.
Safety Considerations
Working on the serpentine belt system involves some inherent risks:
- Rotating Parts: The engine must be OFF and the ignition key removed before working on the serpentine belt. Accidental engine start-up can cause severe injury.
- Hot Components: The engine and exhaust system can be very hot. Allow the engine to cool completely before starting any work.
- Belt Tension: The tensioner is under spring pressure. Use the correct tools to relieve the tension before removing the belt. Incorrectly releasing the tension can cause the tensioner to snap back, potentially causing injury.
- Battery Disconnect: Disconnecting the negative battery terminal is always a good safety practice before working on any electrical components or rotating machinery.
Always wear safety glasses to protect your eyes from debris. Consider wearing gloves to protect your hands from dirt and grease. If you are unsure about any step in the process, consult a qualified mechanic.
We hope this detailed explanation helps you understand and utilize the 2009 Toyota Sienna serpentine belt diagram effectively. Remember, having the right information and following proper safety procedures are key to successful DIY repairs. We have the file with the diagram available for download, so you can easily reference it while working on your vehicle.