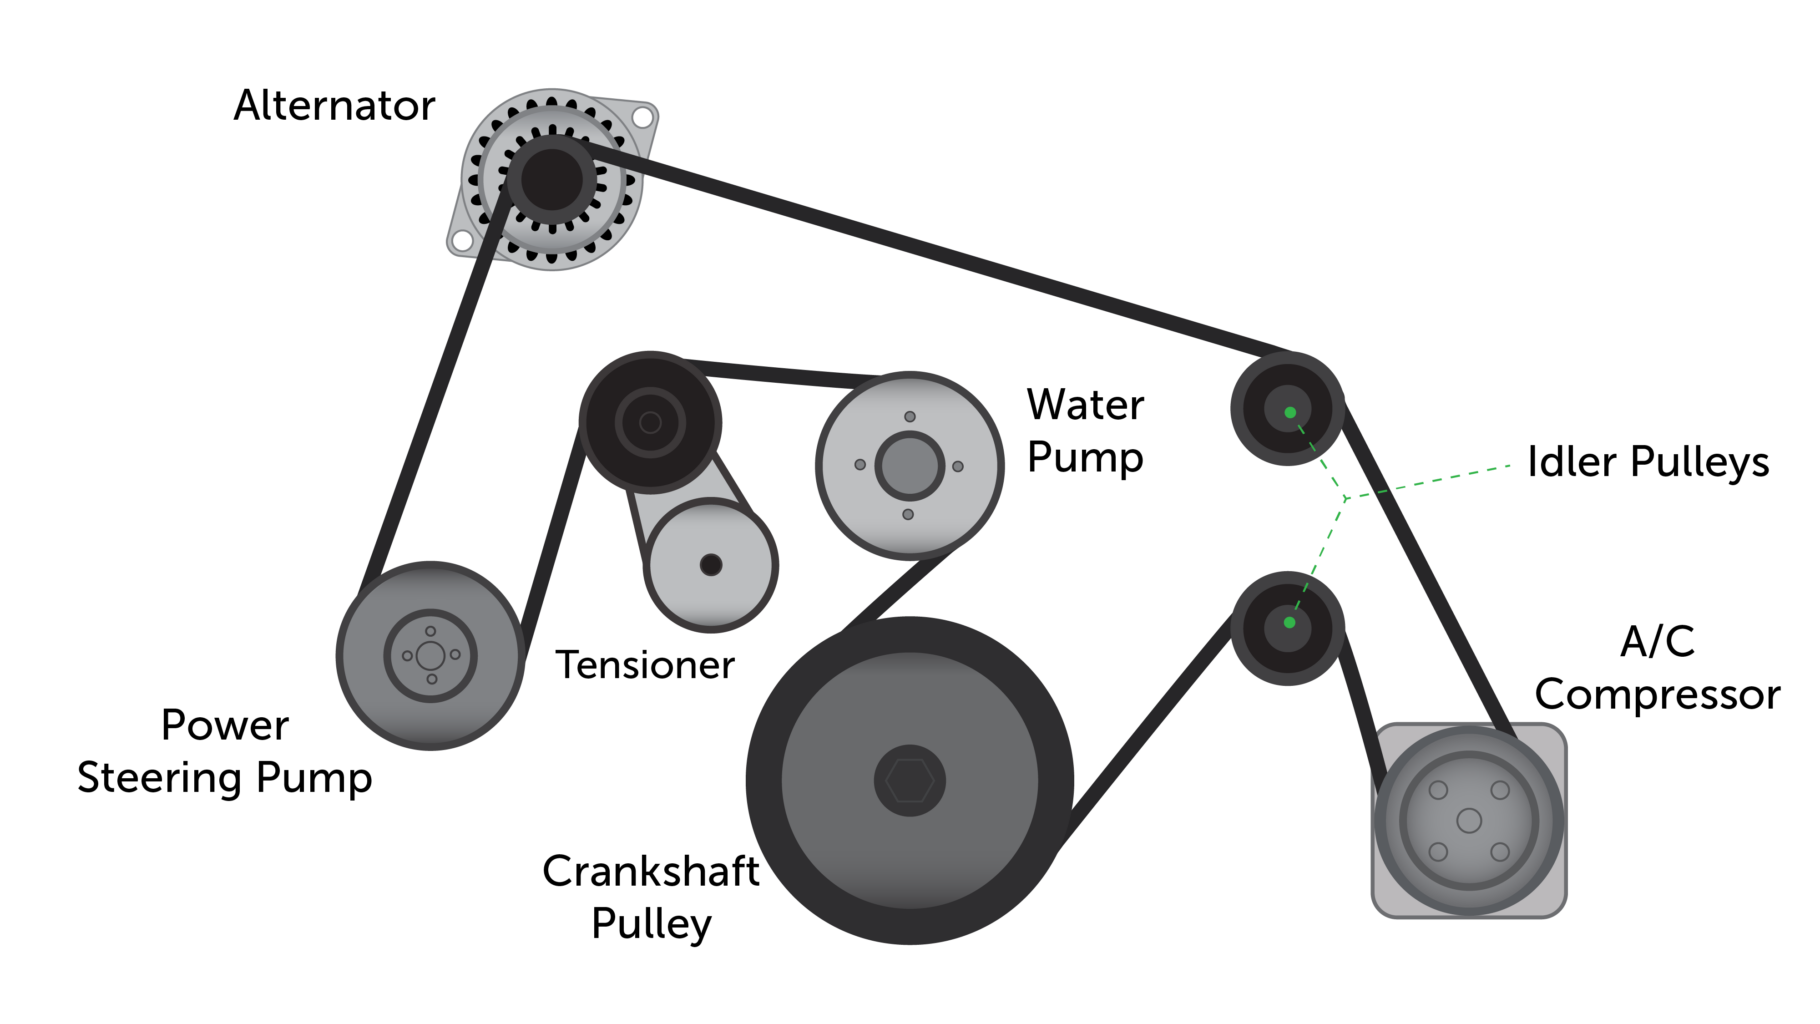
2009 Toyota Tacoma 2.7 Serpentine Belt Diagram
Alright, let's dive into the serpentine belt system of the 2009 Toyota Tacoma with the 2.7L engine. Whether you're tackling a repair, performing preventative maintenance, or just want a better understanding of your truck's inner workings, knowing the serpentine belt routing is crucial. We'll cover everything you need to understand the diagram and confidently work on your Tacoma.
Purpose of the Serpentine Belt Diagram
The serpentine belt diagram is your roadmap for the serpentine belt system. It visually represents how the belt snakes around various engine components. This is vital for several reasons:
- Belt Replacement: Absolutely essential for routing the new belt correctly. Incorrect routing can lead to component failure and engine damage.
- Troubleshooting: Helps identify which component a squealing belt might be related to (e.g., is the squeal coming from the power steering pump or the alternator?).
- Preventative Maintenance: Knowing the system allows you to inspect all components for wear and tear.
- General Understanding: Provides a solid grasp of how the engine accessories are driven.
Key Specs and Main Parts of the 2.7L Tacoma Serpentine Belt System
The 2.7L engine in the 2009 Tacoma typically uses a multi-rib belt, sometimes referred to as a V-ribbed or poly-V belt. These belts are designed for high power transmission and efficient operation. Here are the key components the serpentine belt interacts with:
- Crankshaft Pulley (or Damper): This is the driving force behind the whole system. Connected directly to the engine's crankshaft, it transfers rotational energy to the belt.
- Alternator: Generates electrical power for the vehicle's systems. The serpentine belt spins its pulley, causing it to generate electricity.
- Power Steering Pump: Provides hydraulic pressure to assist steering. The belt drives the pump's pulley, creating the necessary pressure.
- Air Conditioning (A/C) Compressor: Compresses refrigerant in the A/C system. The belt drives the compressor's pulley.
- Idler Pulley(s): Smooth, bearing-mounted pulleys that guide the belt and maintain tension. They don't drive any specific component but are crucial for proper belt routing.
- Tensioner Pulley: Spring-loaded pulley that automatically maintains the correct tension on the serpentine belt. This is critical for preventing slippage and premature belt wear. The tensioner often has a square opening to allow you to relieve tension during belt removal and installation.
Important Specs: While belt lengths can vary slightly based on options (like A/C), the 2.7L Tacoma generally uses a belt around 84-85 inches in length. Always verify the correct belt part number for your specific vehicle's VIN at a reputable parts store or dealership to ensure proper fit. Using the wrong length belt can damage components.
Understanding Serpentine Belt Diagram Symbols
Let's decode the diagram itself. Understanding these symbols will make the diagram much more useful:
- Solid Lines: Represent the front side (ribbed side) of the serpentine belt making contact with a pulley. This is the side that grips the pulley.
- Dotted Lines: Represent the back side (smooth side) of the serpentine belt making contact with a pulley. The smooth side is used on idler pulleys and the tensioner pulley.
- Arrows: Indicate the direction of belt travel. Follow the arrows to trace the entire belt path.
- Component Icons: Each component (alternator, power steering pump, etc.) is represented by a simplified icon. These icons are often labeled with abbreviations (ALT, P/S, A/C).
- Pulley Diameters: Some diagrams may include the diameter of each pulley. This information isn't usually critical for belt routing but can be helpful for diagnosing unusual belt wear patterns or noise issues.
- Tensioner Indicator: The tensioner will usually have an arrow pointing towards a scale. This indicates the normal operating range of the tensioner. A tensioner outside this range usually means the belt has stretched and needs replacing.
Some diagrams may use color coding, although this is less common. If color is used, a legend will explain what each color represents.
How the Serpentine Belt System Works
The principle is simple but effective. The engine's crankshaft provides the rotational power. This power is transferred via the crankshaft pulley to the serpentine belt. The belt, in turn, drives the pulleys of all the accessories (alternator, power steering pump, A/C compressor).
The tensioner pulley plays a crucial role. It maintains constant tension on the belt, preventing slippage. Slippage can lead to reduced performance of the accessories and premature belt wear. The tensioner is spring-loaded and automatically adjusts for slight variations in belt length due to stretching or temperature changes.
Because the belt snakes around multiple pulleys, it's essential to route it correctly. An incorrect routing can cause the belt to rub against itself or other engine components, leading to rapid wear and potentially catastrophic failure.
Real-World Use: Basic Troubleshooting
Here's how you can use the serpentine belt diagram to troubleshoot common issues:
- Squealing Belt: If you hear a squealing noise, first try spraying a small amount of belt dressing on the belt while the engine is running (exercise extreme caution to avoid getting your hands caught in the belt). If the squeal temporarily disappears, it indicates a worn or glazed belt. If the squeal persists, use the diagram to identify which pulley the noise seems to be coming from. A failing bearing in a pulley can also cause a squeal. You can carefully (again, be extremely cautious) use a long screwdriver or mechanic's stethoscope to listen to each pulley while the engine is running to pinpoint the source.
- Belt Slippage: If the alternator light comes on or the power steering feels weak, the belt might be slipping. Check the tensioner. Is it operating within its normal range? Is the belt glazed or cracked? A visual inspection using the diagram as a reference to see the complete belt run is critical.
- Component Failure: If a specific accessory (e.g., A/C compressor) stops working, check if the belt is still properly routed around its pulley. Sometimes, a seized component can cause the belt to break or slip off.
- Visual Inspection: Regularly inspect the belt for cracks, fraying, missing ribs, and glazing. Use the diagram to check the entire belt run, looking closely at areas where the belt makes sharp bends. Early detection of wear can prevent a roadside breakdown.
Safety Considerations
Working on the serpentine belt system involves inherent risks. The engine must be off and cool before starting any work.
- Moving Parts: The serpentine belt and pulleys are extremely dangerous when the engine is running. Never put your hands or any tools near the belt while the engine is running.
- Hot Surfaces: The engine components, especially the exhaust manifold, can be very hot. Allow the engine to cool completely before working on the system.
- Tensioner Spring: The tensioner spring is under considerable pressure. Use the correct tool to relieve tension gradually and safely. Improper handling can cause the tensioner to snap back, potentially causing injury.
- Eye Protection: Wear safety glasses to protect your eyes from debris that may be dislodged during belt replacement.
- Battery Disconnect: It's good practice to disconnect the negative battery terminal before working on any electrical components, like the alternator, to prevent accidental shorts.
Remember to consult your vehicle's repair manual for specific instructions and torque specifications. When replacing the belt, make sure it is seated correctly on all pulleys before releasing the tensioner. Double-check the routing against the diagram to ensure accuracy.
We have the complete 2009 Toyota Tacoma 2.7L Serpentine Belt Diagram available for download. Having a detailed, printable version can be incredibly helpful when you're working in the garage.