2009 Toyota Tacoma Serpentine Belt Diagram
The serpentine belt diagram for a 2009 Toyota Tacoma is an indispensable resource for anyone undertaking engine maintenance, troubleshooting, or component replacement on their vehicle. This article will provide a comprehensive guide to understanding this diagram, empowering you to confidently tackle tasks related to the serpentine belt system.
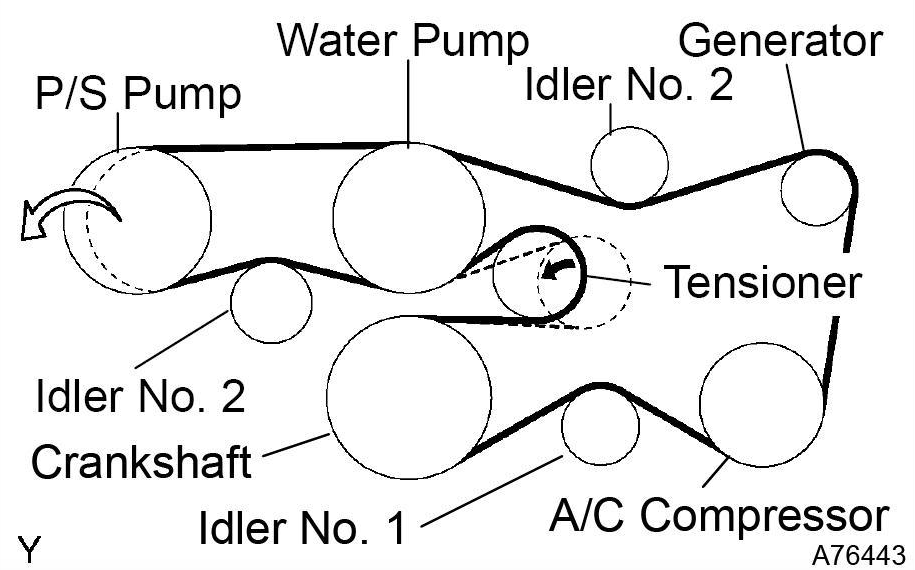
Purpose of the Serpentine Belt Diagram
The serpentine belt diagram isn't just a pretty picture; it's a vital tool. Its primary purpose is to illustrate the routing of the serpentine belt around the various engine accessories it drives. Without a clear diagram, incorrectly routing the belt can lead to serious problems, including:
- Accessory Malfunction: If the belt doesn't have sufficient contact with a pulley, the accessory (e.g., alternator, power steering pump, AC compressor) won't function correctly or at all.
- Belt Slippage: Incorrect routing or insufficient tension can cause the belt to slip, leading to noise, reduced accessory performance, and premature belt wear.
- Engine Damage: In extreme cases, an incorrectly routed or snapped belt can damage other engine components.
Therefore, the diagram is crucial for:
- Belt Replacement: Ensuring the new belt is installed correctly.
- Accessory Replacement: Guiding the removal and reinstallation of accessories driven by the belt.
- Troubleshooting: Identifying potential issues based on the belt's condition and routing.
- General Understanding: Gaining a deeper understanding of how the engine's accessories are driven.
Key Specs and Main Parts
Before diving into the diagram itself, it's important to understand the key components of the serpentine belt system on a 2009 Toyota Tacoma. The main parts include:
- Serpentine Belt: A single, continuous belt that drives multiple engine accessories.
- Crankshaft Pulley (Harmonic Balancer): The pulley attached to the crankshaft, providing the initial rotational force to drive the belt.
- Alternator Pulley: Drives the alternator, which generates electricity for the vehicle's electrical system.
- Power Steering Pump Pulley: Drives the power steering pump, which provides hydraulic assistance for steering.
- Air Conditioning (AC) Compressor Pulley: Drives the AC compressor, which circulates refrigerant in the air conditioning system.
- Water Pump Pulley: Drives the water pump, which circulates coolant throughout the engine to regulate temperature.
- Tensioner Pulley: An adjustable pulley that maintains the correct tension on the serpentine belt. This is often spring-loaded.
- Idler Pulley(s): Smooth, non-driven pulleys that guide the belt around the engine and provide additional contact with the driven pulleys.
The 2009 Tacoma uses different engine options (2.7L I4 and 4.0L V6). While the overall principle remains the same, the specific routing and accessory placement will differ between these engines. Ensure you are using the correct diagram for your specific engine.
Typical serpentine belt specifications for a 2009 Toyota Tacoma (confirm with your owner's manual or parts supplier):
- Belt Length: Varies depending on engine and accessory configuration (usually between 80-95 inches).
- Belt Width: Typically around 0.8 inches.
- Number of Ribs: Typically 5-7 ribs.
Symbols on the Diagram
Serpentine belt diagrams use a standardized set of symbols to represent the different components and belt routing. Understanding these symbols is crucial for interpreting the diagram correctly.
- Solid Lines: Represent the portion of the serpentine belt that is in contact with a pulley.
- Dotted Lines: May indicate the backside of the belt or a portion of the belt that is not in direct contact with a pulley. Pay close attention to how the dotted line transitions into a solid line to understand the belt's path.
- Arrows: Indicate the direction of belt rotation around each pulley. This is critical for ensuring correct routing.
- Pulley Icons: Each pulley is represented by a circle. Some diagrams may include small icons within the circle to indicate the type of accessory it drives (e.g., a fan for the water pump, a lightning bolt for the alternator).
- Tensioner Symbol: The tensioner pulley is often represented with an arrow indicating the direction of its spring-loaded movement. This is crucial for understanding how to relieve tension during belt replacement.
Color coding is rarely used on serpentine belt diagrams, but if present, it might be used to differentiate between different belt paths or to highlight specific components. Always refer to the diagram's legend for clarification.
How It Works
The serpentine belt system's operation is relatively straightforward. The crankshaft pulley, driven by the engine's combustion, provides the rotational force. This force is then transferred to the other pulleys via the serpentine belt. Each pulley, in turn, drives its corresponding accessory.
The tensioner pulley plays a crucial role in maintaining the correct belt tension. Too little tension will cause the belt to slip, while too much tension can damage the belt and accessory bearings. The tensioner automatically adjusts to compensate for belt wear and thermal expansion.
The routing of the belt is carefully designed to ensure sufficient contact with each pulley to prevent slippage and optimize accessory performance. The idler pulleys help to achieve this optimal routing.
Real-World Use and Troubleshooting
Here are some common troubleshooting scenarios where the serpentine belt diagram can be invaluable:
- Squealing Belt: A squealing belt often indicates slippage due to low tension, a worn belt, or a contaminated pulley. Check the tensioner's operation and inspect the belt for cracks, glazing, or oil contamination. Refer to the diagram to ensure the belt is properly routed.
- Accessory Malfunction: If an accessory isn't working (e.g., the AC isn't cooling, the power steering is stiff), check the serpentine belt to ensure it's intact and properly routed around the affected accessory's pulley.
- Belt Damage: A damaged belt (cracked, frayed, or missing ribs) should be replaced immediately. Use the diagram to ensure correct installation of the new belt.
- Tensioner Issues: A faulty tensioner can cause belt slippage, noise, and premature belt wear. Inspect the tensioner for smooth operation and proper tension.
If you're unsure about the correct belt routing, always consult the diagram before proceeding. Taking pictures before removing the old belt can also be helpful.
Safety Precautions
Working on the serpentine belt system can be dangerous if proper precautions aren't taken. Here are some key safety considerations:
- Disconnect the Battery: Always disconnect the negative battery terminal before working on any electrical components, including the alternator.
- Hot Engine: Allow the engine to cool completely before working on the serpentine belt system. Components can get extremely hot and cause burns.
- Moving Parts: The serpentine belt system contains moving parts. Ensure the engine is off and the ignition key is removed before putting your hands near the belt or pulleys.
- Tensioner Spring: The tensioner pulley is spring-loaded and can snap back with considerable force. Use the correct tool to relieve tension and be careful to avoid injury.
- Eye Protection: Wear safety glasses to protect your eyes from debris.
The alternator is a particularly risky component due to its electrical connections. Always disconnect the battery before working near it.
We understand the importance of having a reliable serpentine belt diagram readily available. We have the 2009 Toyota Tacoma serpentine belt diagram file ready for you. Download it now to have a handy reference for your maintenance and repair needs.