2010 Chevy Traverse 3.6 Serpentine Belt Diagram
The serpentine belt in your 2010 Chevy Traverse with the 3.6L engine is a critical component. It's responsible for driving several essential accessories that keep your vehicle running smoothly. Understanding its routing and operation is paramount for proper maintenance and troubleshooting. This guide will provide you with a detailed explanation of the serpentine belt diagram, its components, and how to diagnose common issues. We have the diagram available for download, ensuring you have a visual reference at hand.
Purpose of the Serpentine Belt Diagram
The serpentine belt diagram serves several crucial purposes:
- Repair and Replacement: The most common reason is for replacing a worn or broken serpentine belt. Without the diagram, properly routing the new belt can be a frustrating and potentially damaging process. Incorrect routing can lead to accessory malfunction and premature belt wear.
- Troubleshooting: Diagnosing noises or malfunctions related to the accessories driven by the serpentine belt (power steering, air conditioning, alternator, etc.) often requires understanding the belt's path. A slipping or improperly tensioned belt can cause these accessories to underperform.
- Preventative Maintenance: Regularly inspecting the belt for cracks, wear, or fraying is a crucial part of preventative maintenance. Knowing the belt's route allows you to thoroughly examine its entire length.
- Understanding Vehicle Systems: For DIY mechanics and car enthusiasts, understanding the serpentine belt system is a stepping stone to grasping the overall operation of the engine and its auxiliary systems.
Key Specs and Main Parts
Let's break down the key specifications and the components involved in the 2010 Chevy Traverse 3.6L serpentine belt system:
- Belt Length: While the exact length varies slightly based on accessory configuration, a typical serpentine belt for this application is around 90-95 inches. Always consult your owner's manual or a parts catalog to verify the correct belt length for your specific vehicle's options. Using the wrong length can lead to improper tension and accessory damage.
- Belt Type: Serpentine belts are typically made of a reinforced rubber compound designed for high-temperature and high-stress environments. Look for belts manufactured with EPDM (ethylene propylene diene monomer) rubber for superior durability and resistance to cracking.
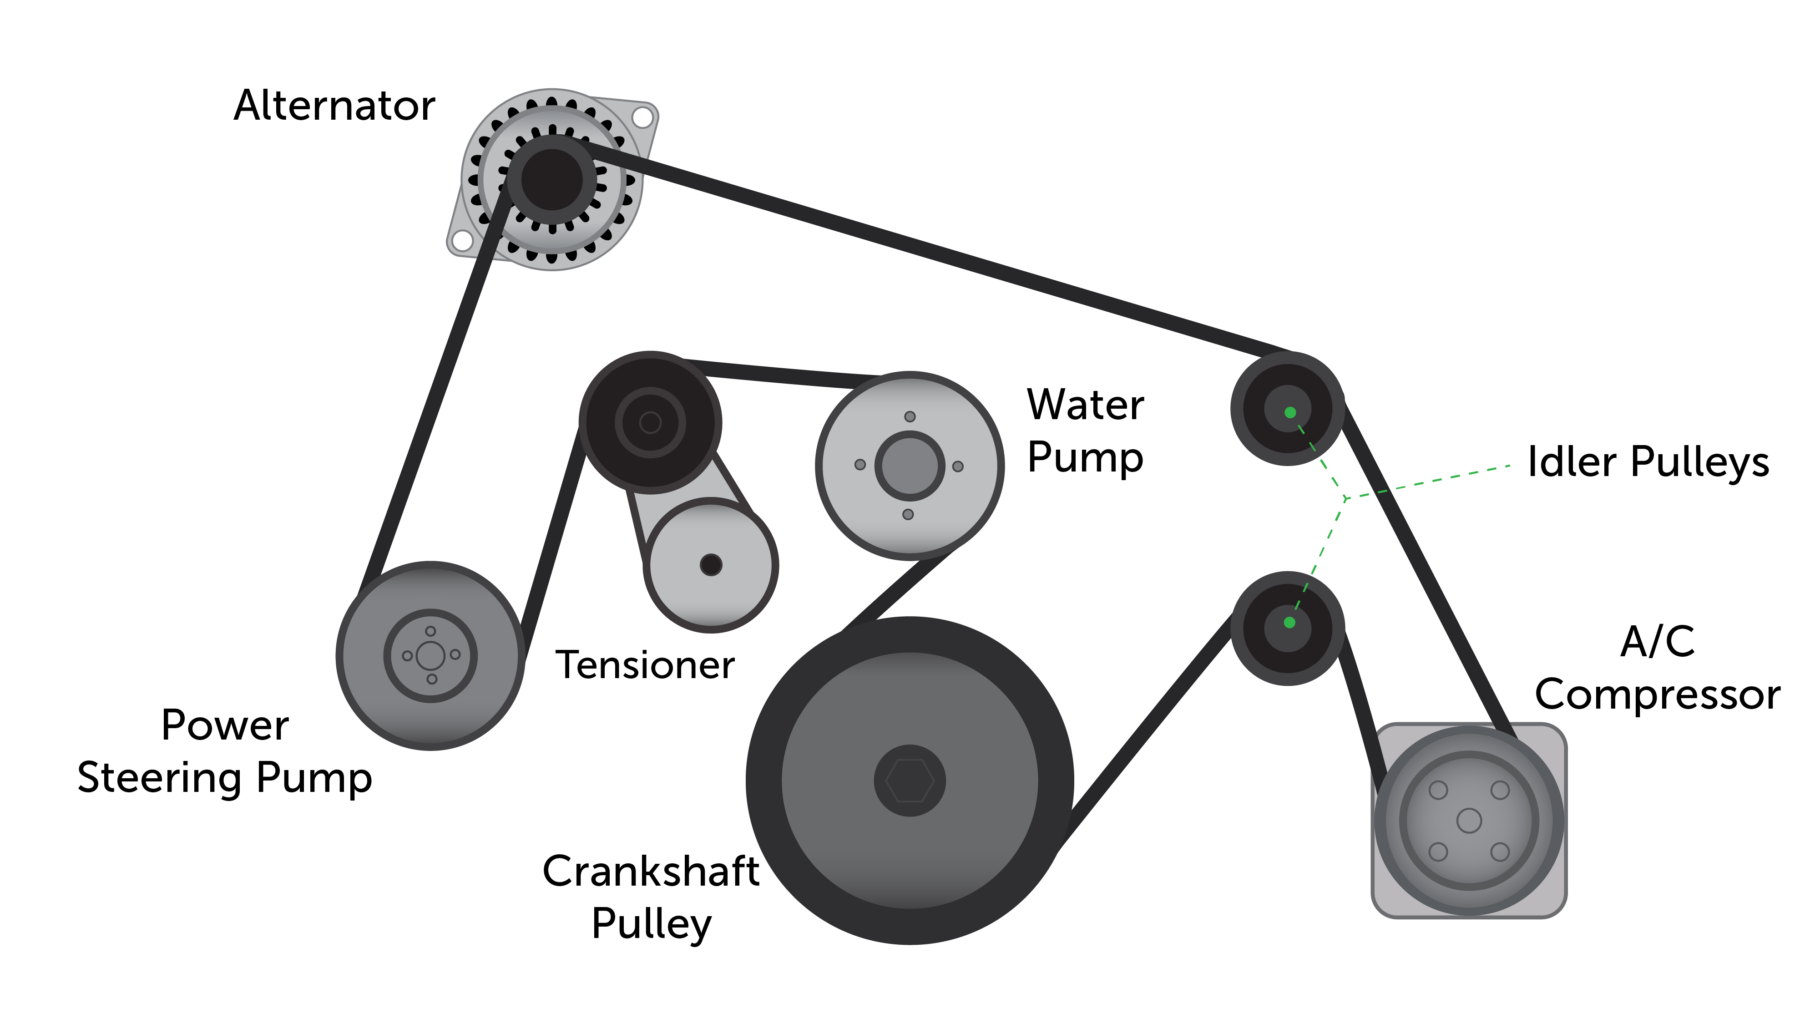
The main components the serpentine belt drives are:
- Crankshaft Pulley: This is the driving pulley, directly connected to the engine's crankshaft. It transfers the engine's rotational power to the serpentine belt.
- Alternator Pulley: The alternator generates electrical power for the vehicle. The serpentine belt spins the alternator, allowing it to charge the battery and power electrical components.
- Power Steering Pump Pulley: The power steering pump provides hydraulic assistance to the steering system. The serpentine belt powers the pump, making steering easier.
- Air Conditioning Compressor Pulley: The A/C compressor is responsible for cooling the vehicle's interior. The serpentine belt drives the compressor, which circulates refrigerant.
- Water Pump Pulley: The water pump circulates coolant through the engine to prevent overheating. In some 3.6L Traverse configurations, the water pump is driven directly by the timing chain. In others, it's driven by the serpentine belt. Consult your diagram to verify.
- Tensioner Pulley: The tensioner pulley maintains the proper tension on the serpentine belt. It's spring-loaded and automatically adjusts to compensate for belt stretch and wear. A faulty tensioner can cause belt slippage and noise.
- Idler Pulley(s): Idler pulleys are smooth, unpowered pulleys that help guide the serpentine belt and maintain its proper wrap angle around the other pulleys.
Symbols and Diagram Interpretation
Understanding the symbols used in the serpentine belt diagram is crucial for proper interpretation:
- Solid Lines: Solid lines represent the main path of the serpentine belt. They indicate the belt's trajectory as it wraps around each pulley.
- Dashed Lines: Dashed lines might be used to indicate the *rear* or *hidden* portion of the belt as it passes behind other components. Pay close attention to dashed lines to ensure you're routing the belt correctly in tight spaces.
- Arrows: Arrows indicate the direction of belt travel. They show the rotational direction of the belt around each pulley.
- Component Symbols: Each component (alternator, power steering pump, etc.) is usually represented by a simplified symbol. The diagram typically includes a legend identifying each symbol.
- Tensioner Indication: The tensioner pulley is often depicted with a spring symbol to indicate its spring-loaded mechanism.
Colors are not generally used consistently across all diagrams, but if present, a legend should explain their meaning. Generally, the lines for the belt are the only thing that will have colour, while components themselves are typically rendered in black and white.
How It Works
The serpentine belt system operates on a simple principle: the engine's rotational force is transferred to the belt via the crankshaft pulley. The belt, in turn, wraps around and drives the pulleys of the various accessories. The tensioner pulley ensures that the belt maintains the correct tension to prevent slippage and ensure efficient power transfer. The idler pulleys help guide the belt and optimize its wrap angle around the driven pulleys.
The tensioner is a particularly important component. It's a spring-loaded device designed to maintain consistent belt tension. As the belt stretches over time, the tensioner automatically adjusts to take up the slack. A worn or faulty tensioner can lead to belt slippage, noise, and premature accessory failure.
Real-World Use and Troubleshooting
Here's how you can use the serpentine belt diagram in real-world troubleshooting scenarios:
- Squealing Noise: A squealing noise, especially during cold starts or when turning the steering wheel, often indicates a slipping serpentine belt. Check the belt tension and condition. Look for cracks, glazing (a shiny, smooth surface), or missing chunks. A loose or worn belt tensioner can also cause this.
- Accessory Malfunction: If you experience issues with the power steering, air conditioning, or charging system, inspect the serpentine belt and its routing. A broken or improperly routed belt will prevent the affected accessory from functioning.
- Belt Wear: Regularly inspect the serpentine belt for signs of wear, such as cracks, fraying, or missing ribs. Replace the belt proactively before it breaks completely.
- Visual Inspection of Pulleys: While you're inspecting the belt, also examine the pulleys for damage, misalignment, or excessive wear. A damaged pulley can cause premature belt wear and failure.
Basic Troubleshooting Tips:
- Check Belt Tension: You should be able to deflect the belt slightly between the longest spans. If it's excessively loose, the tensioner may be faulty or the belt may be stretched beyond its service limit.
- Listen Carefully: Pay attention to any unusual noises coming from the engine bay. Squealing, chirping, or rattling sounds can indicate serpentine belt problems.
- Use a Belt Tension Gauge: For more accurate tension measurement, use a specialized belt tension gauge.
Safety Precautions
Working around the serpentine belt system can be dangerous. Here are some important safety precautions:
- Disconnect the Battery: Always disconnect the negative battery terminal before working on any electrical components or the serpentine belt system. This prevents accidental electrical shocks.
- Avoid Moving Parts: Never put your hands or tools near the serpentine belt while the engine is running. The belt can cause serious injury if it catches your fingers or clothing.
- Hot Surfaces: Be aware that engine components, including the pulleys, can be very hot after the engine has been running. Allow the engine to cool down before working on the serpentine belt system.
- Protective Gear: Wear safety glasses to protect your eyes from debris.
- Tensioner Spring: The tensioner has a strong spring. Use the correct tools (usually a wrench or socket on the tensioner pulley's bolt) to carefully relieve the tension on the belt before removing it. Improper handling can cause the tensioner to snap back forcefully, potentially causing injury.
Important Note: The alternator's terminals are extremely risky if shorted while the engine is running. Take extreme caution.
We've covered the essentials for understanding the 2010 Chevy Traverse 3.6L serpentine belt diagram. Armed with this information, you can confidently tackle serpentine belt replacement, troubleshooting, and preventative maintenance. Remember to use the correct tools, follow safety precautions, and consult the vehicle's service manual for specific instructions. And, of course, you can download the serpentine belt diagram we have available to make the process even easier. Good luck!