2010 Chevy Traverse Fuse Box Diagram
For the experienced DIYer or car enthusiast tackling electrical repairs, modifications, or even just routine maintenance on a 2010 Chevy Traverse, understanding the fuse box diagram is absolutely crucial. It's your roadmap to the vehicle's electrical system, allowing you to pinpoint issues, safely disconnect circuits, and ensure proper functionality. This article breaks down the 2010 Traverse fuse box diagram, explaining its components, symbols, and practical applications.
Purpose and Why It Matters
The fuse box diagram serves several vital purposes:
- Troubleshooting Electrical Issues: When a component stops working, the fuse box diagram helps you quickly identify the corresponding fuse or relay.
- Performing Electrical Modifications: If you're adding aftermarket accessories (lights, stereo systems, etc.), you need to know which circuits to tap into or protect with inline fuses.
- Preventing Further Damage: Replacing a blown fuse with one of the correct amperage is critical to prevent overloading the circuit and potentially causing a fire.
- Understanding Vehicle Systems: Studying the diagram provides a general overview of how different electrical systems in your Traverse are interconnected.
In essence, the fuse box diagram saves you time, money, and potential frustration by providing a clear and concise representation of your vehicle's electrical architecture.
Key Specs and Main Parts
The 2010 Chevy Traverse typically has two main fuse box locations:
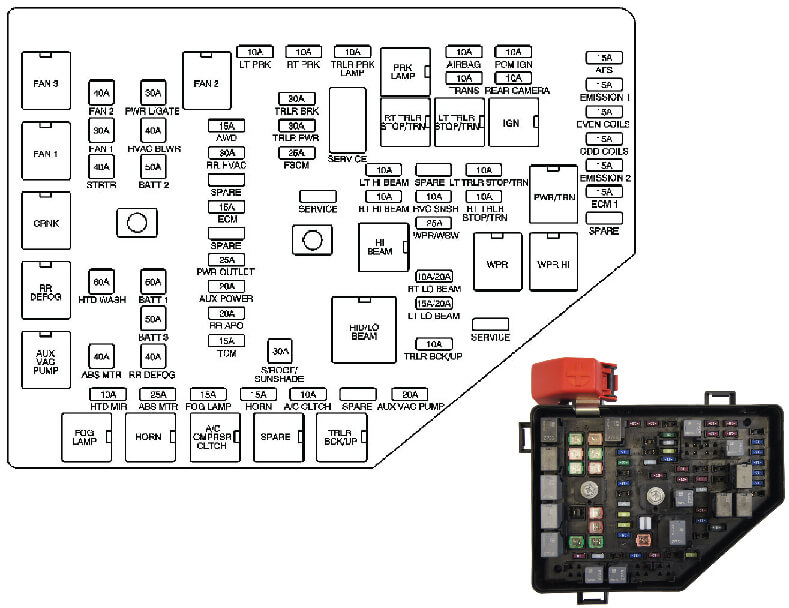
- Underhood Fuse Box (Engine Compartment): Located near the battery, this box houses fuses and relays for high-current systems like the starter, alternator, headlights, and cooling fans.
- Instrument Panel Fuse Box (Inside the Cabin): Usually situated on the driver's side, often behind a small access panel, this box controls lower-current systems like the radio, power windows, interior lights, and accessories.
Each fuse box diagram will list the following key information:
- Fuse Number or ID: A numerical or alphanumeric code assigned to each fuse and relay position.
- Ampere Rating (Amps): The maximum current a fuse can safely handle before blowing (e.g., 5A, 10A, 20A, 30A). This is crucial for selecting the correct replacement fuse.
- Circuit or Component Protected: A brief description of the electrical system or component that the fuse protects (e.g., "Headlamp LH," "Radio," "Power Windows").
- Relay Positions: If a relay is present, the diagram will indicate its function (e.g., "Headlamp Relay," "Fuel Pump Relay"). Relays are electromagnetic switches used to control high-current circuits with a low-current signal.
Important Note: There might be slight variations in fuse box layouts and assignments depending on the specific trim level and optional equipment installed on your 2010 Traverse. Always refer to the diagram specific to your vehicle, usually found in the owner's manual or on a sticker inside the fuse box cover.
Understanding Fuse Box Symbols
Fuse box diagrams utilize a standardized set of symbols to convey information concisely. Here's a breakdown of common symbols:
- Solid Lines: Represent electrical wires or circuits.
- Dashed Lines: Indicate a ground connection or a connection that may vary depending on the vehicle configuration.
- Rectangles: Typically represent fuses. The number inside the rectangle indicates the amperage rating.
- Squares or Other Shapes: Often represent relays. The diagram may include a small symbol within the shape indicating the relay's function (e.g., a headlight symbol for a headlight relay).
- Colors: While not always present on printed diagrams, color-coded wiring may be referenced in the owner's manual or online service information. These colors help trace wires through the harness.
Different manufacturers might use slightly different symbols, but the general principle remains the same: to provide a clear and understandable representation of the electrical circuit.
How It Works
The fuse box acts as a central distribution point for electrical power. Power from the battery flows through various circuits, each protected by a fuse. A fuse is a safety device containing a thin wire or strip of metal designed to melt and break the circuit if the current exceeds its rated amperage. This prevents damage to the wiring and components connected to that circuit.
When a fuse blows, it's usually an indication of an overload or a short circuit. An overload occurs when too much current is drawn through the circuit, perhaps due to a faulty component or an excessive number of accessories plugged in. A short circuit happens when a wire accidentally comes into contact with ground (the vehicle's chassis), creating a low-resistance path for current to flow, leading to a rapid increase in current.
Relays are used to switch high-current circuits with a low-current signal. For example, the headlights draw a significant amount of current. Instead of routing that high current through the headlight switch on the dashboard (which would require a very robust switch), a relay is used. The headlight switch only controls a small amount of current to activate the relay, which then closes the circuit to the headlights, allowing the full current to flow.
Real-World Use – Basic Troubleshooting Tips
Here's how to use the fuse box diagram for basic troubleshooting:
- Identify the Symptom: Determine which component or system is malfunctioning (e.g., the radio isn't working, the headlights are dim).
- Consult the Diagram: Locate the fuse box diagram for your 2010 Traverse. Find the fuse that corresponds to the malfunctioning component.
- Inspect the Fuse: Visually inspect the fuse. A blown fuse will have a broken filament. You can also use a multimeter to test for continuity. Set the multimeter to the continuity setting (usually indicated by a diode symbol or a buzzer). Touch the probes to both ends of the fuse. If the multimeter beeps or shows a reading of 0 ohms, the fuse is good. If it shows infinite resistance or doesn't beep, the fuse is blown.
- Replace the Fuse: Replace the blown fuse with a new fuse of the same amperage rating. Using a fuse with a higher amperage rating can overload the circuit and cause further damage or a fire.
- Test the System: After replacing the fuse, test the component to see if it's working.
- If the Fuse Blows Again: If the new fuse blows immediately or shortly after replacement, it indicates a more serious problem, such as a short circuit. Further diagnosis is required, and you may need to consult a professional mechanic.
Example: Your 2010 Traverse's power windows aren't working. You consult the fuse box diagram and find a fuse labeled "Power Windows" with a rating of 25A. You locate the fuse in the instrument panel fuse box, visually inspect it, and find that the filament is broken. You replace the fuse with a new 25A fuse, and the power windows now function correctly.
Safety – Highlight Risky Components
Working with electrical systems can be dangerous. Here are some important safety precautions:
- Disconnect the Battery: Before working on any electrical component, disconnect the negative (-) terminal of the battery. This prevents accidental short circuits and electrical shocks.
- Use Insulated Tools: Always use insulated tools when working with electrical systems.
- Never Bypass a Fuse: Never attempt to bypass a fuse with a wire or other conductive material. This is extremely dangerous and can cause a fire.
- Be Careful Around High-Current Systems: The starting system and charging system (alternator) operate at high currents and voltages. Exercise extreme caution when working with these systems.
- Be Aware of Airbag Systems: The airbag system contains sensitive components that can be accidentally triggered. Consult the service manual for proper procedures before working near airbag components.
Important Note: If you are uncomfortable working with electrical systems or unsure about any procedure, it's best to consult a qualified mechanic.
We have a detailed fuse box diagram available for download. This diagram provides a comprehensive layout of both the underhood and instrument panel fuse boxes, along with detailed descriptions of each fuse and relay. This resource will prove invaluable for any electrical work you undertake on your 2010 Chevy Traverse.