2010 Corolla Serpentine Belt Diagram
Welcome, fellow gearheads! Today, we're diving into the heart of your 2010 Toyota Corolla's engine bay – specifically, the serpentine belt system. This seemingly simple component is crucial for keeping your car running smoothly. Understanding its layout and function, aided by a good diagram, is essential for preventative maintenance, troubleshooting, and even some performance mods.
Why a Serpentine Belt Diagram Matters
The serpentine belt diagram is your roadmap to understanding the accessory drive system. It's absolutely vital for:
- Correct Belt Replacement: Installing the belt incorrectly can lead to component failure and potentially strand you on the side of the road.
- Troubleshooting Accessory Issues: Is your power steering weak? AC not blowing cold? A slipping or broken belt could be the culprit. The diagram helps you trace the belt's path and identify which component might be affected.
- Performing Routine Maintenance: Inspecting the belt for wear and tear is a crucial part of preventative maintenance. The diagram allows you to quickly identify all the pulleys and their positions, aiding in a thorough inspection.
- Modifying Your Engine: Want to upgrade your alternator or add a supercharger? The diagram is essential for understanding how your existing accessory drive is configured and how your modifications will impact it.
- Understanding Engine Function: Simply put, learning about the serpentine belt system enhances your overall understanding of how your car's engine operates.
Key Specs and Main Parts of the 2010 Corolla Serpentine Belt System
Before we dive into the diagram, let's cover the essential components of the 2010 Corolla's serpentine belt system. Keep in mind that specific engine options (primarily the 1.8L 2ZR-FE) may have minor variations, but the general layout remains the same.
Main Components:
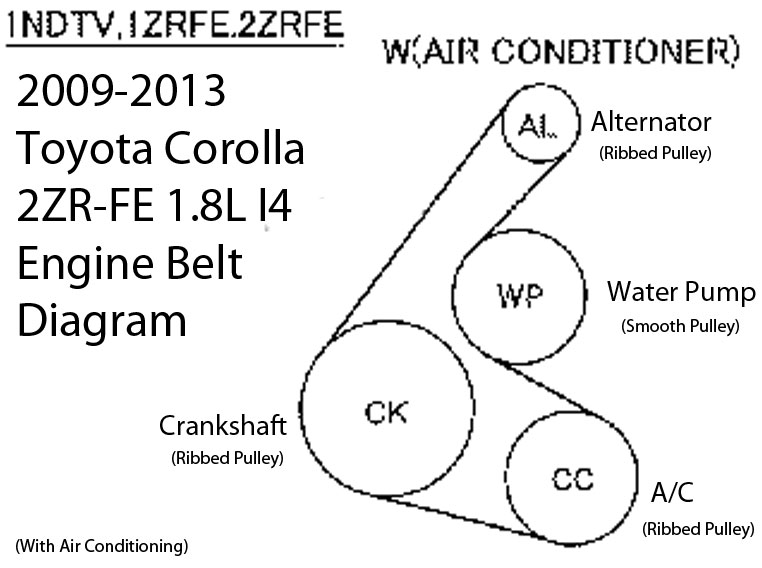
- Crankshaft Pulley (Crank Pulley): This is the driven pulley, directly connected to the engine's crankshaft. It provides the rotational power to the entire system.
- Alternator Pulley: Driven by the serpentine belt, the alternator generates electricity to power your car's electrical system and charge the battery.
- Air Conditioning (AC) Compressor Pulley: The AC compressor pressurizes refrigerant, which is essential for cooling the cabin.
- Power Steering Pump Pulley: This pulley drives the power steering pump, providing hydraulic assistance to make steering easier.
- Water Pump Pulley: This critical component circulates coolant throughout the engine to prevent overheating.
- Tensioner Pulley: This spring-loaded or hydraulically damped pulley maintains the correct tension on the serpentine belt. It's vital for preventing slippage and extending belt life. A faulty tensioner can cause belt squeal or even belt failure.
- Idler Pulley: An idler pulley (or pulleys) is used to guide the belt around the various components and optimize its wrap angle. It's usually a smooth pulley that doesn't drive any specific component.
- Serpentine Belt: The heart of the system! This single, continuous belt transfers power from the crankshaft pulley to all the other driven components.
Key Specs:
- Belt Length: The exact belt length varies slightly depending on specific vehicle options (e.g., AC or no AC). Always refer to your vehicle's specific service manual or a reputable parts catalog for the correct length. Expect lengths around 80-85 inches. Using the wrong length belt will lead to improper tension and component failure.
- Belt Material: Modern serpentine belts are typically made from EPDM (Ethylene Propylene Diene Monomer) rubber, which offers excellent resistance to heat, cracking, and wear.
- Tensioner Torque Specs: When replacing the tensioner, it's crucial to tighten the mounting bolts to the manufacturer's specified torque. Overtightening can damage the tensioner or the engine block. This information is generally found in a repair manual or online database.
Understanding Symbols and the Diagram Itself
A good serpentine belt diagram will use standardized symbols to represent the various components and the belt's routing.
- Solid Line: Represents the path of the serpentine belt. The line thickness can sometimes indicate belt width, but this is not always consistent.
- Circles: Represent pulleys. The size of the circle doesn't necessarily correlate with the actual pulley size.
- Labeled Circles: Each pulley will be labeled with an abbreviation or symbol indicating the component it's attached to (e.g., ALT for alternator, AC for air conditioning compressor, P/S for power steering).
- Arrows: Indicate the direction of rotation for each pulley. This is crucial for understanding how the belt is routed.
- Tensioner Symbol: The tensioner is usually depicted with a symbol that shows a spring or a pivoting arm, indicating its ability to maintain belt tension.
- Dotted or Dashed Lines: Sometimes used to indicate the backside of the belt (the smooth side) making contact with a pulley. This is important for identifying which pulleys are driven by the belt's friction against their smooth surface.
Important Note: Diagrams may vary slightly depending on the source. Always cross-reference your diagram with the actual layout of your engine bay to ensure accuracy.
How the Serpentine Belt System Works
The system's operation is relatively straightforward. The crankshaft pulley, driven directly by the engine's rotation, provides the power to turn the serpentine belt. The belt, in turn, drives all the accessory pulleys: the alternator, AC compressor, power steering pump, and water pump. The tensioner pulley maintains the proper tension on the belt, preventing slippage and ensuring efficient power transfer to all components. Without proper tension, the belt will slip, leading to reduced performance from the accessories and potentially overheating. The idler pulley(s) guide the belt around the various components, ensuring optimal wrap angle on each pulley.
Real-World Use: Basic Troubleshooting Tips
Here's how you can use the serpentine belt diagram to troubleshoot common problems:
- Squealing Belt: A squealing belt is often a sign of slippage. Check the belt tensioner to ensure it's functioning correctly. Inspect the belt for cracks, glazing, or missing chunks. Use the diagram to inspect all the pulleys and ensure they are aligned properly. Misaligned pulleys will cause excessive wear and noise.
- Weak Power Steering: If your power steering is weak, check the serpentine belt to make sure it is properly routed around the power steering pump pulley. A loose or damaged belt can prevent the pump from operating correctly.
- No Cold Air Conditioning: Similar to the power steering issue, check the belt routing and tension to ensure the AC compressor is being driven properly.
- Overheating: If your car is overheating, the water pump might not be circulating coolant effectively. Check the serpentine belt to ensure it is properly routed and tensioned around the water pump pulley.
- Charging Problems: If the battery isn't charging properly, the alternator may not be generating enough electricity. Check the serpentine belt routing and tension to ensure the alternator is being driven correctly.
Use the diagram to visually inspect the belt's routing. Has anything come loose? Is the belt routed incorrectly after a previous repair? These visual checks can save you a lot of time and frustration.
Safety Considerations
Working on the serpentine belt system can be dangerous if proper precautions are not taken.
- Disconnect the Battery: Always disconnect the negative battery cable before working on any electrical components. This prevents accidental shorts and potential electrocution.
- Engine Must Be Off and Cool: Never work on the serpentine belt system while the engine is running or hot. The belt and pulleys are moving at high speeds and can cause serious injury.
- Keep Hands and Clothing Clear: Keep your hands, hair, and clothing clear of the moving belt and pulleys. Loose clothing can get caught in the belt, pulling you into the engine bay.
- Tensioner Spring: Be extremely careful when releasing the tension on the belt tensioner. The spring can be very strong, and the tensioner arm can snap back forcefully. Always use the proper tools to release the tension.
- Eye Protection: Wear safety glasses to protect your eyes from debris that may be dislodged during the repair.
Crucial Warning: The crankshaft pulley is directly connected to the engine. Accidentally bumping the starter while your hands are near the belt or pulleys can result in severe injury.
By understanding the diagram, the components, and the safety precautions, you'll be well-equipped to tackle serpentine belt-related tasks on your 2010 Corolla with confidence. Remember, preventative maintenance is key to avoiding costly repairs down the road.
For your convenience, we have the 2010 Corolla Serpentine Belt Diagram readily available. You can download it now and keep it handy for all your future maintenance and repair needs.