2010 Dodge Caliber 2.0 Serpentine Belt Diagram
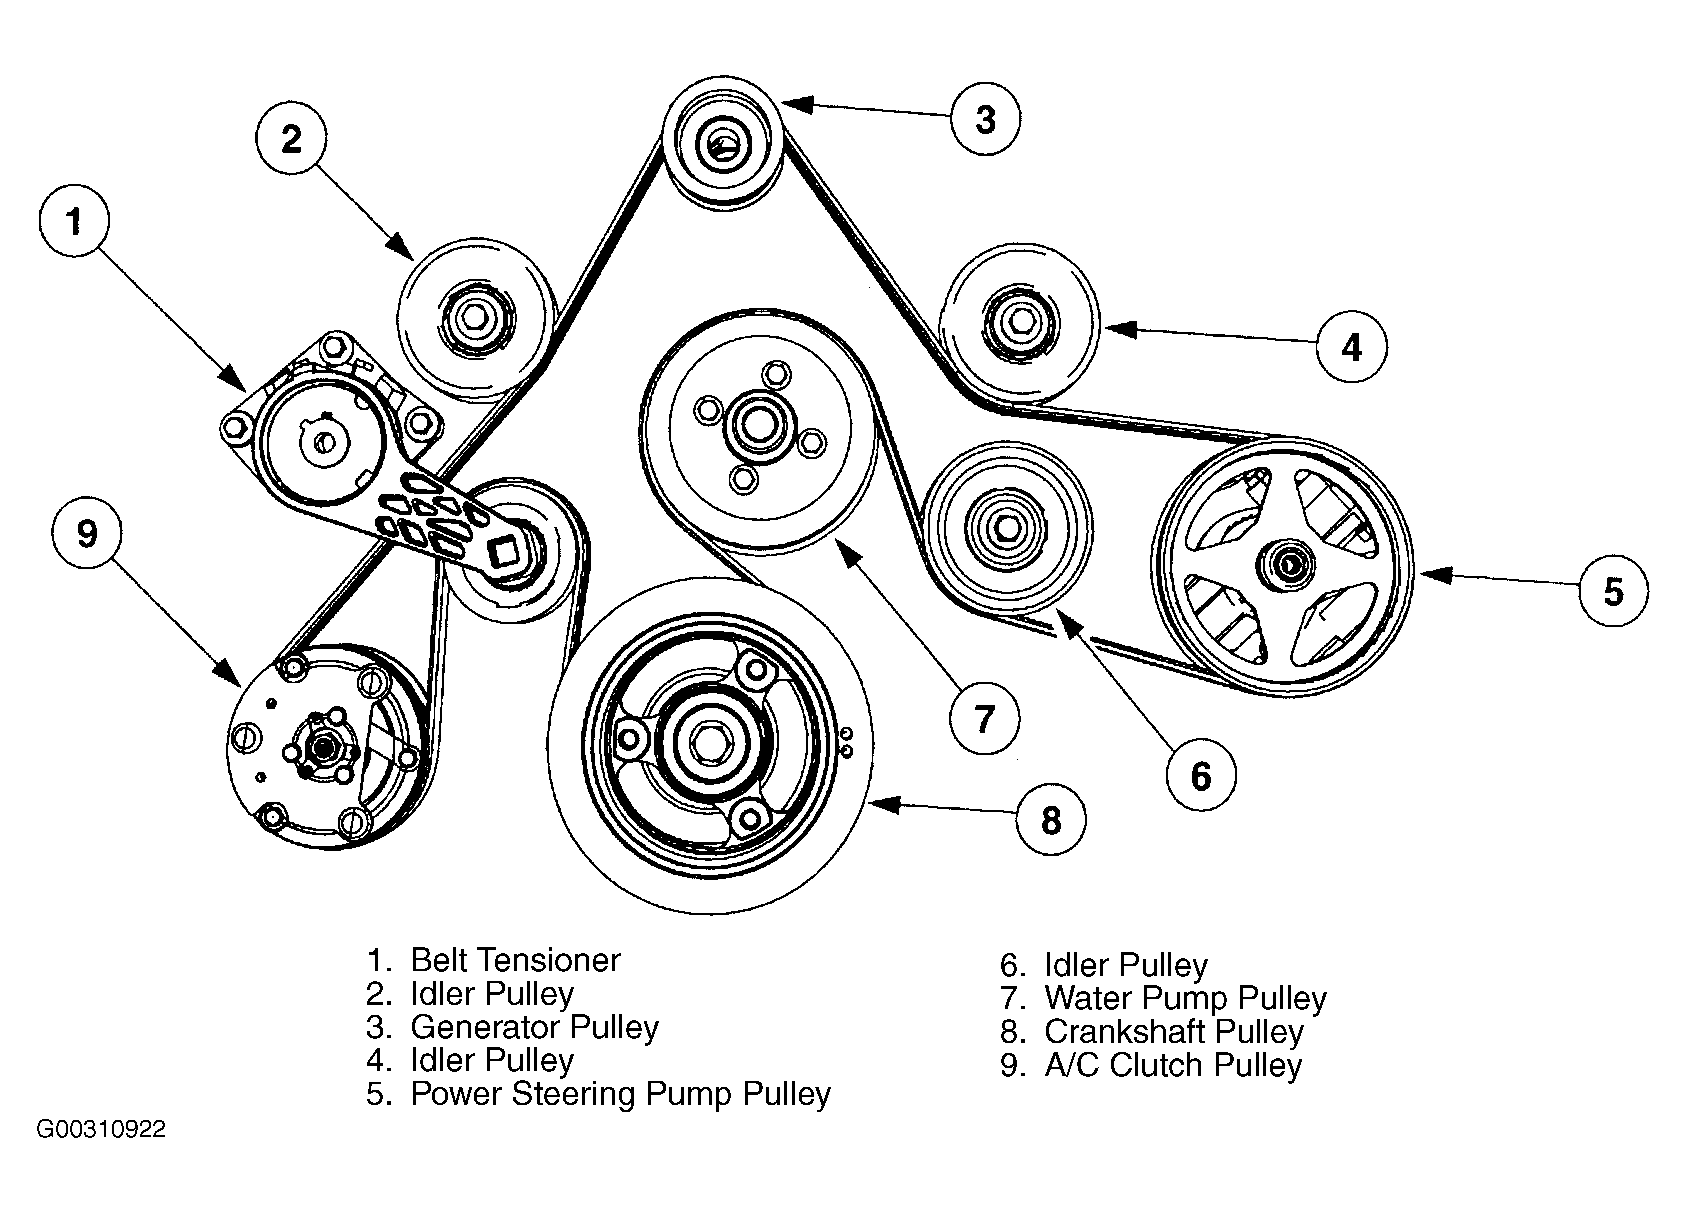
Okay, let's dive into the serpentine belt diagram for the 2010 Dodge Caliber with the 2.0-liter engine. Understanding this diagram is crucial for a variety of tasks, from routine maintenance to diagnosing and fixing potentially crippling engine problems. We're talking about keeping your Caliber running smoothly and saving you a hefty bill at the shop.
Purpose of the Serpentine Belt Diagram
The serpentine belt diagram is essentially a roadmap for your engine's accessory drive system. Its primary purpose is to illustrate the correct routing of the serpentine belt around all the pulleys. Why is this important? Several reasons:
- Proper Belt Installation: If you're replacing the belt yourself, the diagram is your *bible*. Incorrect routing can lead to belt slippage, component failure, and potentially serious engine damage.
- Troubleshooting Accessory Problems: If your air conditioning isn't blowing cold, your power steering is stiff, or your battery isn't charging correctly, the diagram helps you visualize which component the belt drives and narrow down the source of the problem.
- General Maintenance: Regularly checking the belt's condition and comparing it to the diagram can help you spot potential issues before they escalate.
- Educational Value: Understanding the belt routing helps you understand the overall operation of your engine's auxiliary systems.
Key Specs and Main Parts
The 2010 Dodge Caliber 2.0L utilizes a single serpentine belt to drive several crucial engine components. These include:
- Crankshaft Pulley: This is the heart of the system. Bolted to the crankshaft, it transfers the engine's rotational energy to the belt.
- Alternator: Driven by the belt, the alternator generates electrical power to charge the battery and run the vehicle's electrical systems.
- Power Steering Pump: This pump provides hydraulic pressure to assist steering.
- Air Conditioning Compressor: Compresses refrigerant to cool the cabin.
- Tensioner Pulley: This spring-loaded pulley maintains the correct tension on the serpentine belt, preventing slippage and extending its lifespan. It’s a critical component, and a common failure point.
The serpentine belt itself is a single, long belt made of reinforced rubber. The 2.0L Caliber typically uses a belt with a specific length and number of ribs, and it is *critical* to use the correct replacement. Consult your owner's manual or a reputable auto parts store to ensure you get the right one.
Understanding the Symbols on the Diagram
Serpentine belt diagrams aren't always the most intuitive things to read, so let's break down the common symbols:
- Solid Lines: Represent the path of the *outer* surface of the serpentine belt.
- Dotted Lines: Usually indicate the path of the *inner* (grooved) surface of the belt. This is especially important for identifying how the belt wraps around pulleys to provide traction.
- Arrows: Show the direction of belt travel. Always pay attention to these!
- Pulleys: Depicted as circles or stylized representations of the actual pulleys. The diagram will typically label each pulley with an abbreviation indicating the component it drives (e.g., ALT for alternator, AC for air conditioning compressor).
- Tensioner: Often shown with a spring symbol or a specific label like "TENSIONER" or "IDLER."
Color coding is rare on simpler serpentine belt diagrams, but some may use different colors to highlight the belt path or to distinguish between different components.
How It Works: The Serpentine Belt System
The serpentine belt system is relatively straightforward in concept. The crankshaft pulley spins, transferring its rotational force to the serpentine belt. The belt, in turn, drives the other accessory pulleys. The tensioner pulley ensures that the belt remains taut and maintains sufficient grip on each pulley to prevent slippage. Think of it like a carefully choreographed dance where each component plays a vital role.
The key to the system's efficiency is the *wrap angle* of the belt around each pulley. The wrap angle is the amount of the pulley's circumference that the belt contacts. A larger wrap angle generally provides better grip. The diagram is important because it shows you exactly how the belt must be routed to achieve the correct wrap angle for each component.
Real-World Use: Basic Troubleshooting Tips
Okay, so you have the diagram. How do you use it in the real world? Here are a few basic troubleshooting tips:
- Squealing Belt: A squealing belt is a common problem, often caused by a loose belt, a worn belt, or a misaligned pulley. Use the diagram to check the belt's tension. If the tensioner is working correctly, inspect the belt for cracks, fraying, or glazing. Also, visually inspect each pulley for signs of damage or misalignment.
- Accessory Failure: If your air conditioning stops working or your power steering fails, use the diagram to determine which component the belt drives. Check the belt for proper tension and condition. If the belt is fine, the problem likely lies within the affected accessory itself.
- Belt Slippage: Belt slippage can cause a variety of problems, including reduced alternator output and overheating. The diagram can help you identify potential causes of slippage, such as an incorrectly routed belt or a faulty tensioner.
- Belt Replacement: When replacing the belt, *always* refer to the diagram! Take a picture of the old belt routing before removing it to ensure you route the new belt correctly.
Before starting any work, disconnect the negative battery cable! This prevents accidental electrical shocks and damage to your vehicle's electrical system.
Safety Considerations
Working on the serpentine belt system can be dangerous if you're not careful. Here are some important safety precautions:
- Engine Off: Always work on the serpentine belt system with the engine *off* and the key removed from the ignition.
- Hot Engine: Avoid working on the system immediately after the engine has been running, as components can be extremely hot.
- Moving Parts: Be extremely cautious when working near the serpentine belt system with the engine running. The belt and pulleys are spinning at high speeds and can cause serious injury. Never place your hands or tools near moving parts.
- Eye Protection: Wear safety glasses to protect your eyes from debris.
- Tensioner Spring: The tensioner pulley is spring-loaded and can snap back forcefully when released. Use the correct tools to relieve the tension and avoid injury. Most auto parts stores will rent or loan you the correct tools.
The *most dangerous* component is, without a doubt, the spinning belt and pulleys. Respect their power and maintain a safe working distance.
By carefully studying the serpentine belt diagram and following these guidelines, you can confidently diagnose and repair problems with your 2010 Dodge Caliber's accessory drive system. Remember to always prioritize safety and consult a qualified mechanic if you're unsure about any aspect of the repair.
We have the complete, high-resolution diagram available for download. It includes all the details discussed above. Click here to access it. Good luck!