2010 Dodge Charger 3.5 Serpentine Belt Diagram
The 2010 Dodge Charger with the 3.5L V6 engine relies on a serpentine belt system to power various essential components. Understanding the serpentine belt diagram is crucial for diagnostics, maintenance, and even performance modifications. This article serves as a comprehensive guide, breaking down the diagram, its components, and how it all works together.
Purpose of the Serpentine Belt Diagram
Why should you care about a serpentine belt diagram? Several reasons: firstly, replacing the belt itself. Over time, serpentine belts wear down, crack, and can eventually break, leaving you stranded. Secondly, diagnosing issues. Squealing noises, power steering failure, or a dead battery can often be traced back to a failing belt or a problem with a component in the belt's path. Thirdly, performing other repairs. Many repairs require removing the belt to access other parts of the engine. A diagram is invaluable for ensuring correct re-installation. Finally, understanding your vehicle. For those who enjoy modifying their vehicles, understanding the belt system is essential.
Key Specs and Main Parts
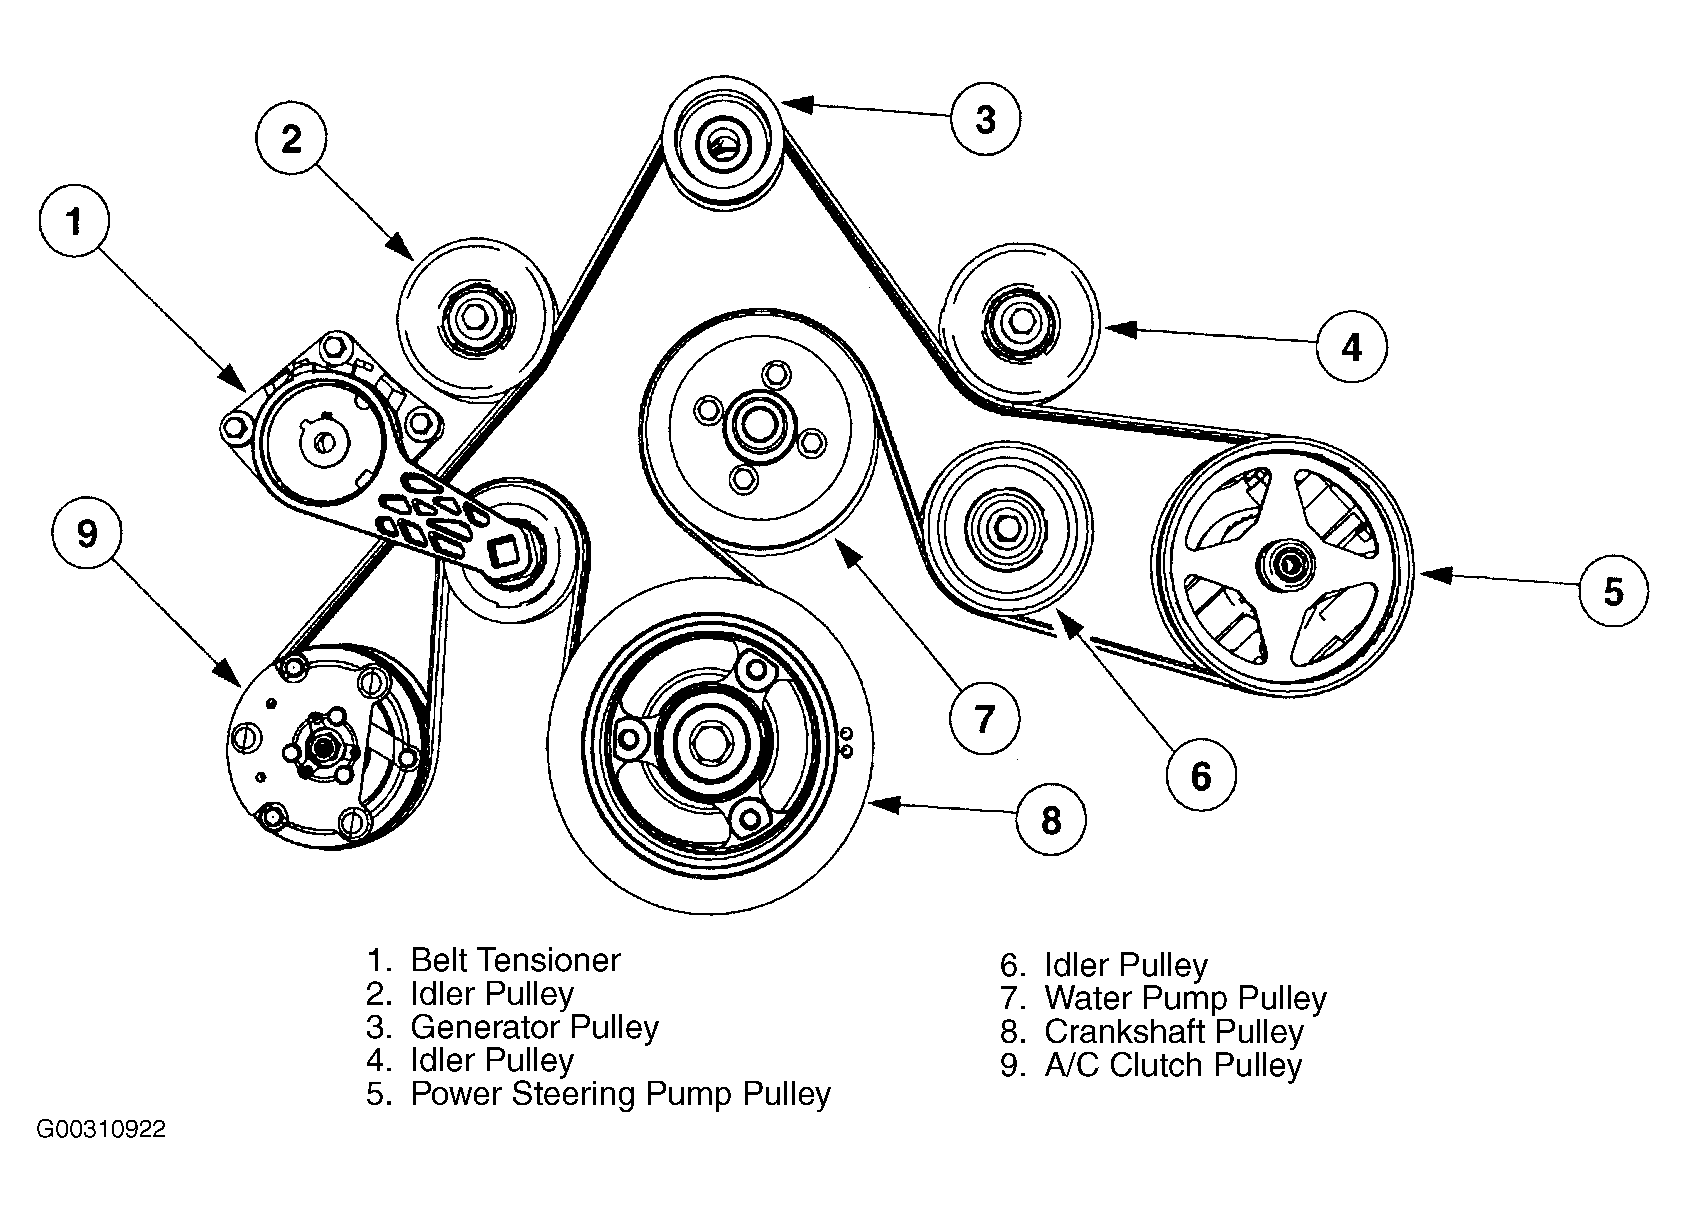
The serpentine belt system on the 2010 Dodge Charger 3.5L consists of several key components, each with a specific role:
- Serpentine Belt: This is the main drive belt, a long, continuous belt (usually made of reinforced rubber) that snakes around multiple pulleys. Its size and length are specific to the 3.5L engine in the 2010 Charger; using the wrong belt can lead to performance issues or damage.
- Crankshaft Pulley (Harmonic Balancer): Located at the bottom of the engine, connected directly to the crankshaft. It's the driving force behind the entire system, transferring the engine's rotation to the belt. The harmonic balancer also dampens torsional vibrations from the crankshaft.
- Alternator Pulley: The alternator generates electricity to power the car's electrical system and charge the battery. The serpentine belt drives the alternator.
- Power Steering Pump Pulley: Powers the power steering system, providing hydraulic assistance to make steering easier.
- Air Conditioning Compressor Pulley: The A/C compressor circulates refrigerant through the A/C system. This pulley is only engaged when the A/C is turned on.
- Idler Pulley(s): Smooth, bearing-mounted pulleys used to guide the belt and maintain proper tension. They don't drive any specific component.
- Tensioner Pulley: A spring-loaded pulley that automatically maintains the correct tension on the serpentine belt. This is crucial for proper operation and belt longevity. The tensioner typically has a square hole or a bolt head that allows you to relieve tension for belt removal and installation.
Symbols and Diagram Conventions
Serpentine belt diagrams use standard conventions to represent components and belt routing. Understanding these conventions is key to interpreting the diagram correctly:
- Solid Lines: Represent the section of the serpentine belt that is making contact with the pulleys (driven or idler).
- Dotted Lines: Typically indicate the backside of the belt, meaning the smooth side is making contact with the pulley. This is how idler pulleys engage with the belt.
- Arrows: Indicate the direction of rotation for each pulley. This is important for visualizing how the belt moves around the system.
- Component Labels: Abbreviations or full names of each component are usually printed next to the pulley symbols (e.g., ALT for alternator, P/S for power steering).
- Routing Path: The diagram clearly shows the path the belt takes around all the pulleys. Pay close attention to the order and orientation.
How It Works
The serpentine belt system is a relatively simple yet vital part of your 2010 Dodge Charger's engine. The crankshaft pulley, directly connected to the engine's crankshaft, rotates when the engine is running. This rotation is transferred to the serpentine belt. The belt, in turn, wraps around and drives the pulleys of the alternator, power steering pump, and air conditioning compressor. The idler pulleys guide the belt, ensuring proper alignment and preventing it from rubbing against other engine components. The tensioner pulley applies consistent tension to the belt, preventing slippage and ensuring efficient power transfer to all the driven components.
The tensioner is critical. Its spring-loaded design automatically compensates for belt stretch and wear. Without proper tension, the belt will slip, resulting in reduced performance from the alternator (leading to a discharged battery), power steering pump (making steering difficult), and A/C compressor (resulting in poor cooling). A squealing noise is a common indicator of a slipping belt.
Real-World Use and Basic Troubleshooting
Here's how you can use the serpentine belt diagram for real-world troubleshooting:
- Belt Replacement: Before removing the old belt, carefully study the diagram. Note the exact routing path. It can be helpful to take a picture or draw a quick sketch. Use a wrench or socket to relieve the tension on the tensioner pulley, allowing you to slip the old belt off. Install the new belt, making sure it's properly seated on all the pulleys, and release the tensioner. Double-check the routing against the diagram before starting the engine.
- Squealing Noise: A squealing noise, especially when starting the engine or turning the steering wheel, often indicates a slipping belt. Check the belt for wear, cracks, or glazing. Also, inspect the tensioner pulley for proper operation. If the tensioner is weak or seized, it needs to be replaced.
- Component Failure: If you suspect a particular component (e.g., alternator, power steering pump) is failing, check the serpentine belt and pulley for signs of damage or misalignment. A seized component can cause the belt to slip or break.
- Visual Inspection: Regularly inspect the serpentine belt for wear and tear. Look for cracks, fraying, missing chunks, or glazing (a shiny, hardened surface). A worn belt should be replaced promptly.
Safety Precautions
Working on the serpentine belt system can be dangerous if proper safety precautions are not taken:
- Disconnect the Battery: Always disconnect the negative battery terminal before working on any electrical components or near the engine. This prevents accidental short circuits.
- Engine Temperature: Ensure the engine is cool before working on the serpentine belt. Touching hot engine components can cause severe burns.
- Moving Parts: Never put your hands or tools near the serpentine belt while the engine is running. The belt and pulleys can cause serious injury.
- Tensioner Spring: The tensioner pulley is spring-loaded and can snap back forcefully when released. Use caution when relieving tension and follow the manufacturer's instructions.
- Eye Protection: Wear safety glasses to protect your eyes from debris.
The serpentine belt system, while relatively simple, requires a good understanding to diagnose and repair effectively. Armed with this knowledge and the correct diagram, you'll be well-equipped to maintain and troubleshoot the system on your 2010 Dodge Charger 3.5L.
We have the detailed serpentine belt diagram available for download. It provides a clear visual representation of the belt routing and component locations.